How to visit Online Store
You can only use the Online Store feature after purchasing an online store plan or an O2O plan on Posify.
There are three ways to access the Online Store: open from the CMS, enter the link directly, and access it through a domain.
Open from CMS
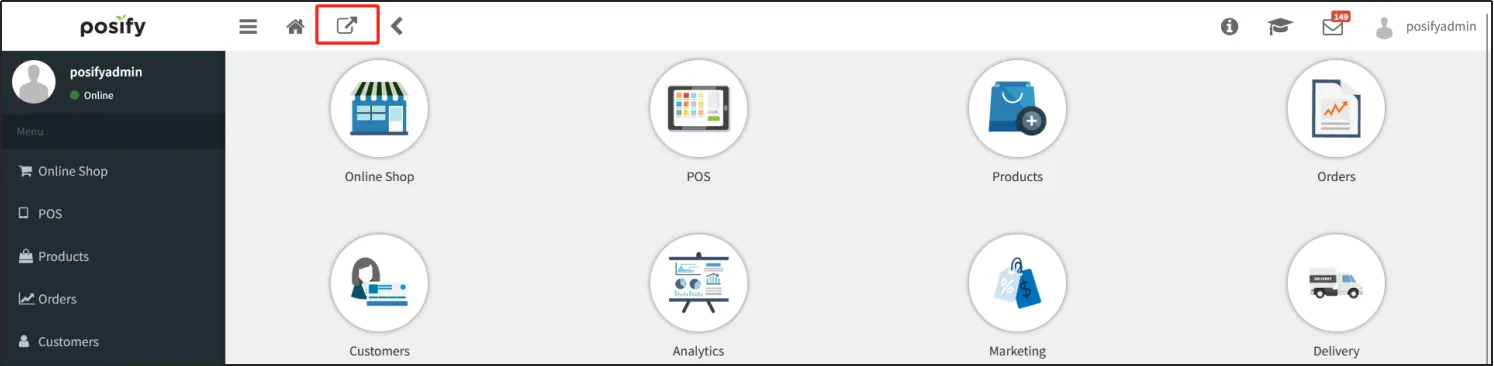
Open the CMS click on the front desk icon at the top left, and the Online Store page will pop up.
Enter Link directly Link
Enter the Posify standard online store link in the address bar of your browser: "https://web21.posify.me/" + "registered store name".
For example, if the name of the Posify store you apply for is: teststationerystore, then the corresponding online store link is: https://web21.posify.me/teststationerystore.

Access from a domain
If you have your own domain and have already configured it, you can use the domain to access the Online Store.
For details on how to configure a domain, see How to Set a Domain in a playbook.
Apply an online store theme
If you're a beginner eCommerce merchant, you can choose to quickly set up a simple Online Store with Posify's built-in themes.
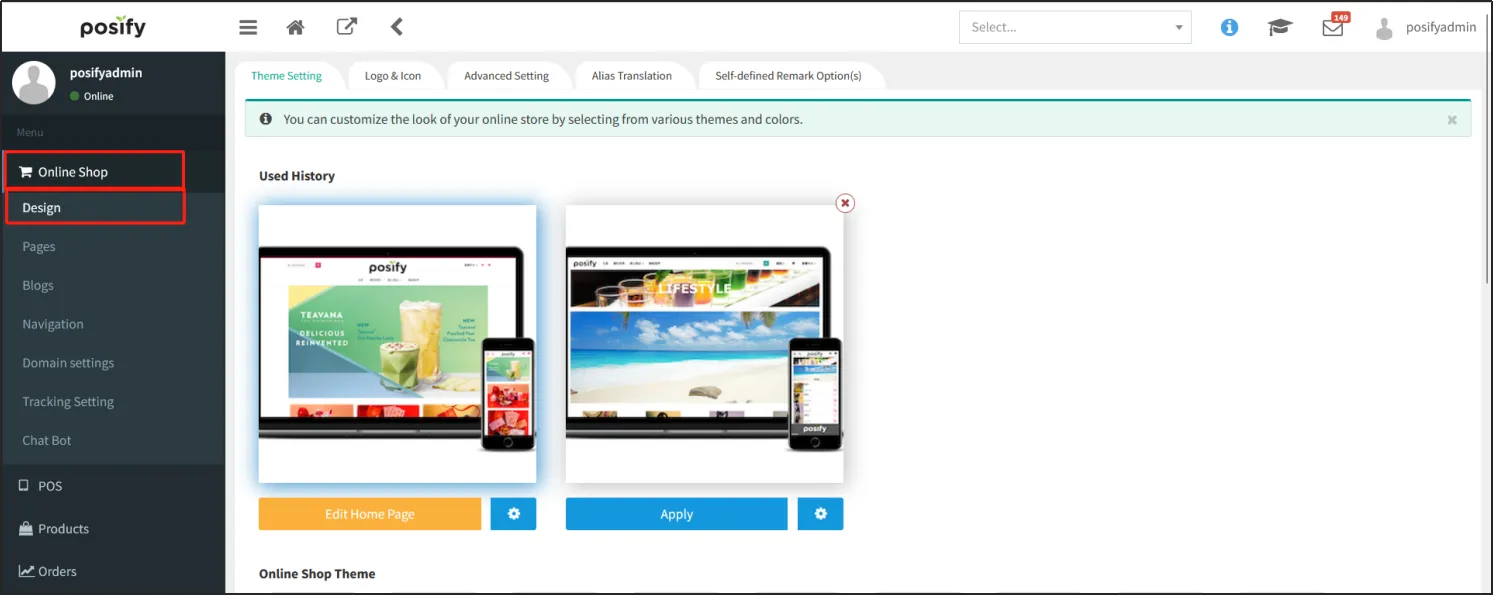
Open the CMSclick on the online storeclick on the design.
Theme
Click on the Theme Settings tab and select your online store theme.
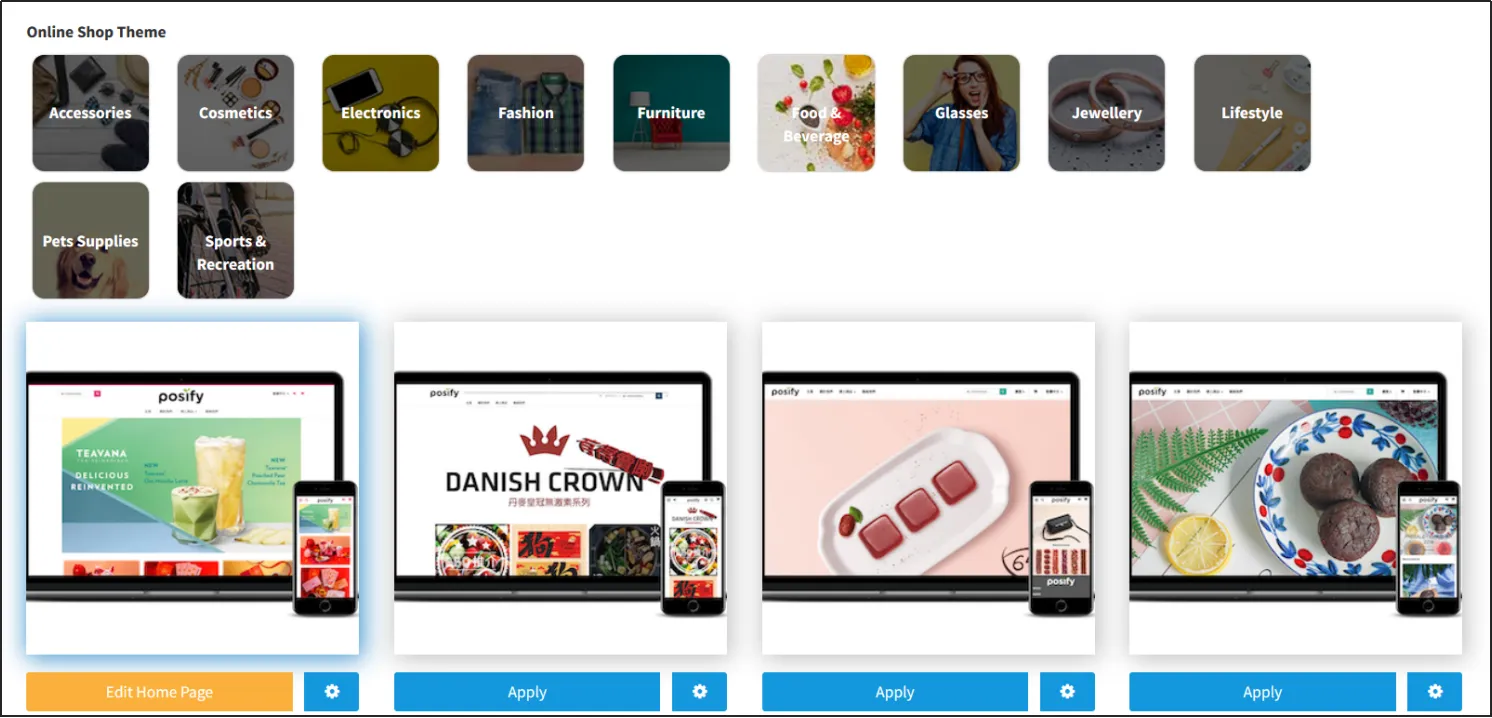
Click [Select] below the theme to switch to a different online store theme.
Edit the homepage after selecting a theme
Click the [Select] theme, and then click "Edit Home" to edit the content of the Page. 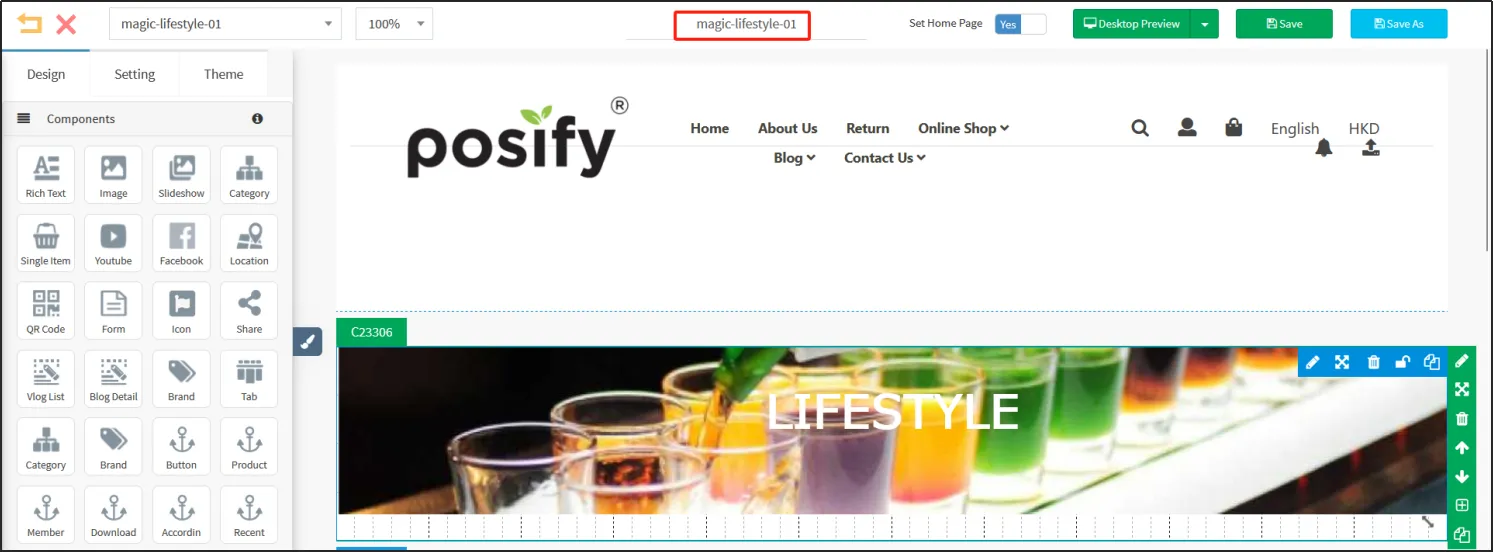
Once you are on the homepage editing page, it is recommended to change the page name to: Homepage.

The first component in the master page is: the picture component.
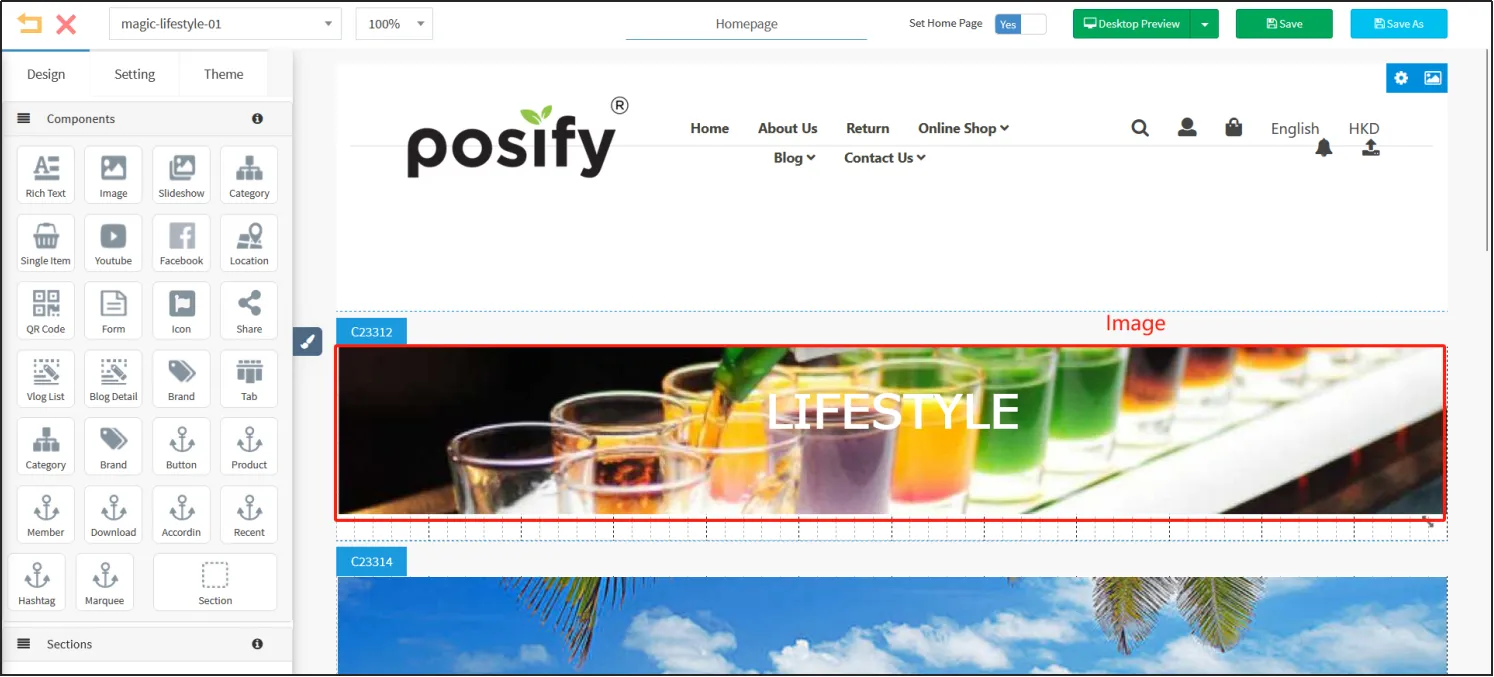
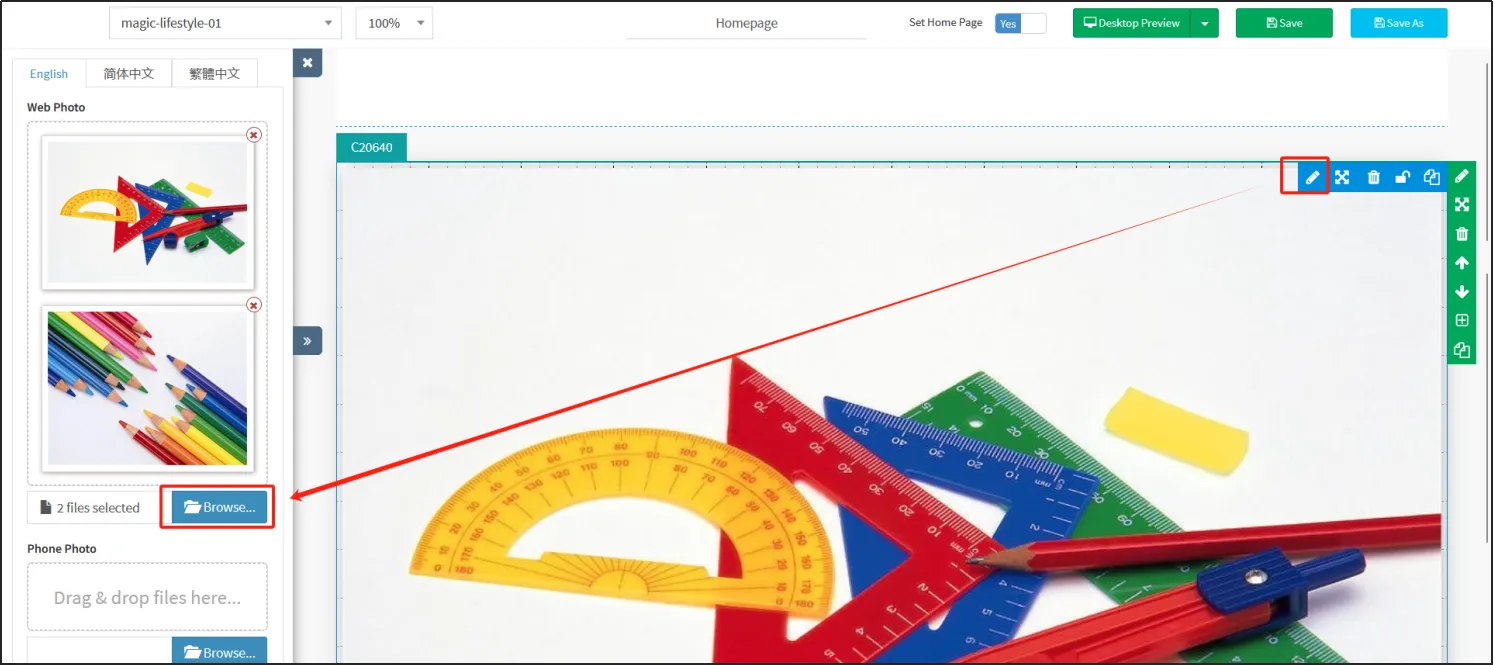
If you move the mouse over the image component area, you can see that there are several different icons displayed in the upper right corner of the component, and click the small pen icon to edit the detailed settings of the image component on the left side.
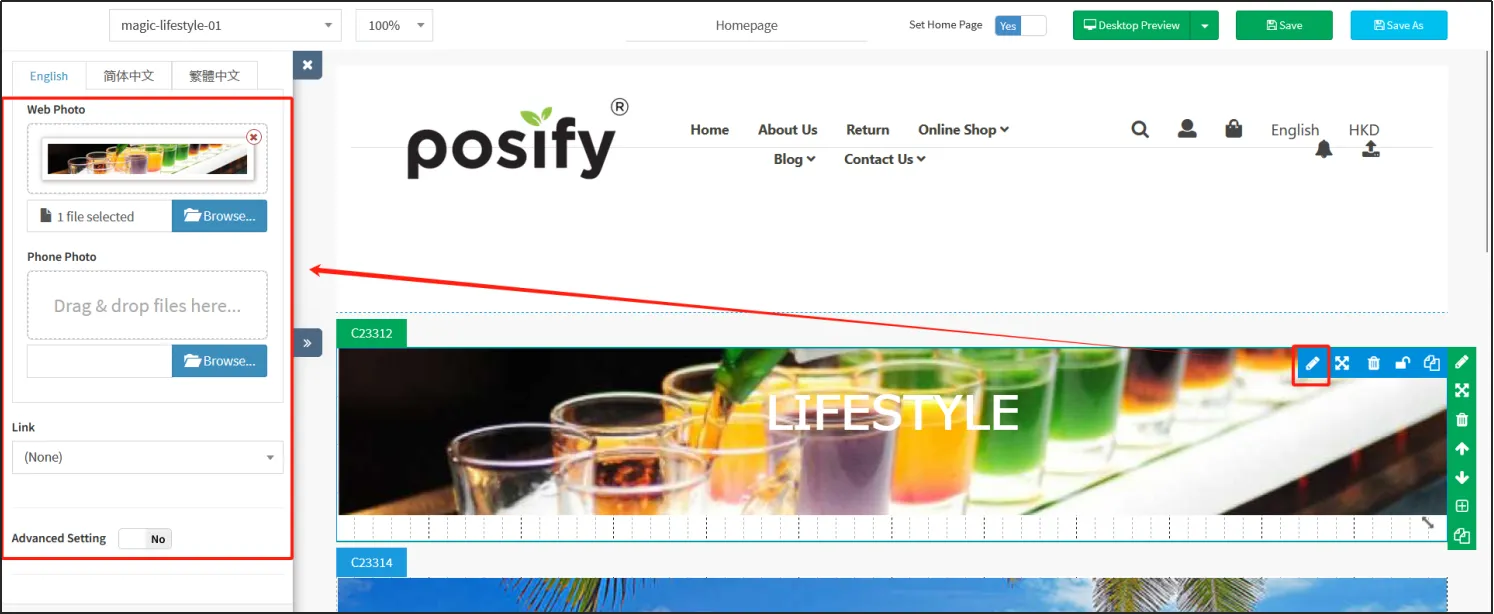
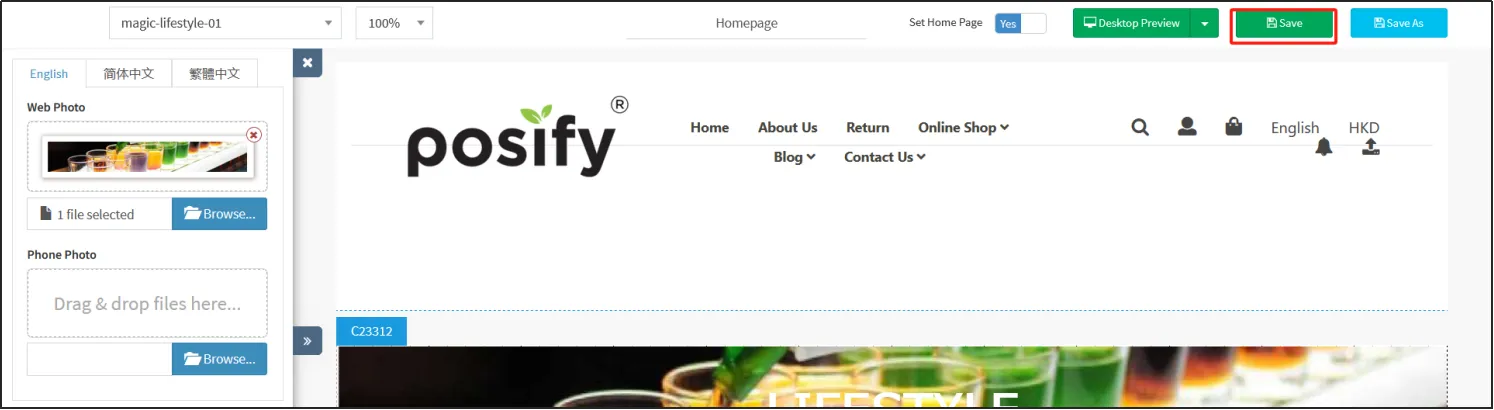
On the image editing page on the left, click the "X" in the upper right corner of the image under the [Web Image] field to delete the image that comes with this theme, and then click [Select File...] Upload the image of the ad you want to display on the homepage of your online store from your local area.
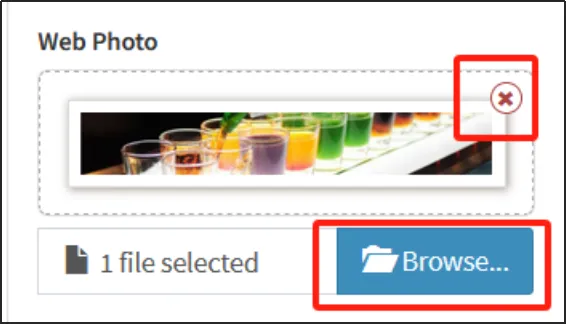
Note: 1. Only one image can be uploaded for image elements.
2. The recommended pixel size for the ad image is as follows:
3.PC version: The minimum width is not less than 1600px, the recommended width is 1920px, and the height can be made according to actual needs.
4.Mobile version: The minimum width is not less than 1080px, the recommended width is 1200px, and the height can be made according to actual needs.
5.Please keep the file size of a single image under 2MB, and use jpg, jpeg, png format.
Once the upload is complete, you will see the newly uploaded image in the web editing tool on the right.
Click the [Save] button in the upper right corner to save the changes. It is recommended that businesses save more during the editing process to avoid losing the editing progress.
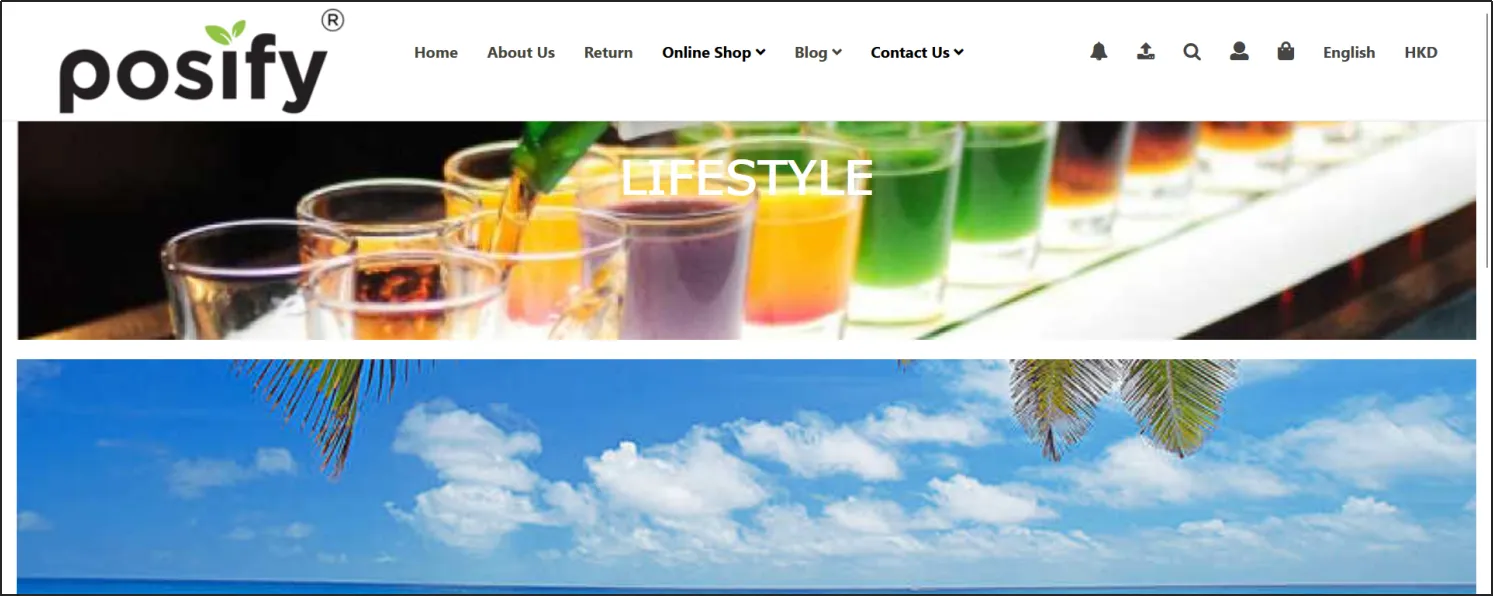
After saving, open the Online Store and refresh the page to see your newly uploaded image.
If you want your homepage ad image to have a slideshow effect, where multiple ad images play in a loop, you can use the Slideshow component.
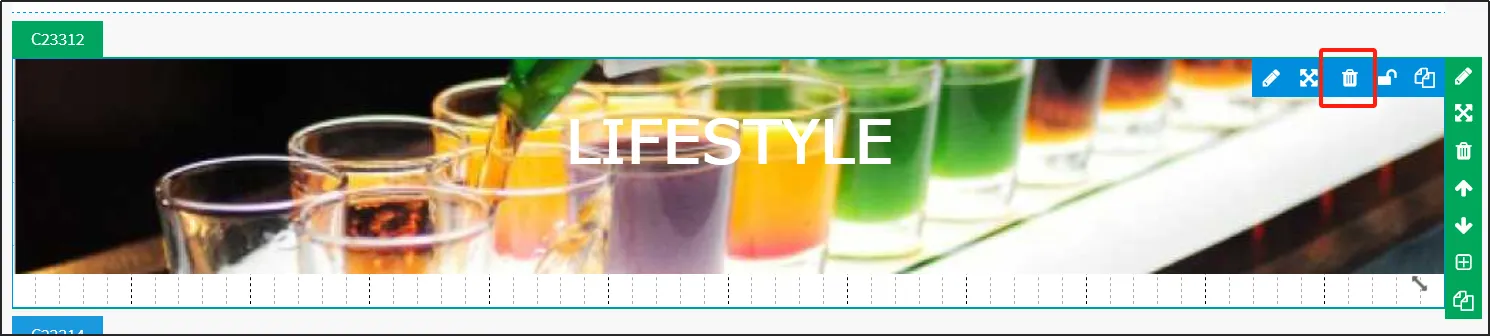
Go back to the Homepage page, move the mouse over the image element area, and click the trash can icon to delete the image component.
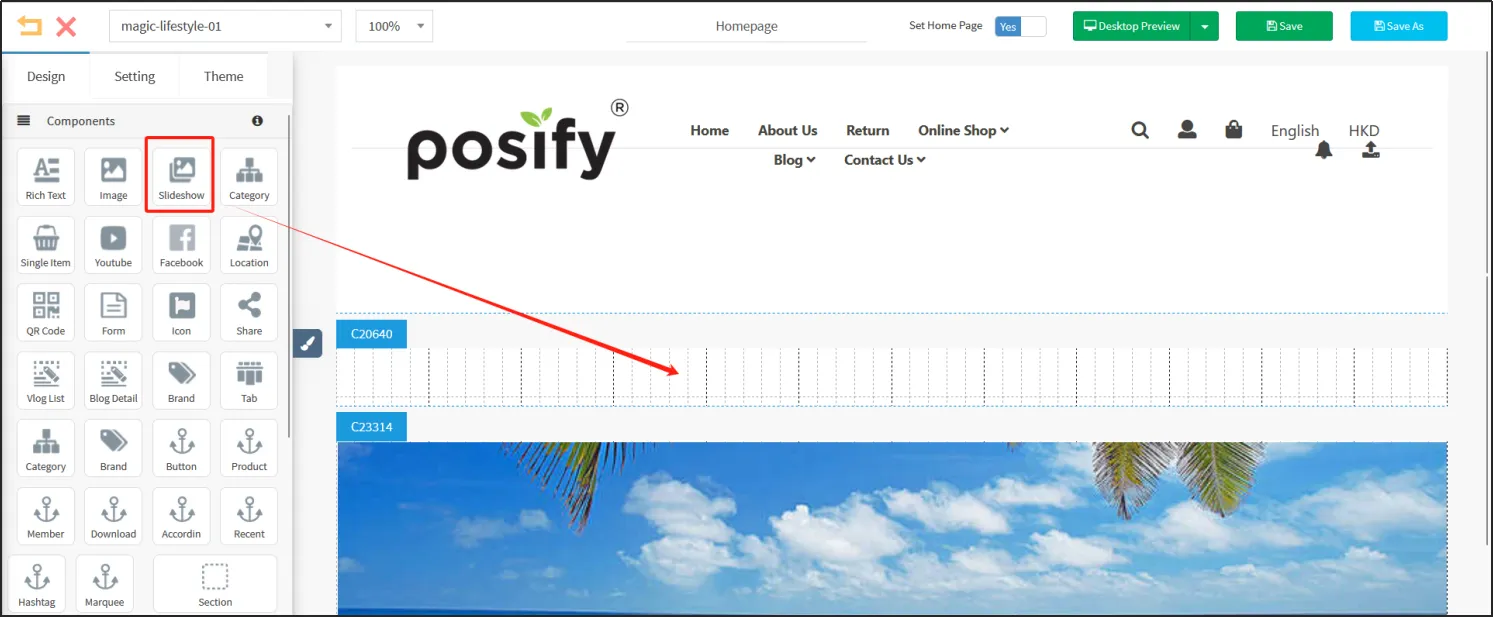
Click the brush icon to open the left toolbar, click and hold the [Slide Element] with the mouse, and drag it into the container where the original image element is located on the right, that is, in the "C20640" area of the figure below.
Move the mouse over the scope of the slideshow component, click the small pen icon to open the detailed editing page, and click [Select File...] under the [Web Image] field. to upload an image for your ad. If you need to edit [mobile version image], the same method is used.
Note: You can upload a maximum of 10 images.
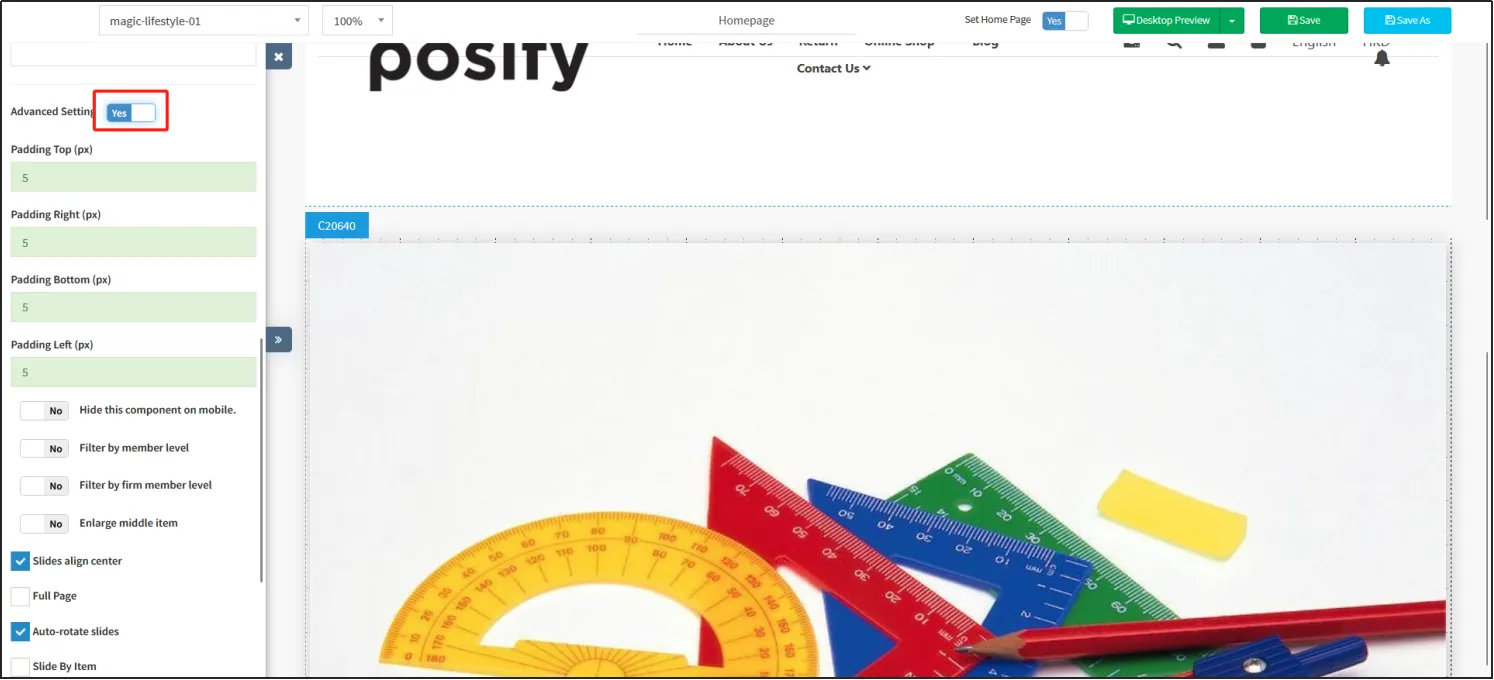
Scroll down the slide component edit page on the left and select [Advanced Design Settings] to set the slide auto-page transition interval and display style here. You can also set whether Phone Mode hides this component, and the size of the margins for the component.
After the settings are complete, click [Save] in the upper right corner to refresh the Online Store to view the slideshow effect.
Let's move on to adding other common components to the Homepage.
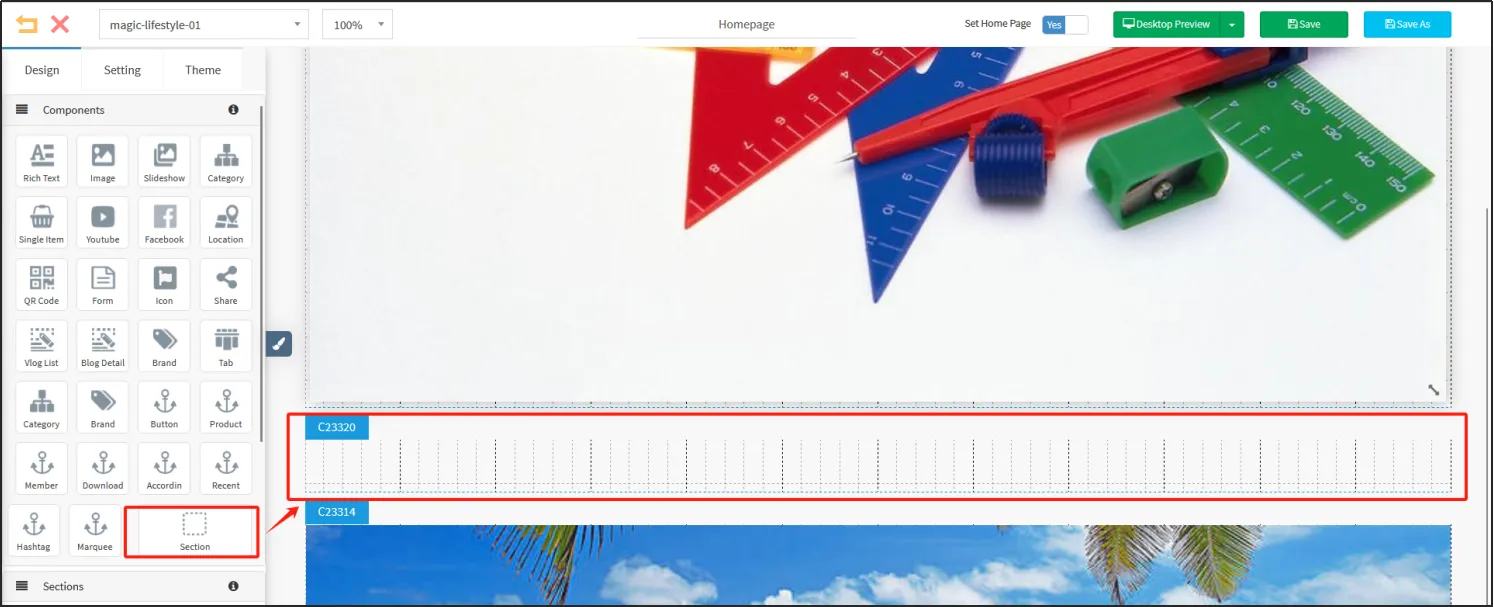
First of all, we need to add a [section] first, you can think of [section] as the "container" of the component, and all other components must be placed in the [section].
In the toolbar on the left, click Add Section, or install Segment and drag it to the location on the right where you want to add a section, as shown in the following figure:
Click the section name to modify the section name.
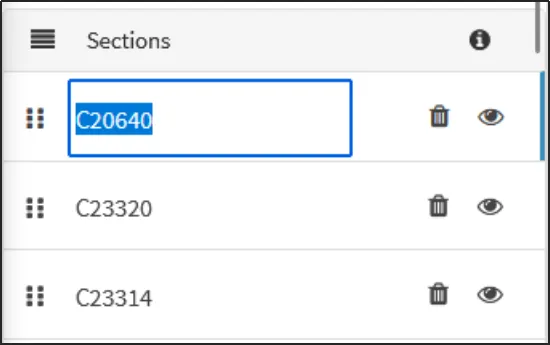
Hold down  and drag it up and down to adjust the order of the sections.
Click  to show/hide the section.
Click  to delete the section.
Note: If you have a lot of elements on your home page, we strongly recommend that you change the default section name to facilitate maintenance later.
Hold down the [Rich Text] component and drag it into the new section on the right.
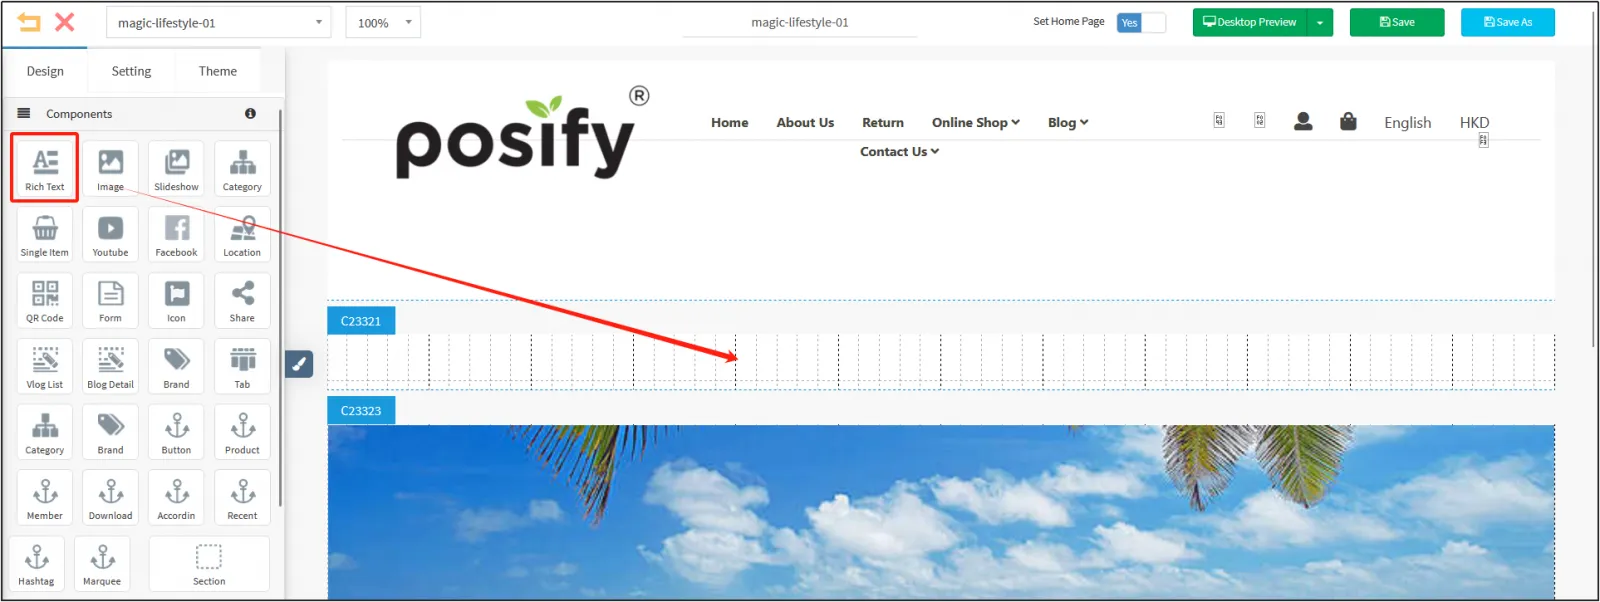
Then enter the text you want to display in the rich text box on the left, for example, if you want to show wine products below, you can enter: Life style.
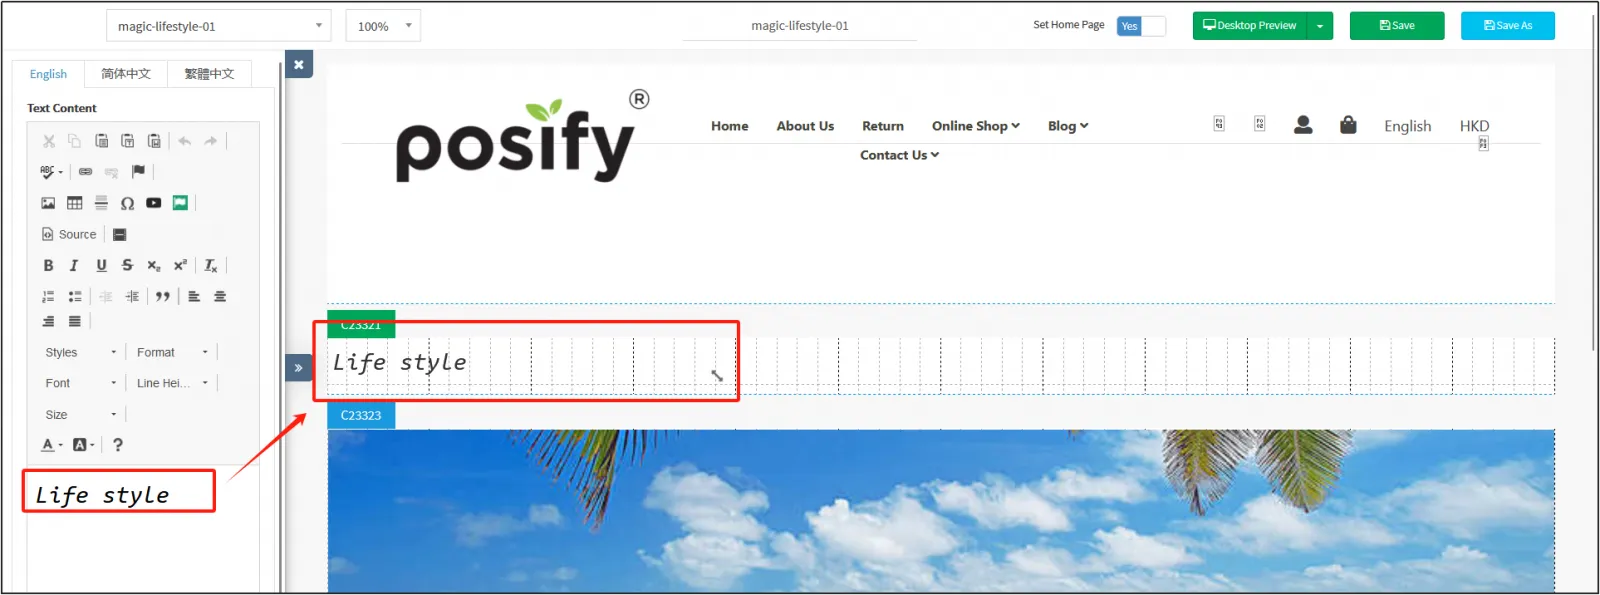
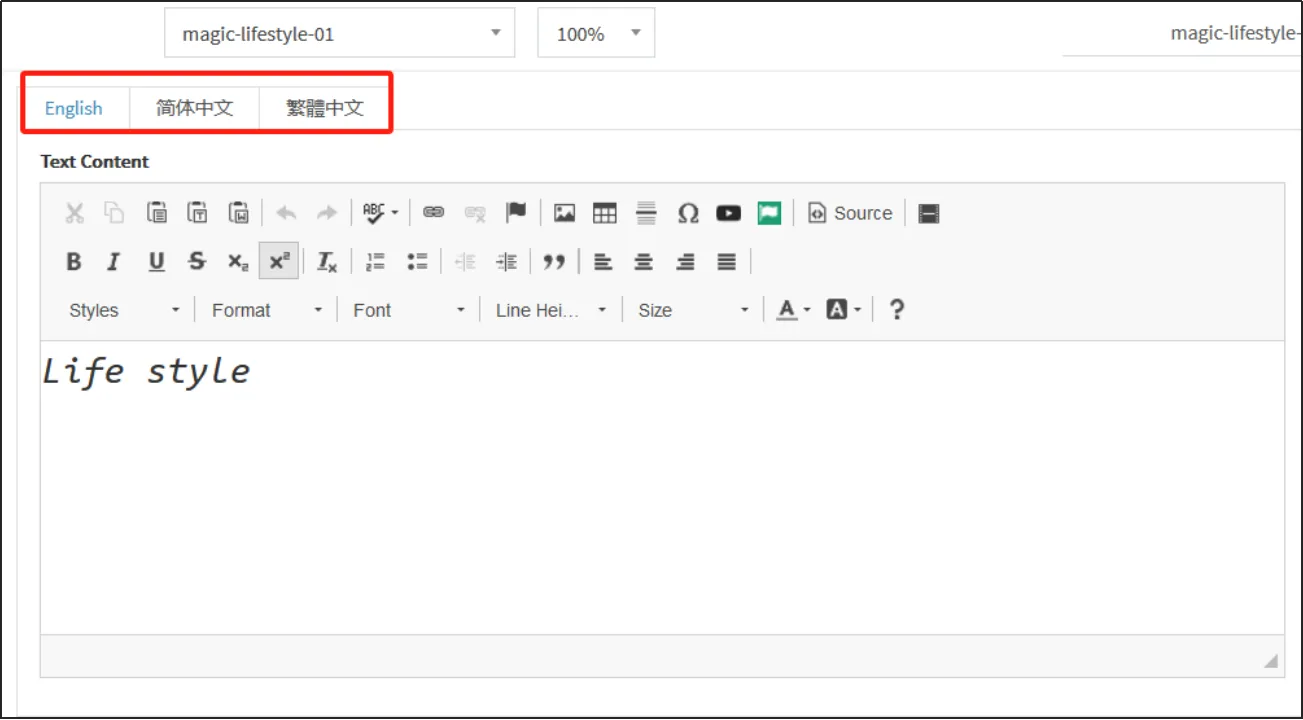
Depending on the language enabled in the system settings, you will need to enter the corresponding text in a different language. For example, if Chinese Simplified, Chinese Traditional, and English are enabled in the system, there will be tabs in three languages. Enter the corresponding text content in different tabs.
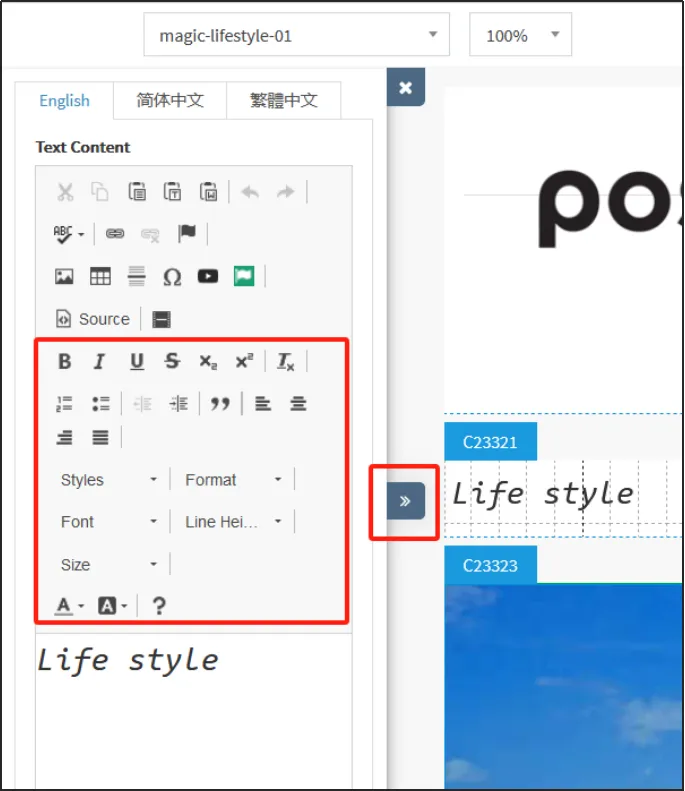
In the rich text symbol, you can modify the glyph, size, bold, color, etc., please try it yourself (as shown in the figure below). Click on to expand the text symbol, and the larger area is convenient for editing a large amount of text.
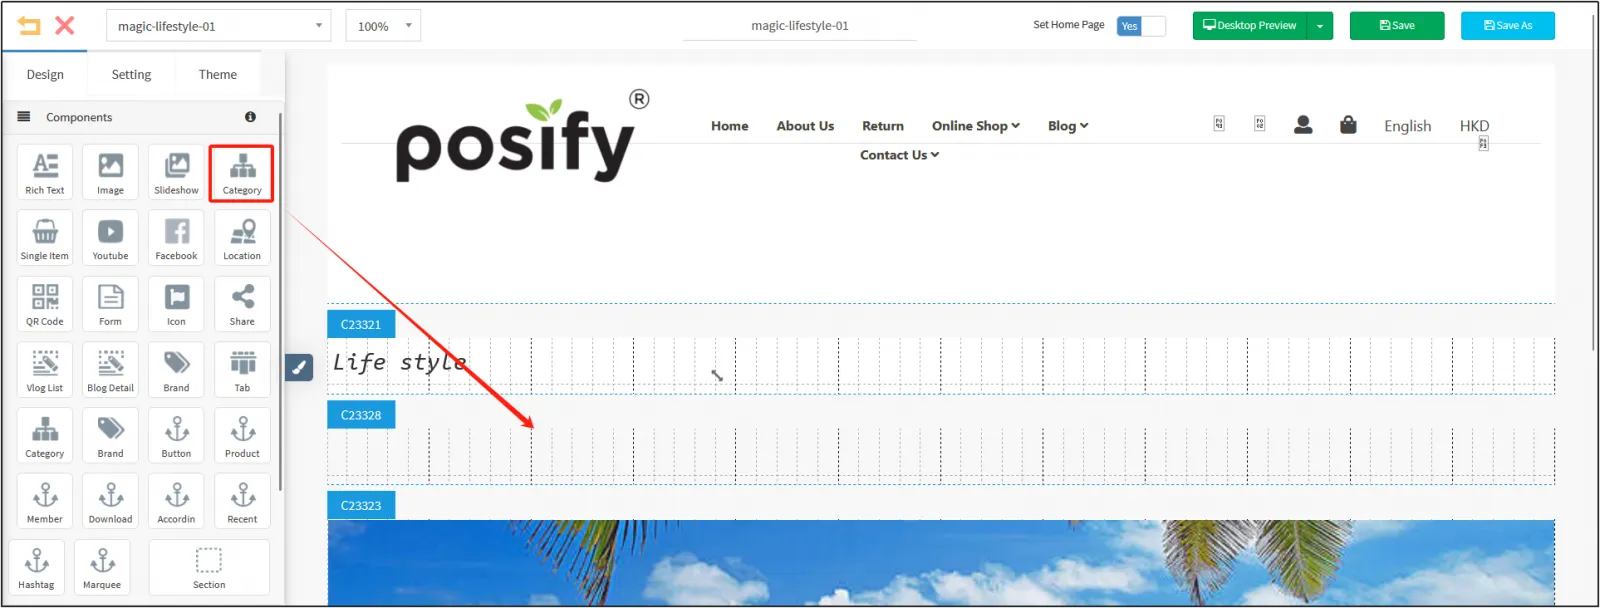
To add a new [Category] component to display wine products, you need to add a new section first, and then drag and drop the [Category] component into the new section.
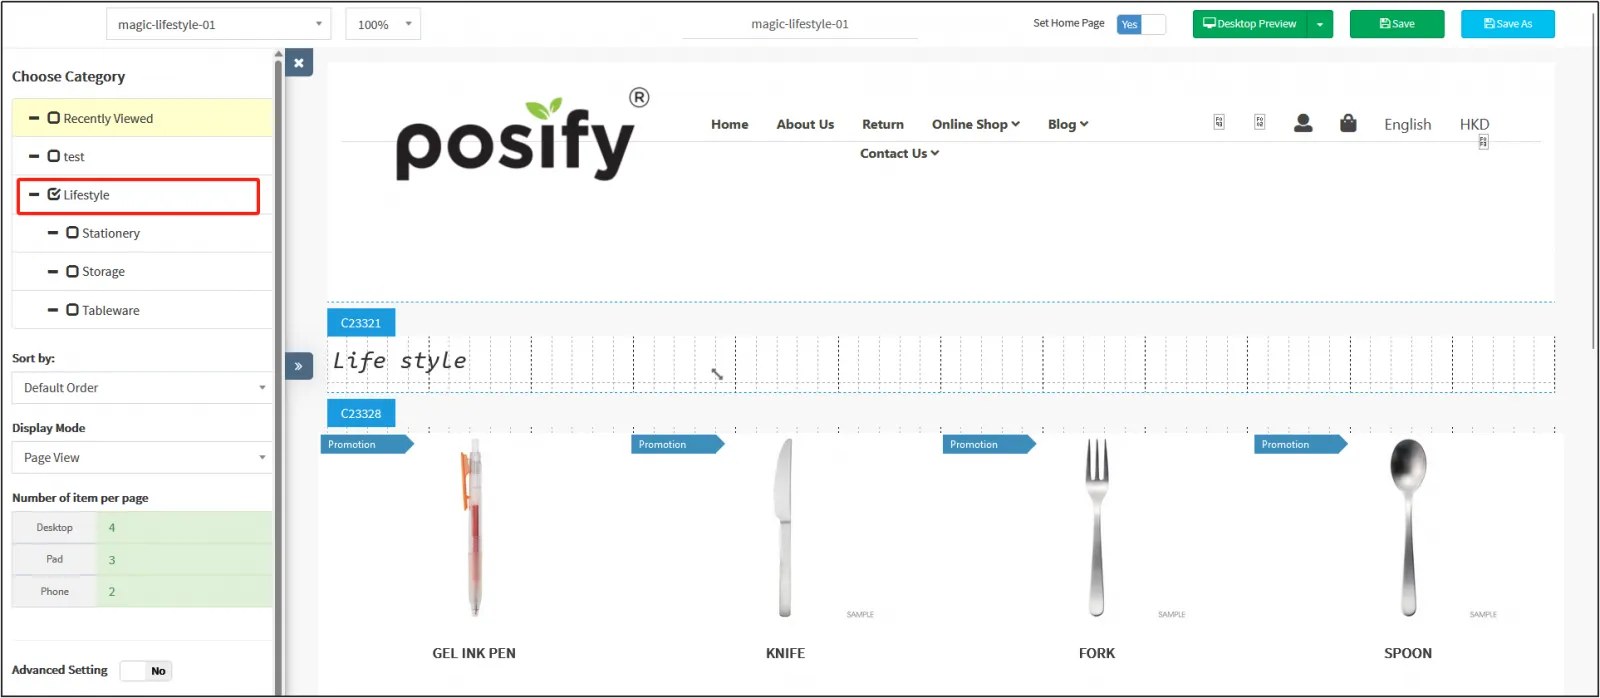
Check the product category that needs to be displayed, and select here: Selected Red Wines.
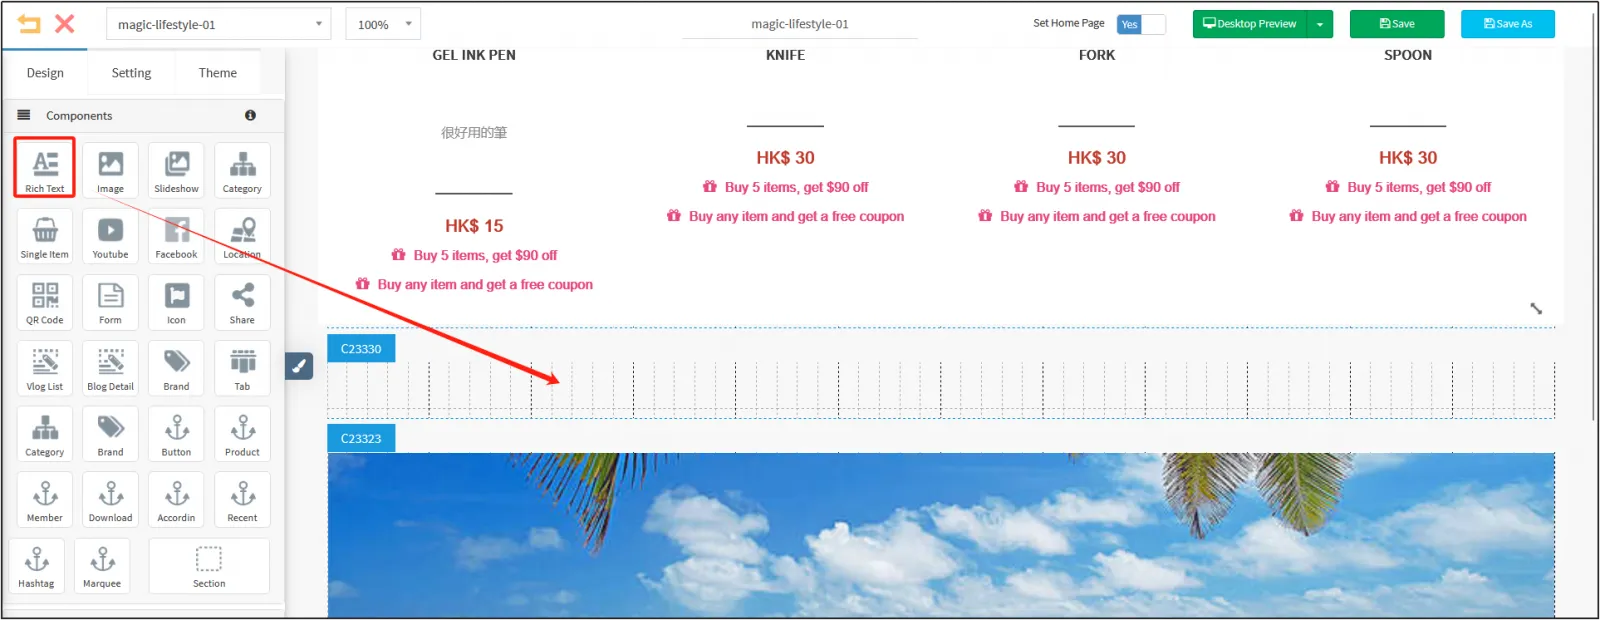
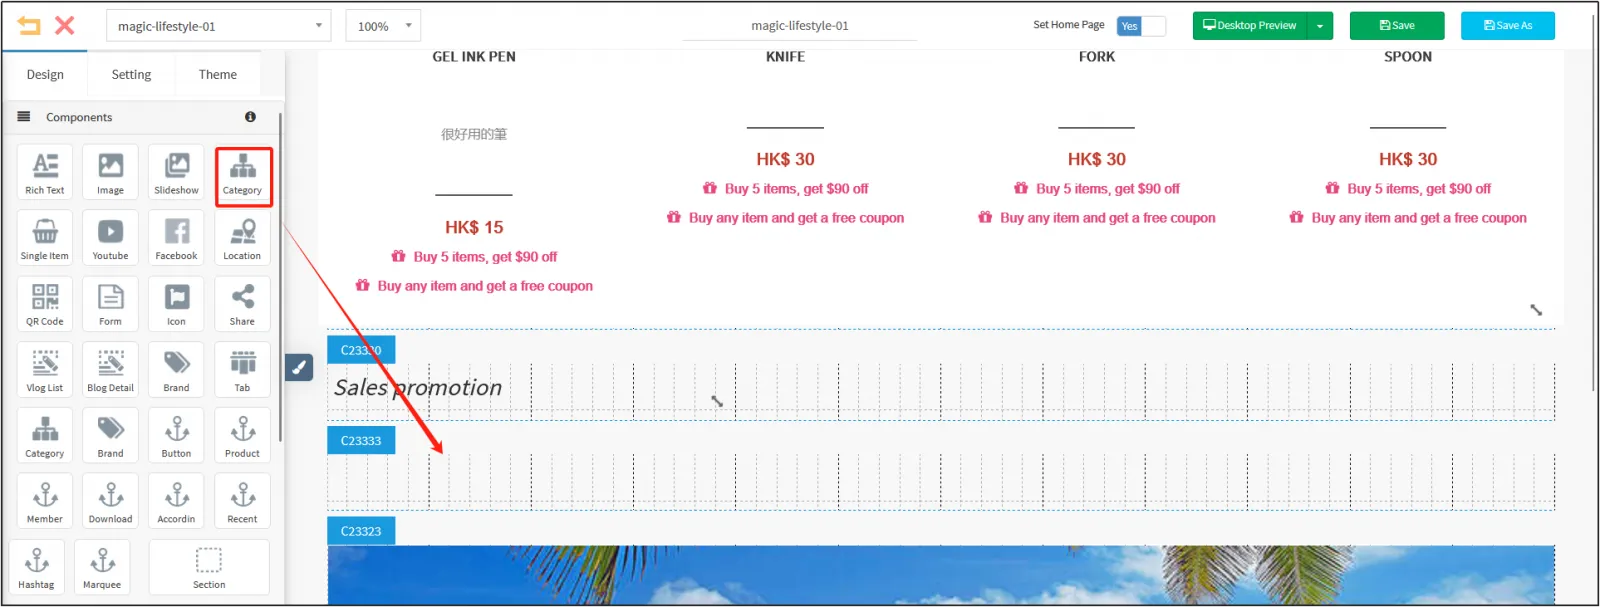
Add another [Section] and put in a [Rich Text] component.
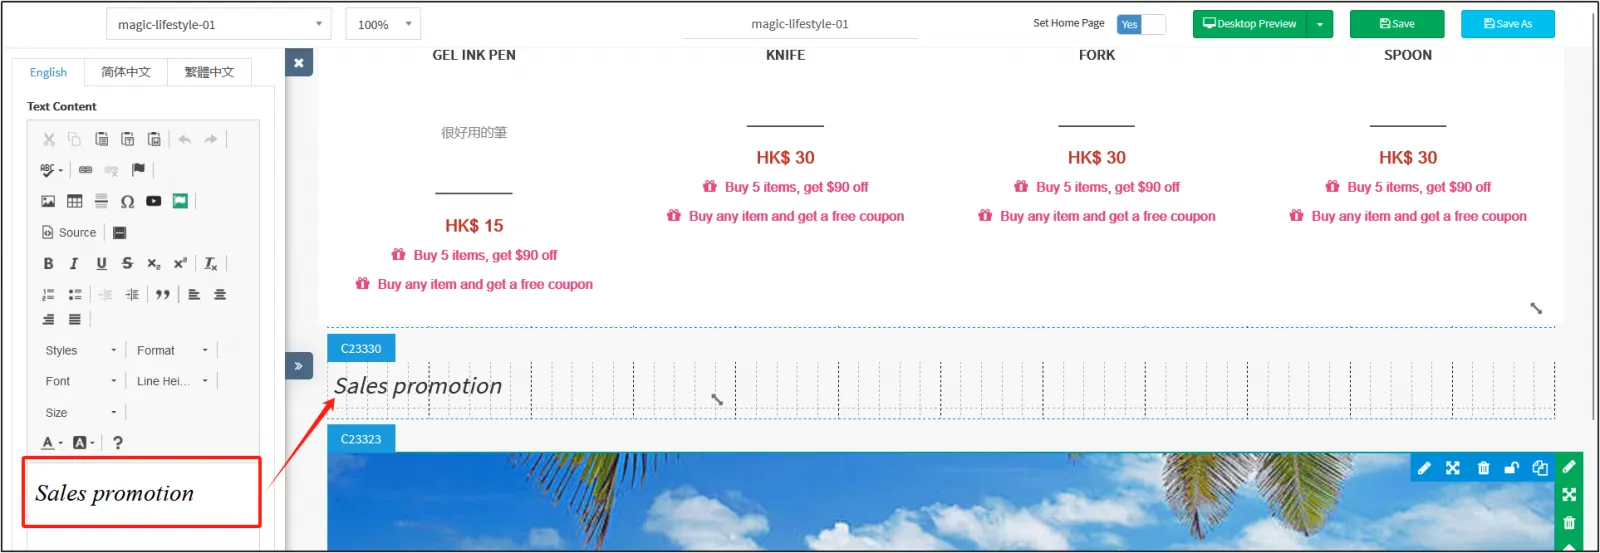
For example, if you want to show the products on sale, you can enter in the rich text box: Sales promotion.
As above, add a new [Segment] and drag and drop a [Category] component below.
Select a promotion category, and then click [Save].
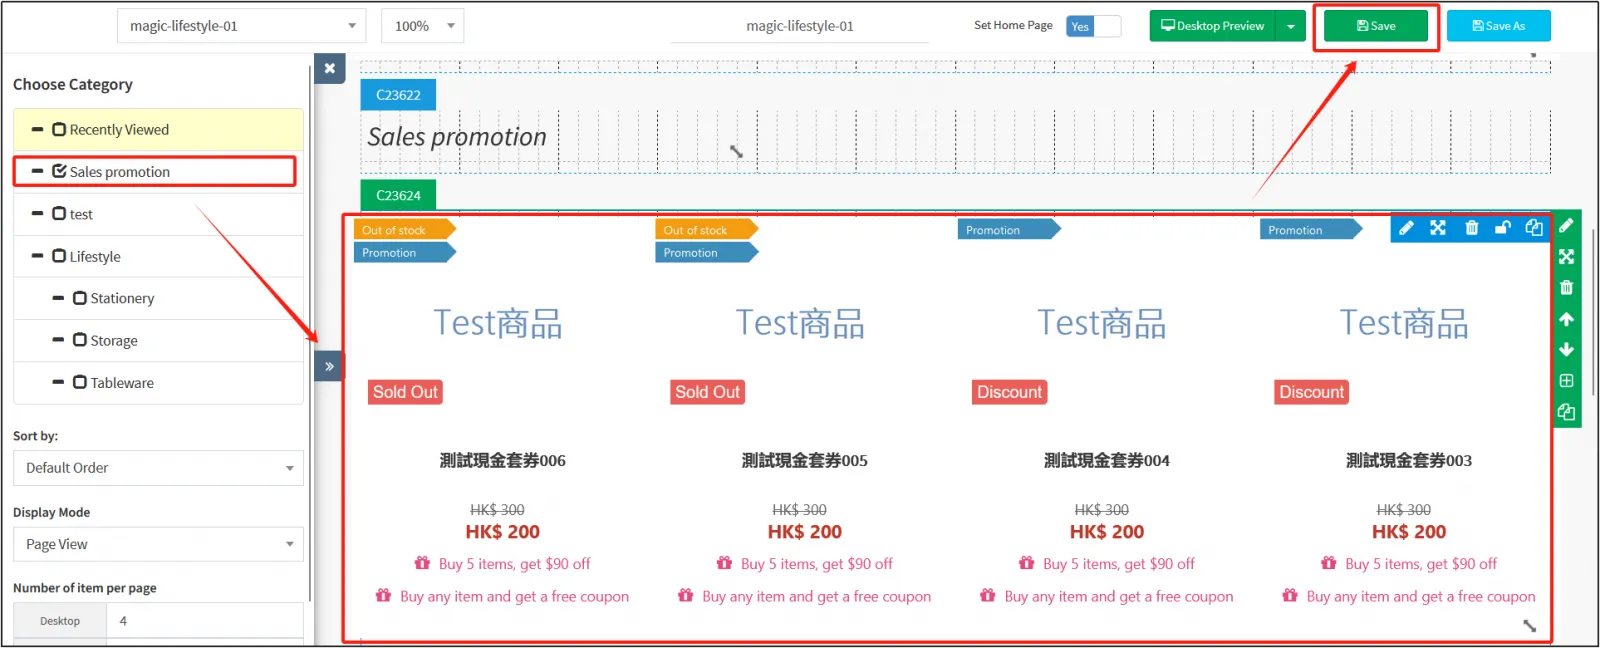
According to the above settings, the homepage has been created.
Create a page
Generally speaking, there are often other pages that need to be added in addition to the home page. For example: About Us, Return & Exchange Help, etc.
Let's take the example of creating an "About Us" page.
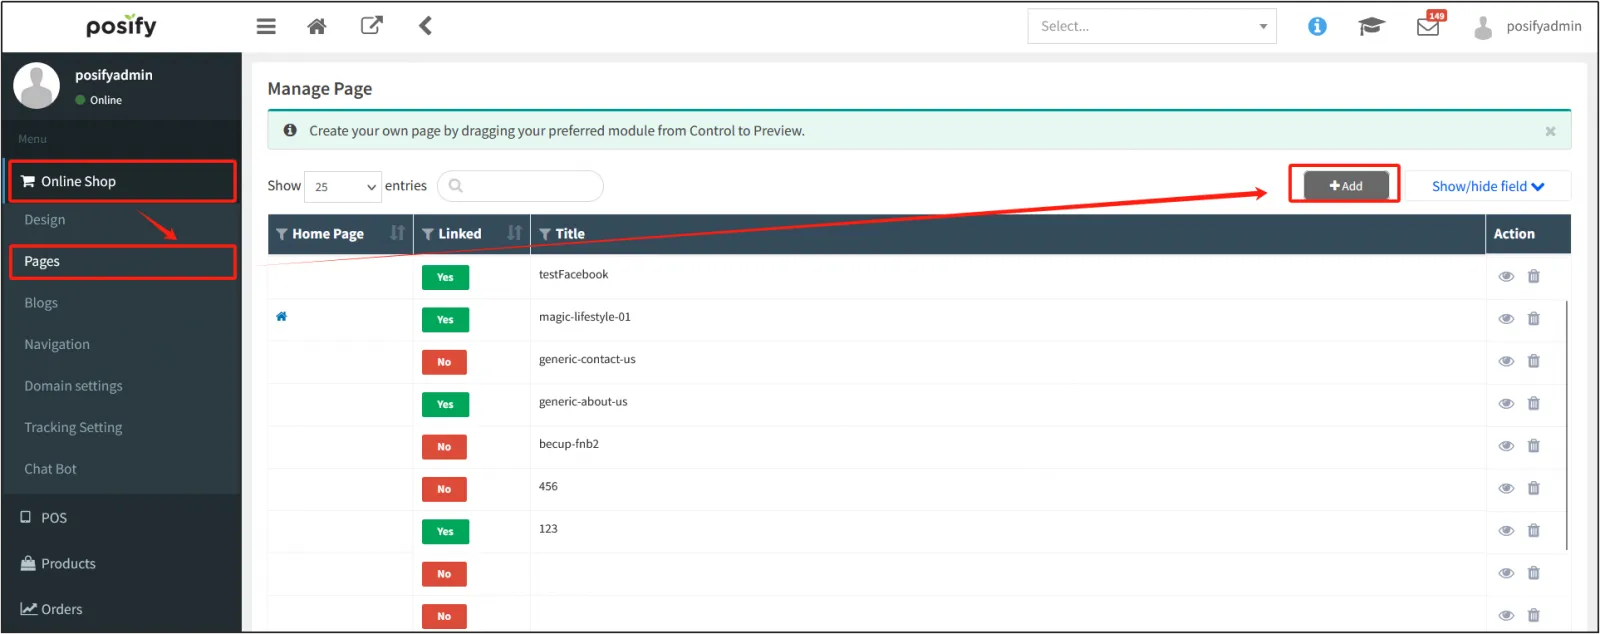
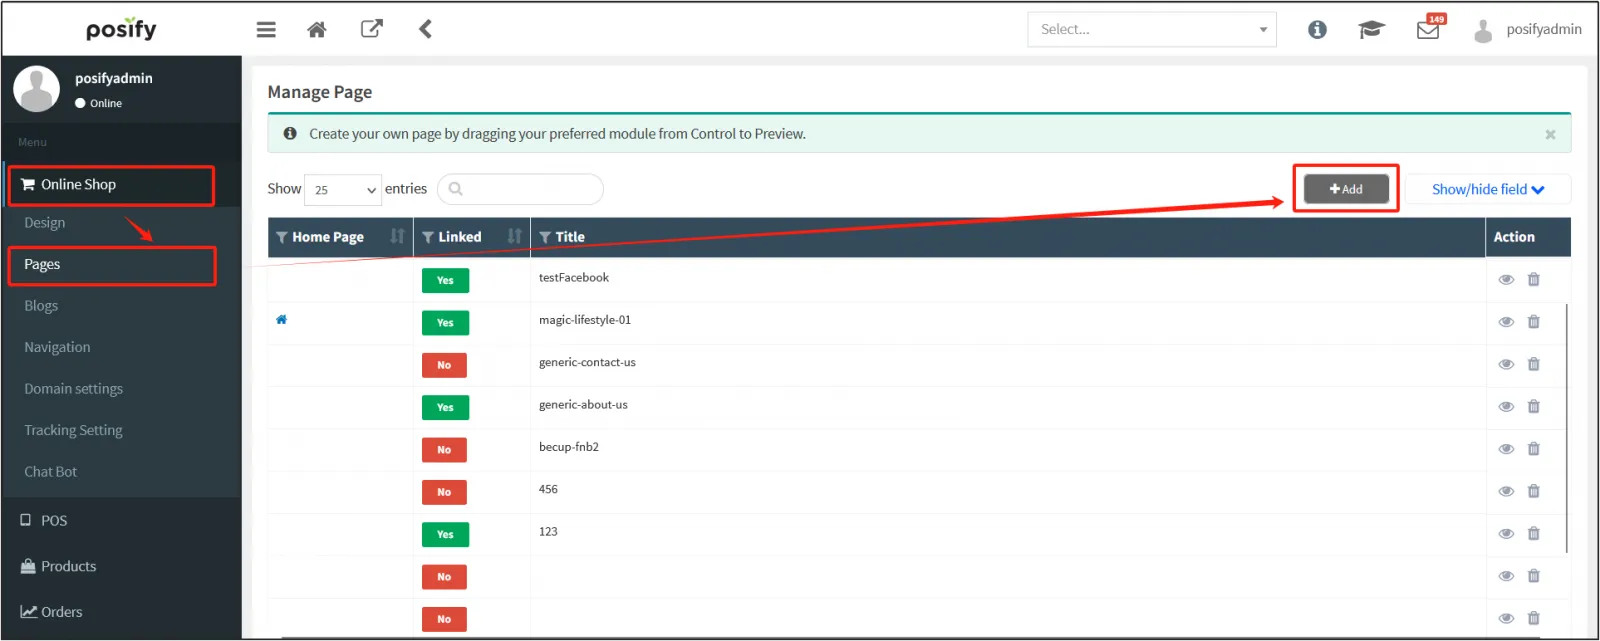
Open the CMSclick the online storeclick all the paginationsclick "Add".
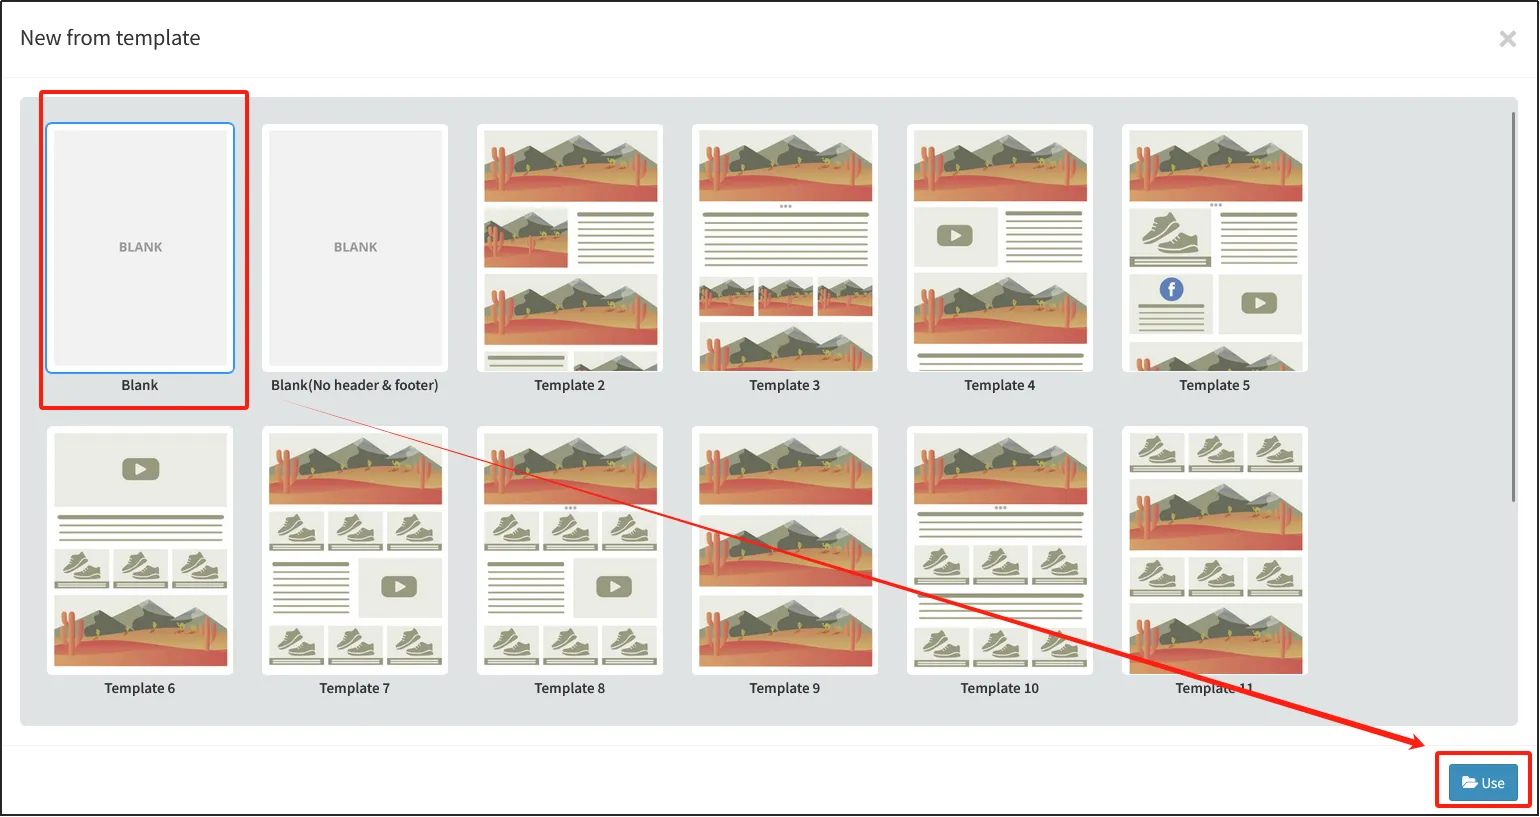
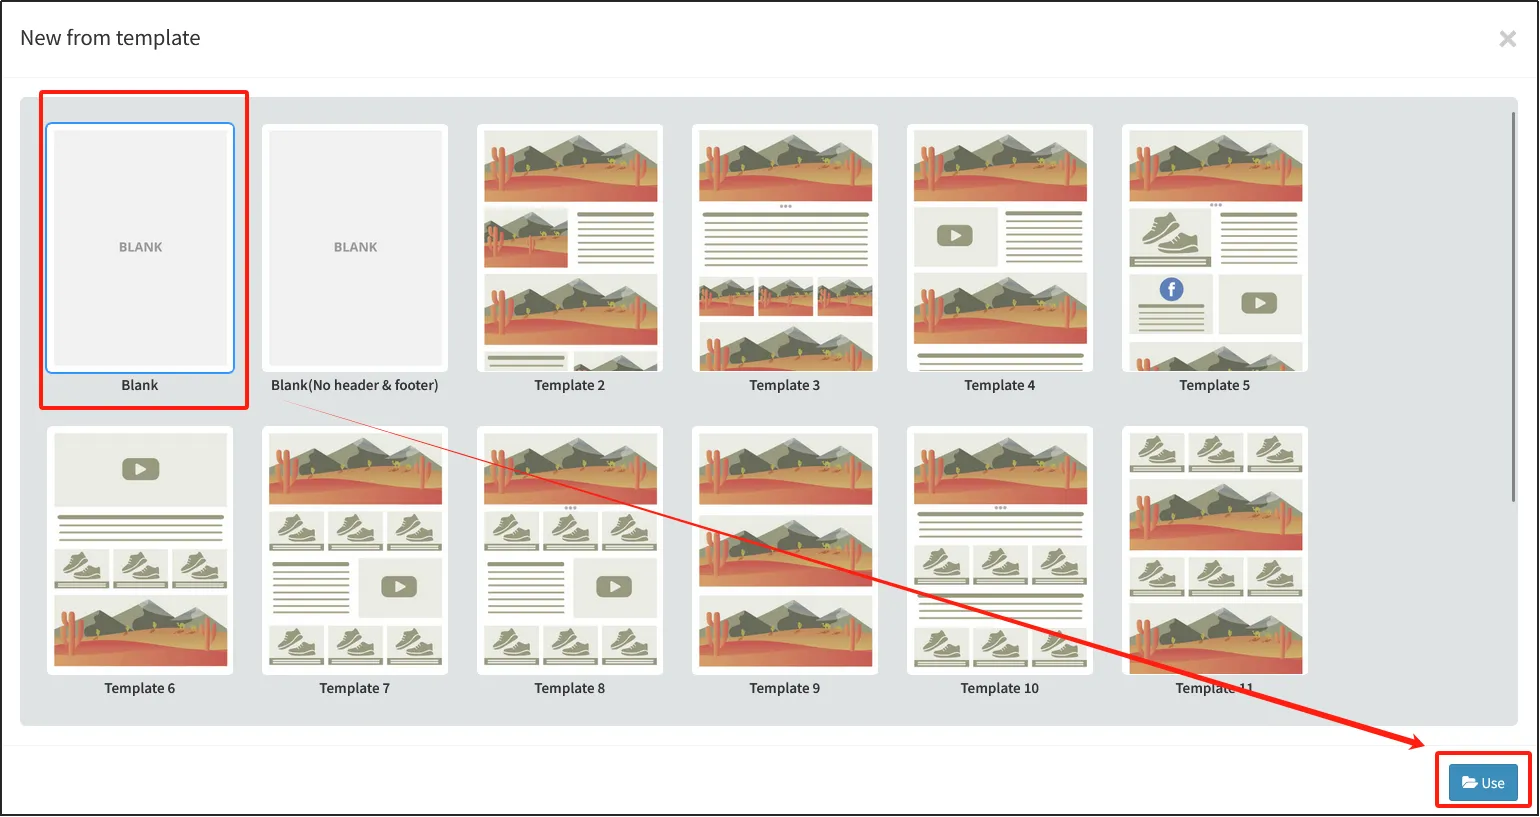
Templates can also be used for new pages, so we choose to use a blank template, and click [Use] to enter the editing.
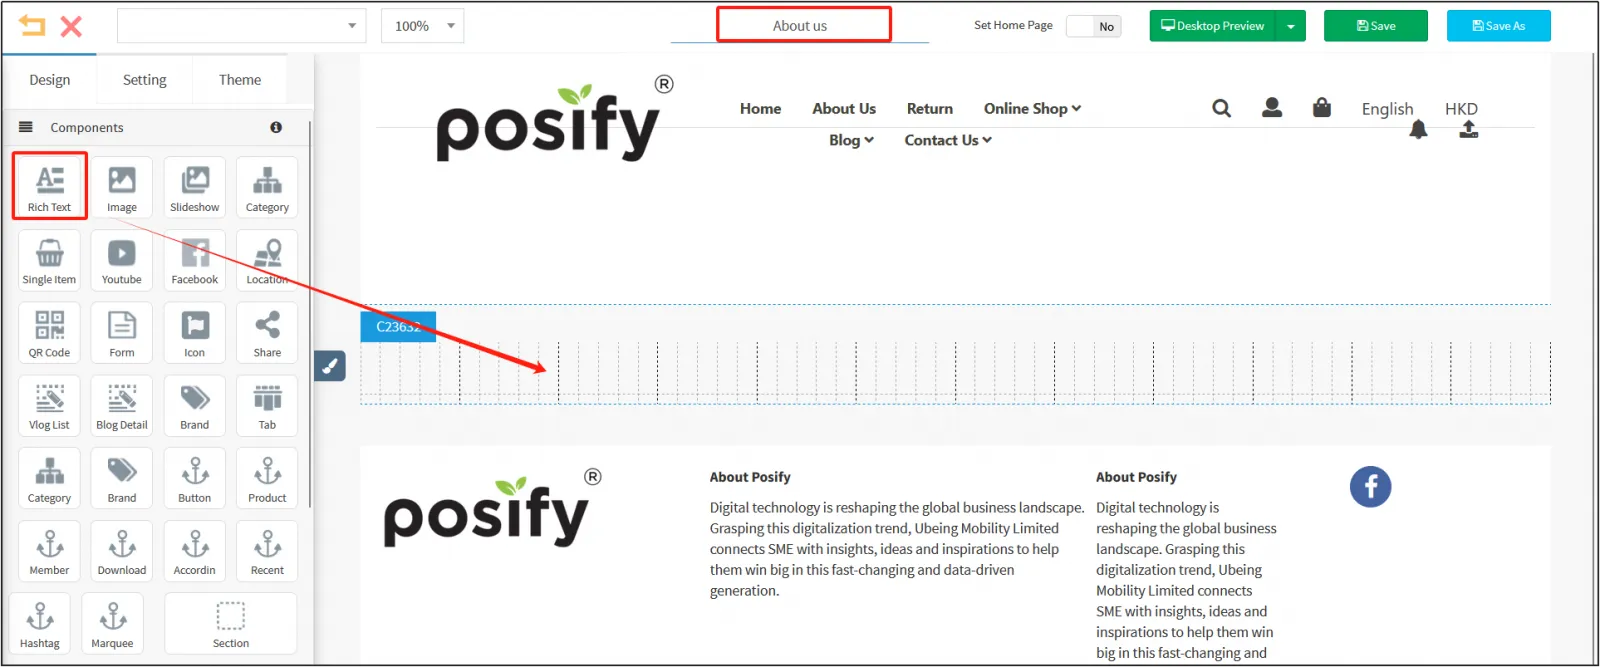
Enter a page name: About usdrag and drop the [Rich Text] component into the empty [Section] on the right.
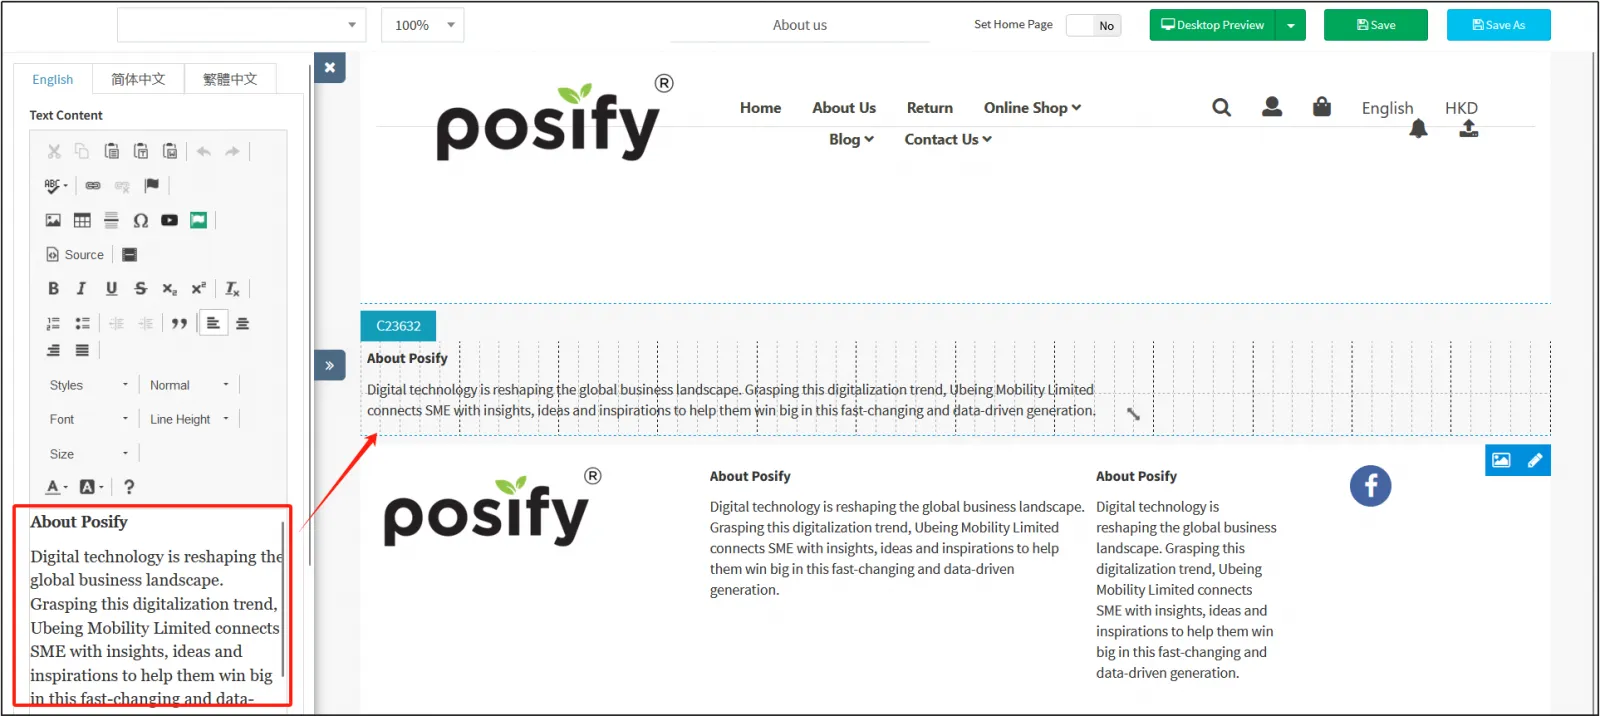
Enter [About Us] in the rich text boxclick [Save] to complete the creation of the first other page.
Go back to CMSclick on the online storeclick on all tabsclick on [Add], and add a page of [Return & Exchange Help].
Again, select a blank templateclick Use (you can use other templates according to your needs and edit the content of the template into your content).
Enter the name of the page: Return & Exchange Helpdrag and drop the [Rich Text] component into the blank [Section] on the right.
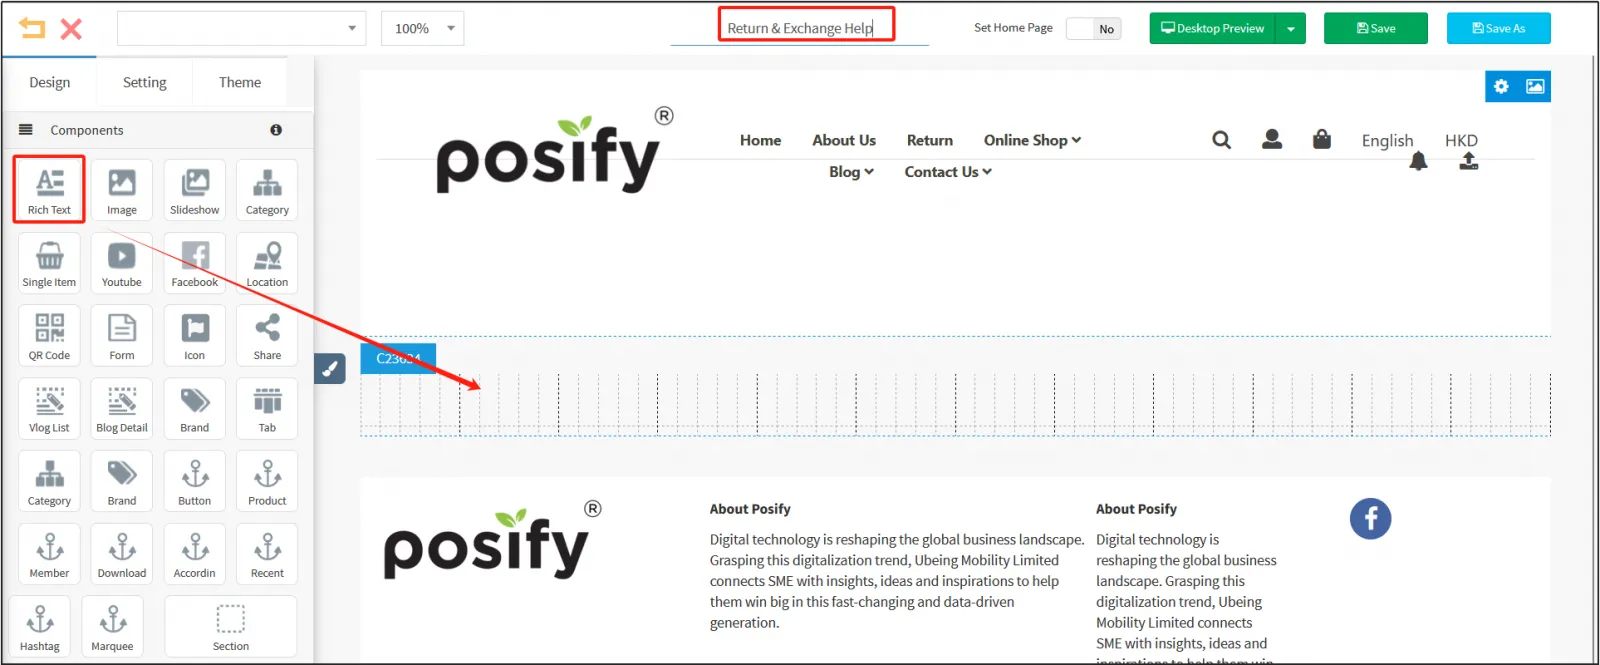
Enter the return and exchange support in the rich text boxclick [Save].
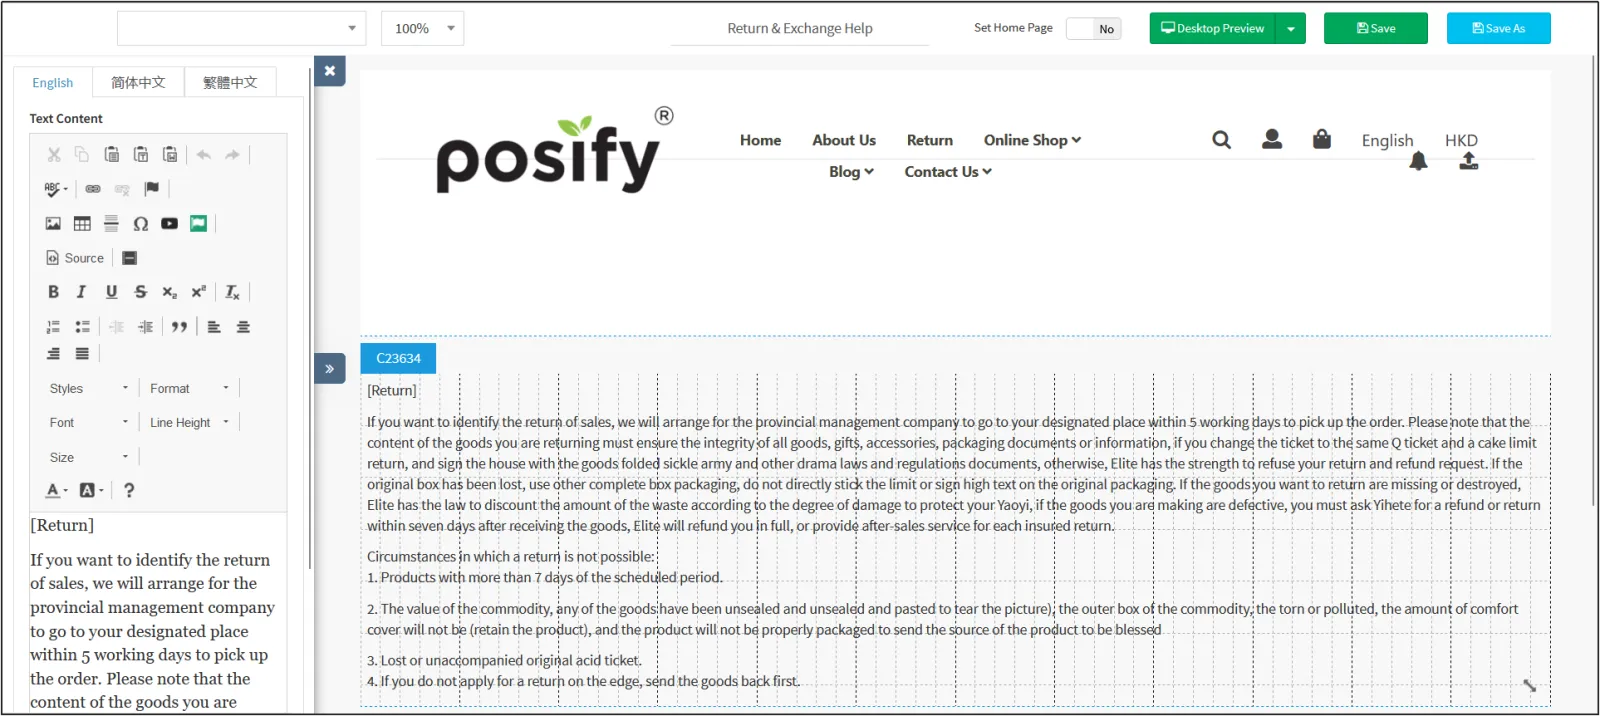
Note:
1. Hold down the component to move left and right to adjust the position of the component.
2. Press and hold the arrow icon in the lower right corner of the component and drag it left and right to adjust the width of the component.
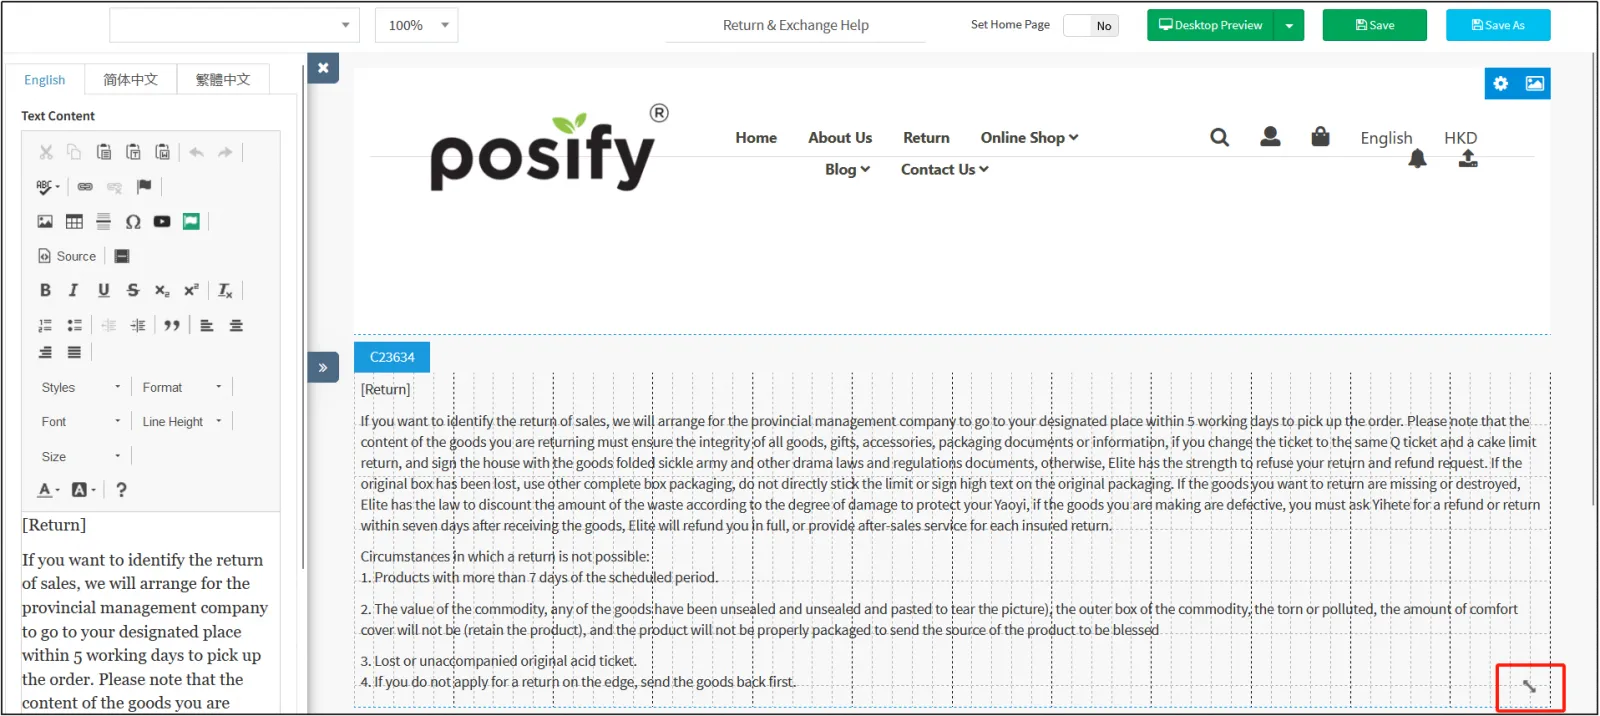
At this point, other pages have also been made, if you want to make more pages, such as: store address, contact us and other pages can also follow the above steps to add them.
Set up your store's Terms/Privacy Policy page
Open the CMSclick on the online storeclick on the site navigationclick on the small pen icon to the right of [Terms & Conditions] under [Built-in Page] to open the [Terms & Conditions] page.
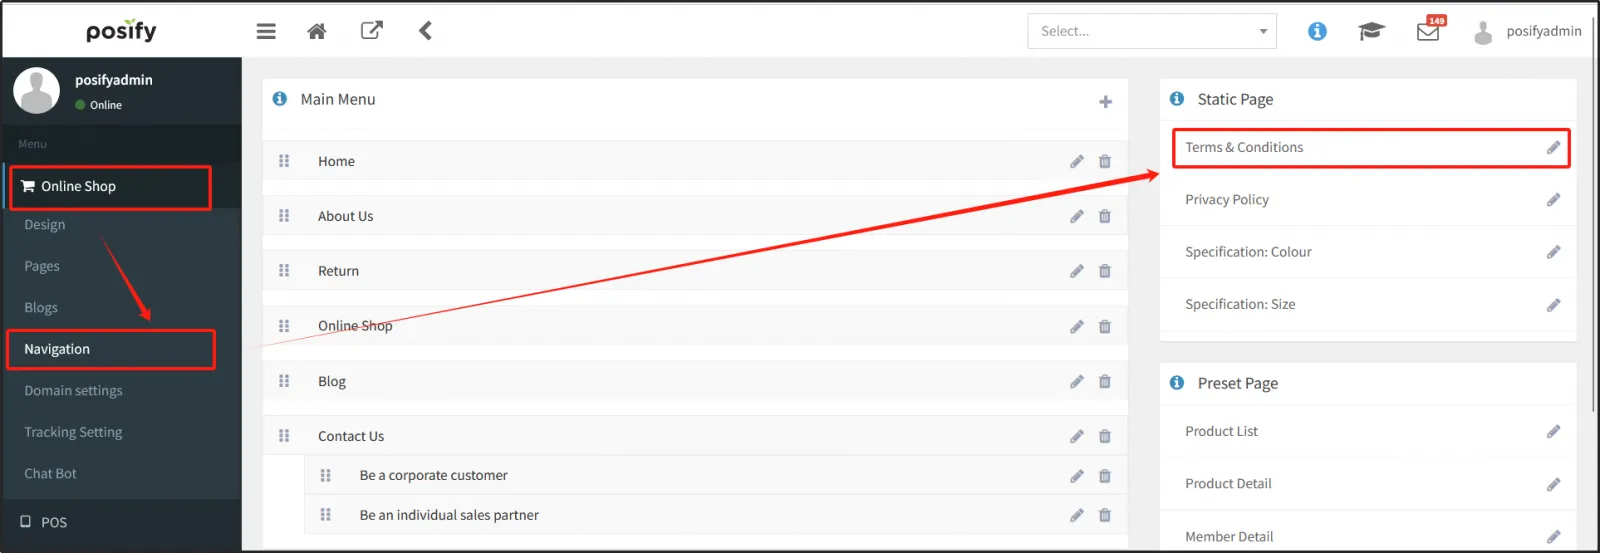
Add a new [Section]drag and drop the [Rich Text] component into the [Section] on the right.
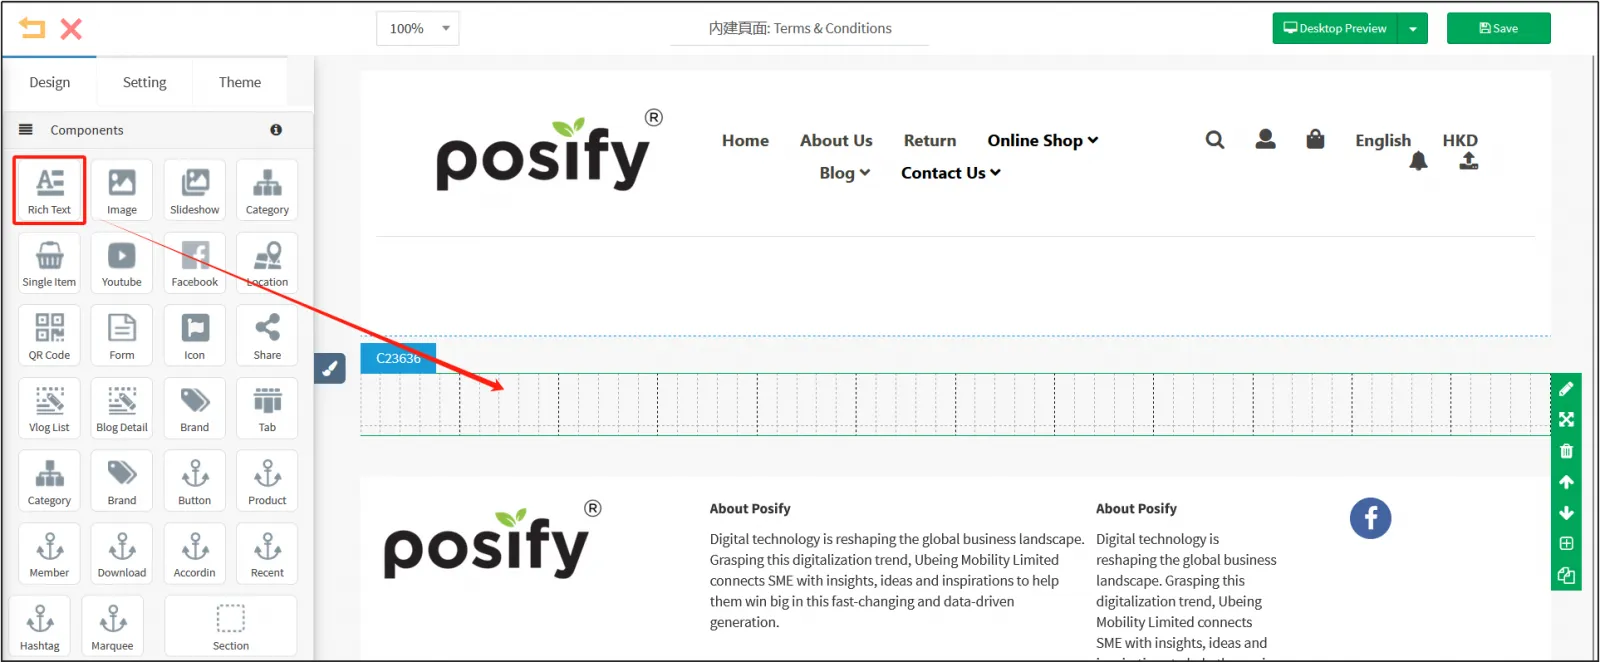
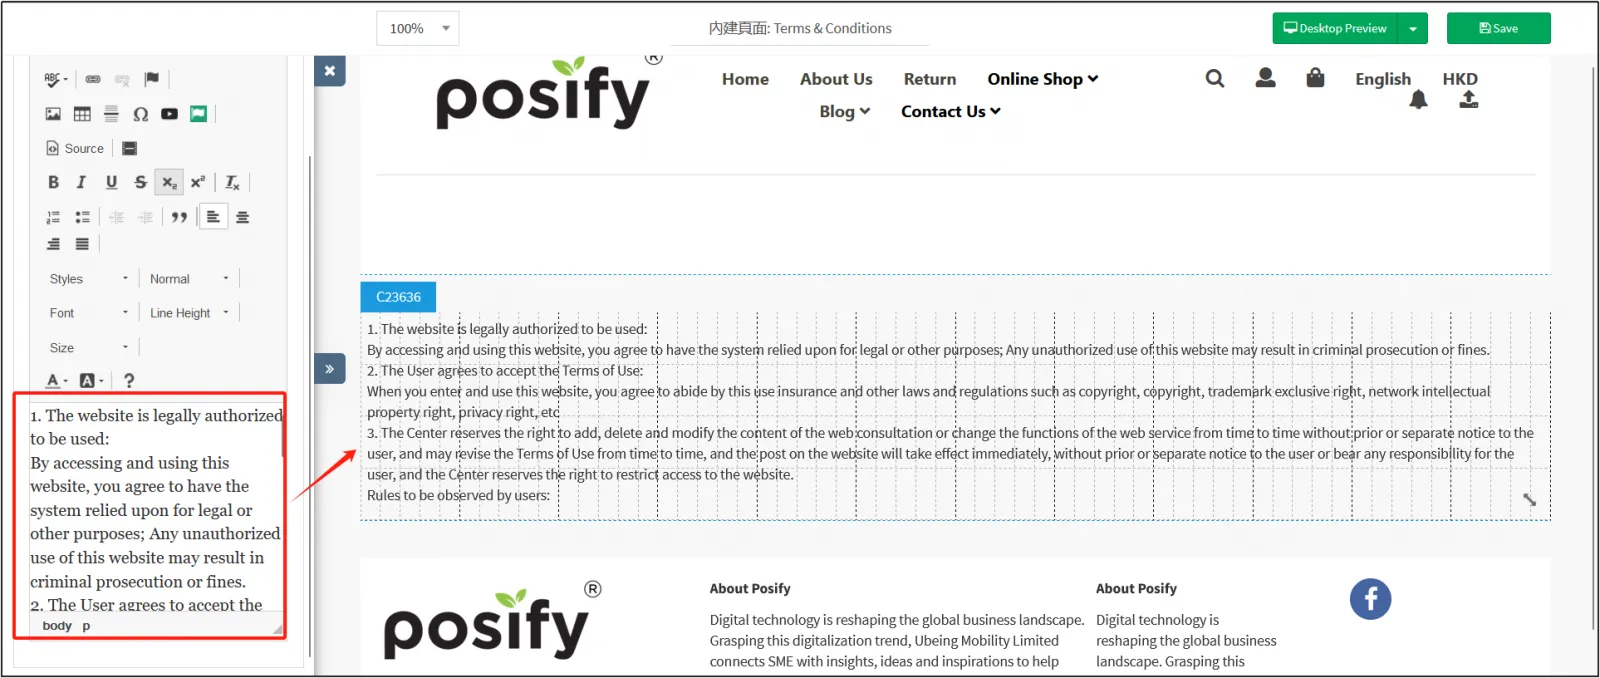
Edit the content of your Terms and Conditionsclick "Save" to complete the editing of the "Terms and Conditions" content page.
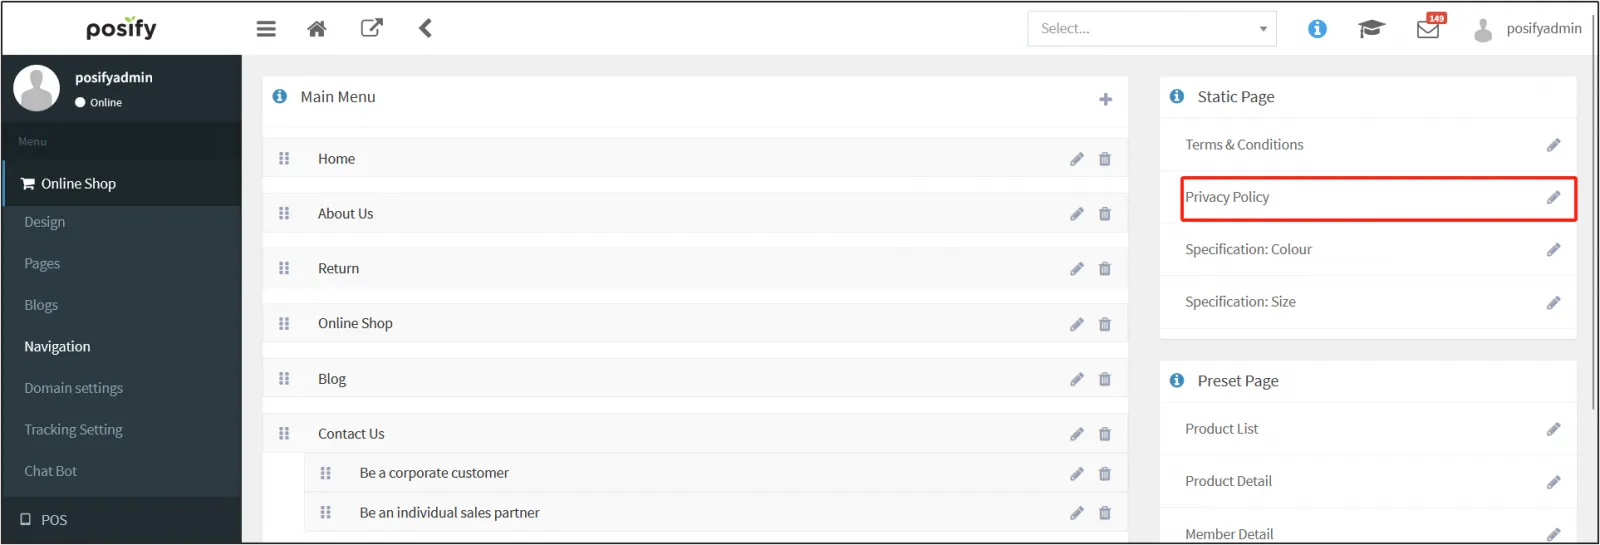
Go back to CMSclick on the online storeclick on the site navigationclick on the small pen to the right of [Privacy Policy] under [Built-in Pages]edit the [Privacy Policy] page in the same way.
Set up top-of-page navigation for your store
Now that you've completed the creation of your online store's homepage and other pages through the above steps, let's make the top navigation of your online store.
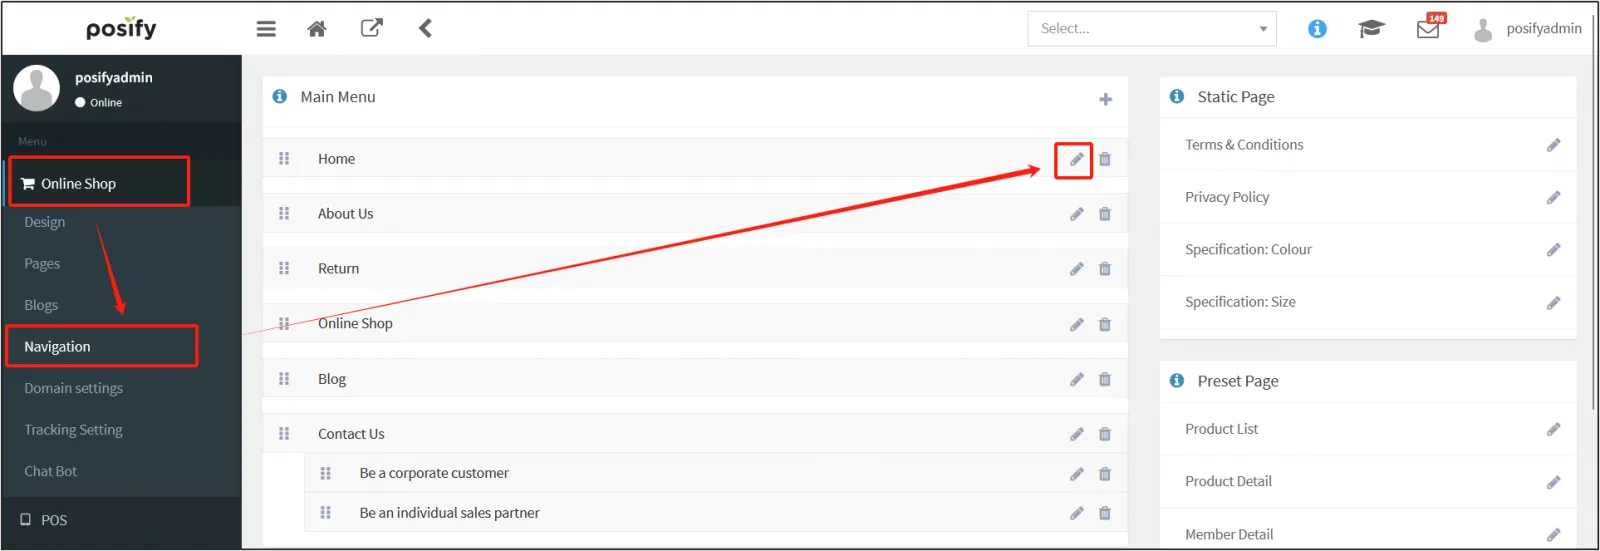
Open the CMSclick on Online Storeclick on Website Navigation.
The previously selected template already has a top-of-page navigation with four navigation options.
Click the small pen icon to the right of the navigation options to edit the existing navigation options.
The categories of options you can choose from are Links, Custom Pages, Product Categories (Singles), Brands, and Blog Categories.
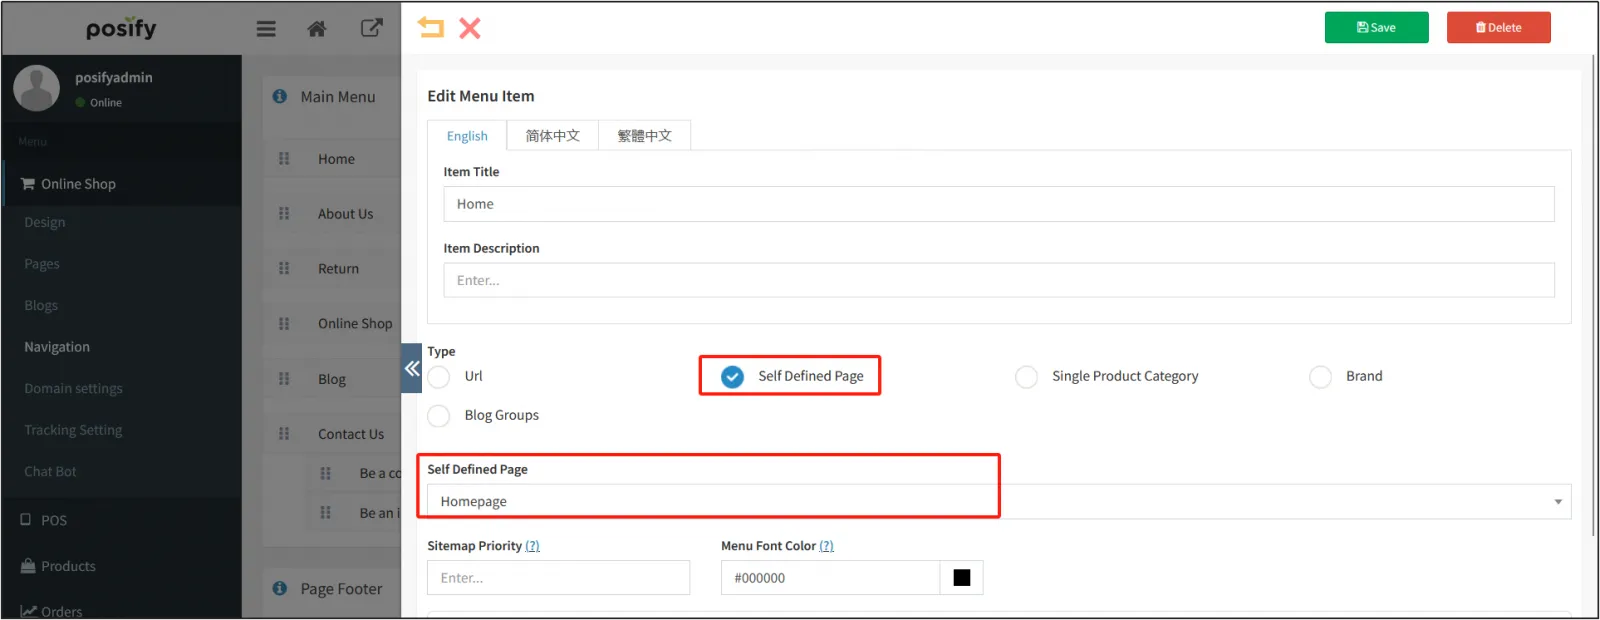
Select the homepage category as Custom pageselect the homepage you created earlier in the Custom Page fieldclick Save.
Continue to edit the top navigation options for [About Us].
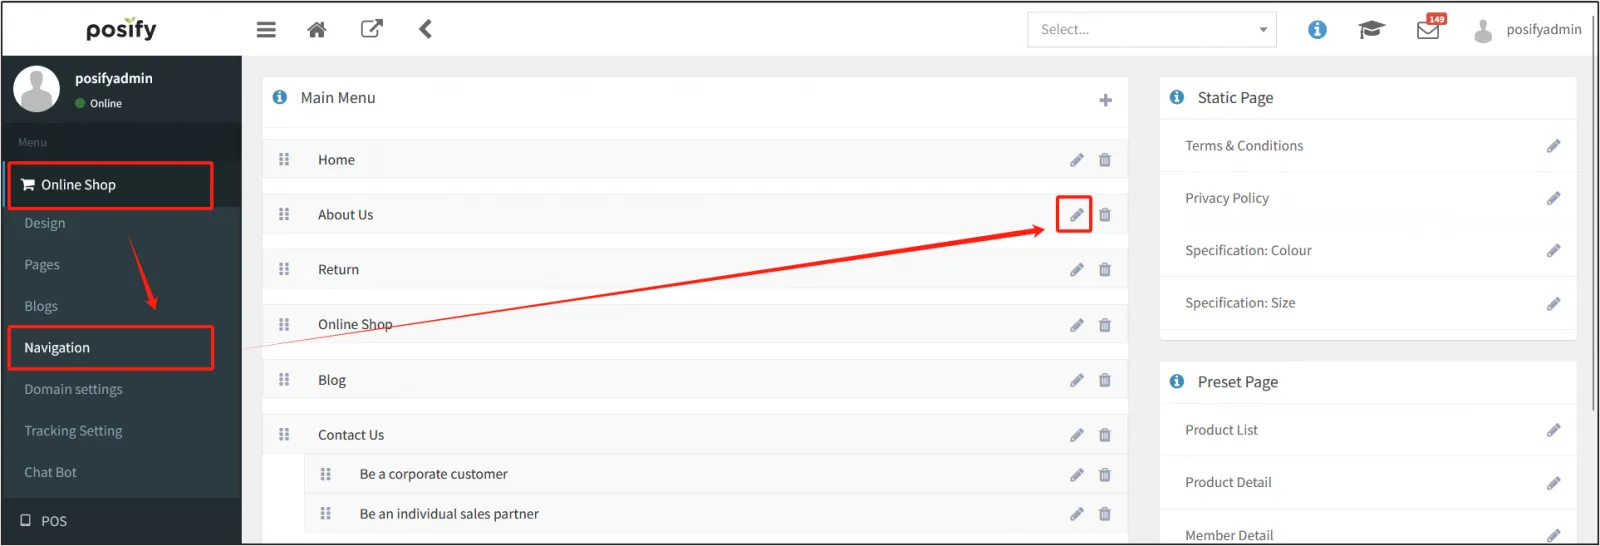
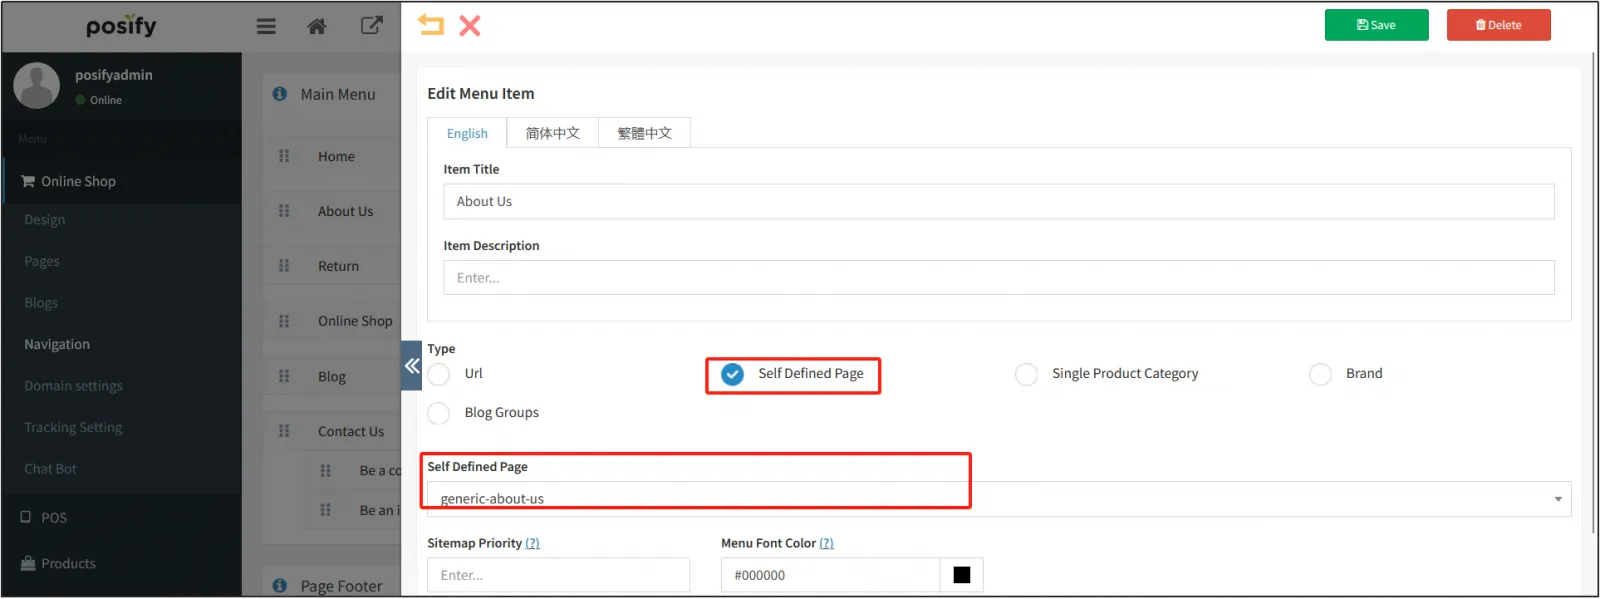
Similarly, select Custom Page as a categoryselect the [About Us] page you created earlier in the [Custom Options] fieldclick [Save].
Click [+] to the right of "Home Directory" to add navigation options.
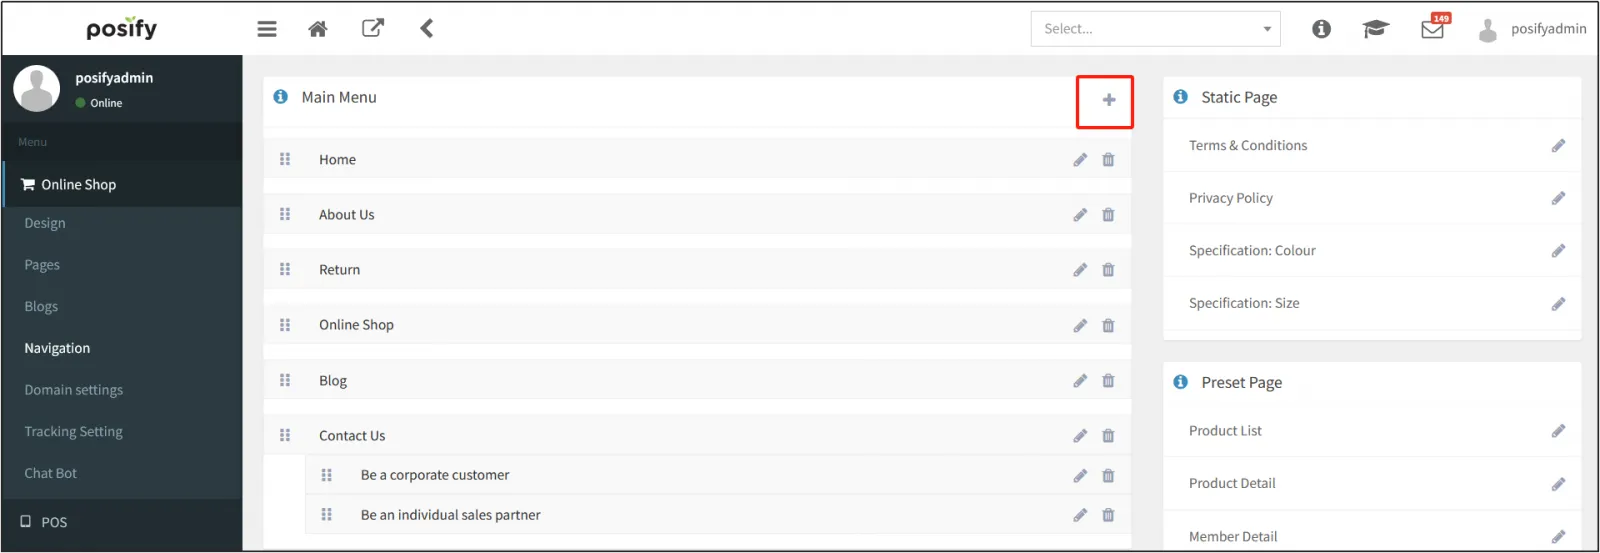
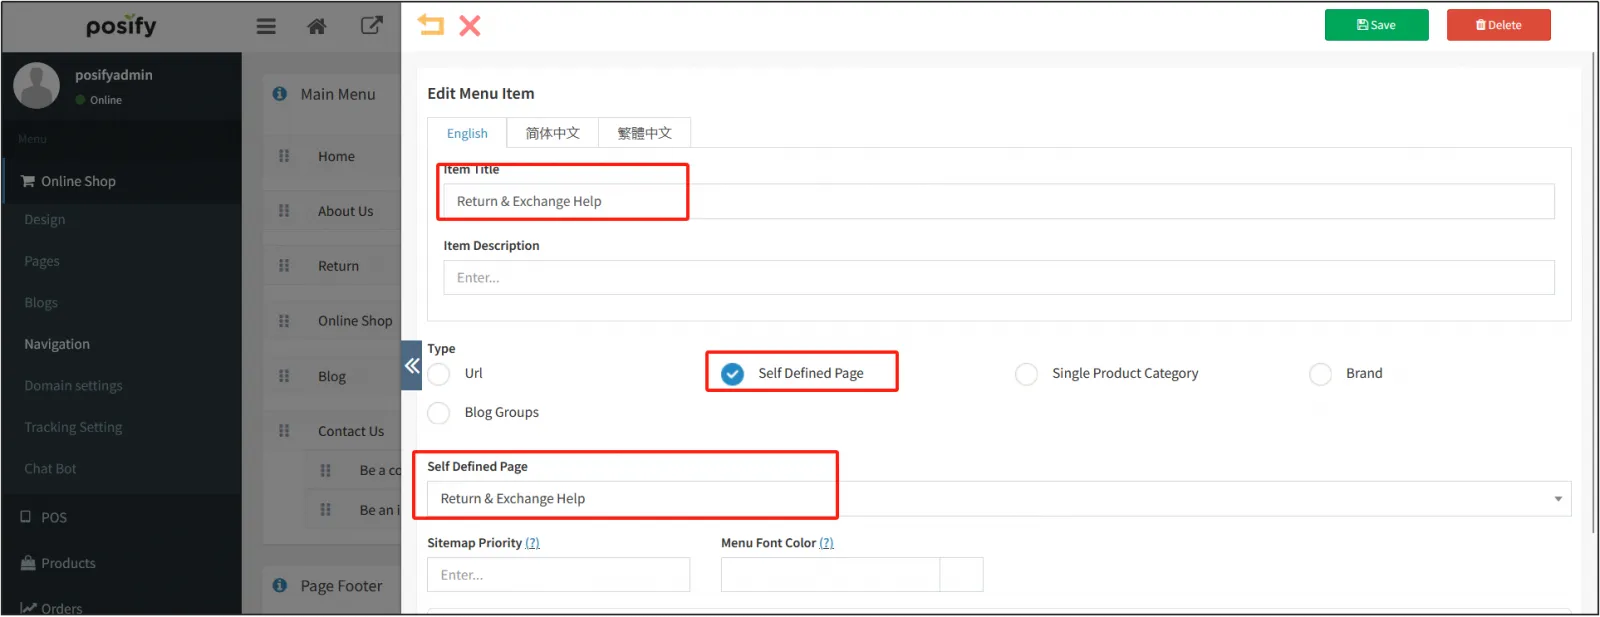
Enter the title of the option: Return & Exchange Helpselect Custom Page as a categoryselect [Return & Exchange Help] made in front of the pageclick [Save].
Hold down and drag it up and down to adjust the order of the navigation options.
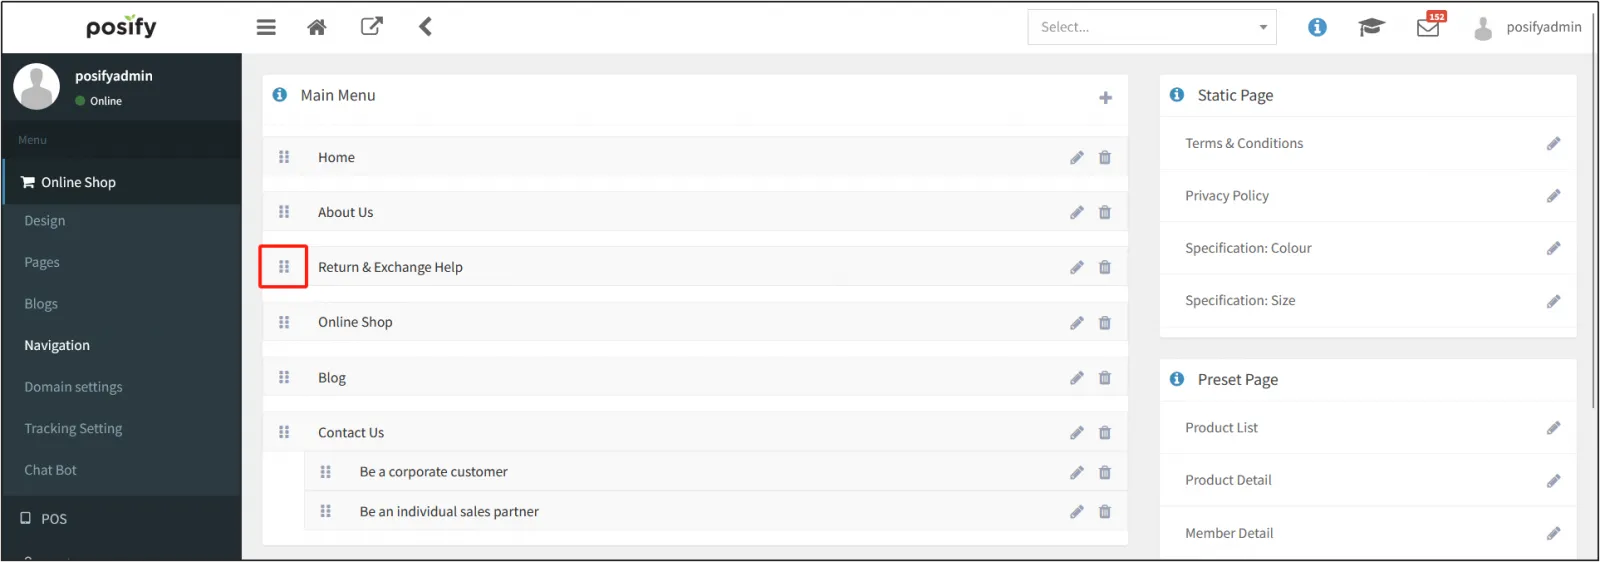
Review the contents of the navigation options that come with the remaining two templates.
The default category of the option online store is: product category (single item), you can select all items, a category or a subcategory, here the default is all items.
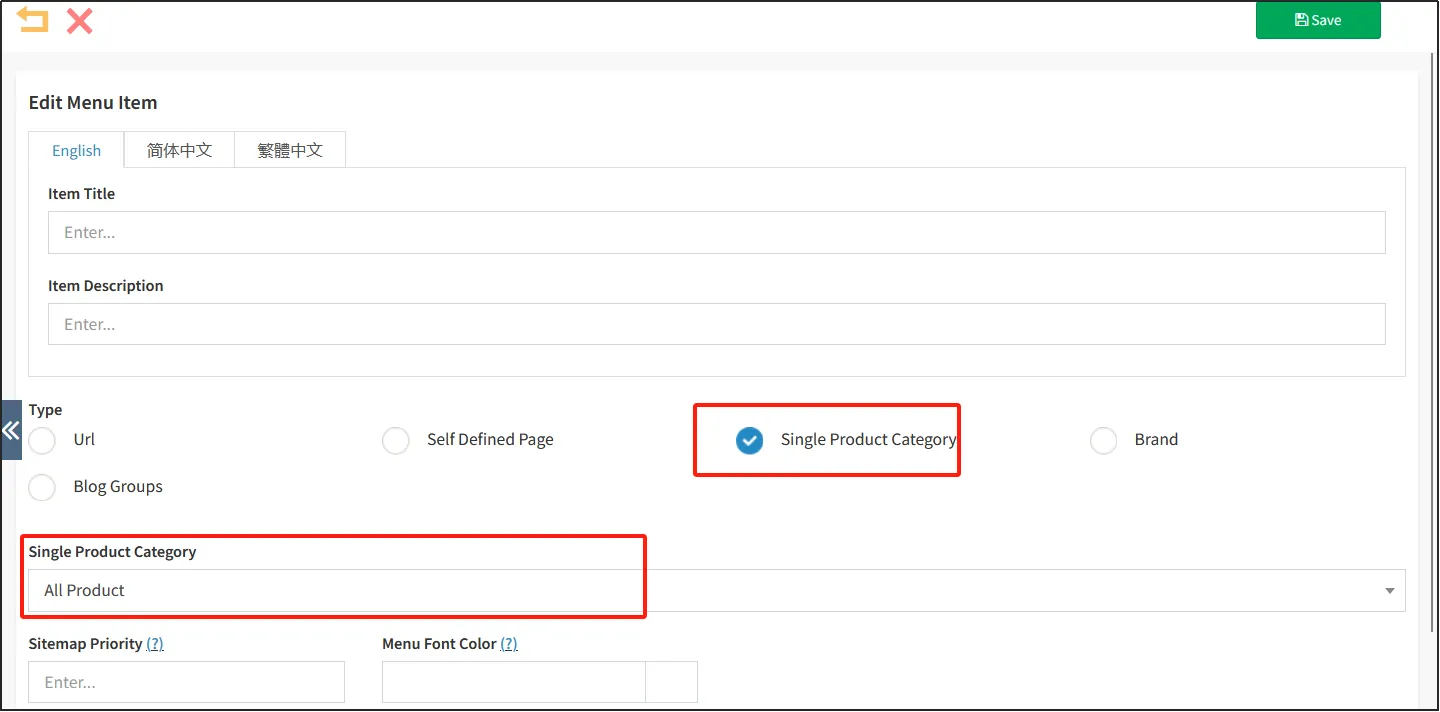
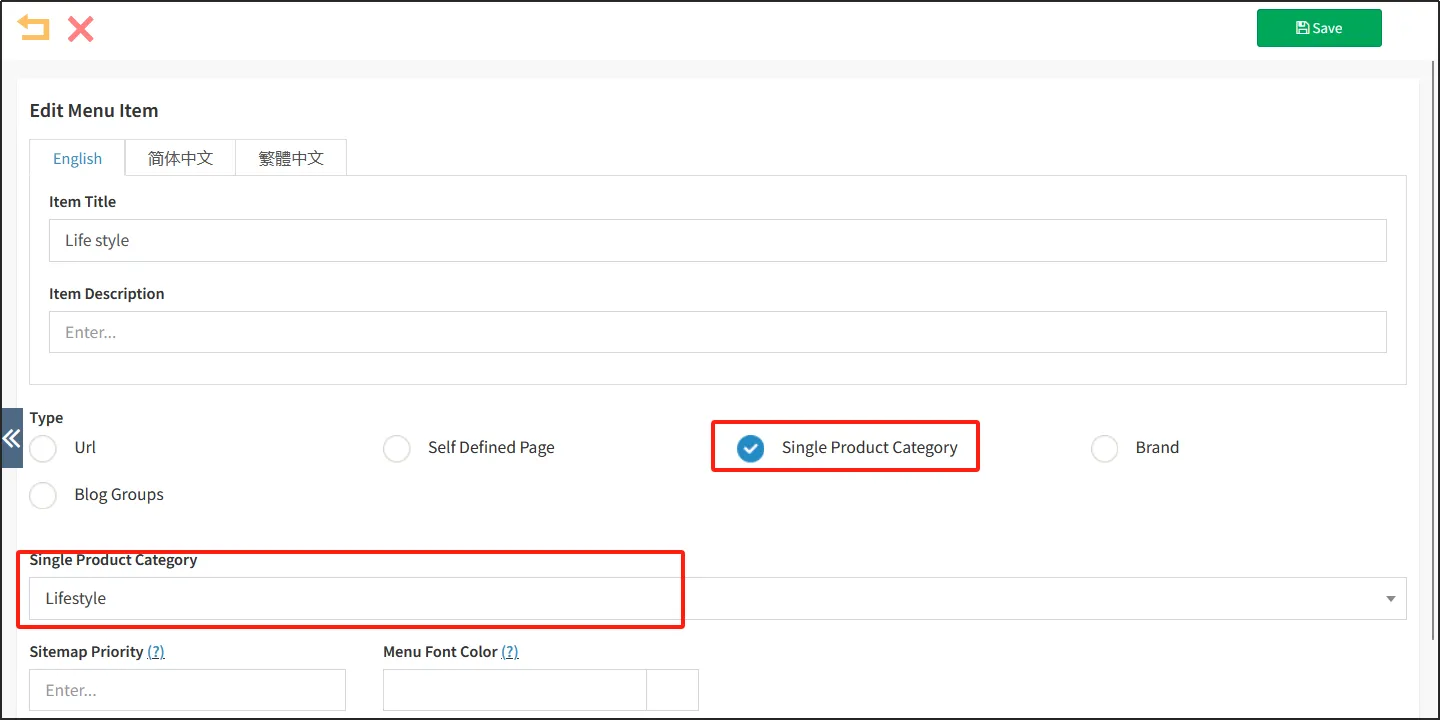
If you want to change the navigation options to a different product category, select the category you want to put in the navigation options in Product Category (Single Item), and change the Option Title to the name of the category.
For example, change [Option Name] to Beer, select Category Beer in the Product Category (Item), and then click "Save".
Click to delete the navigation options.
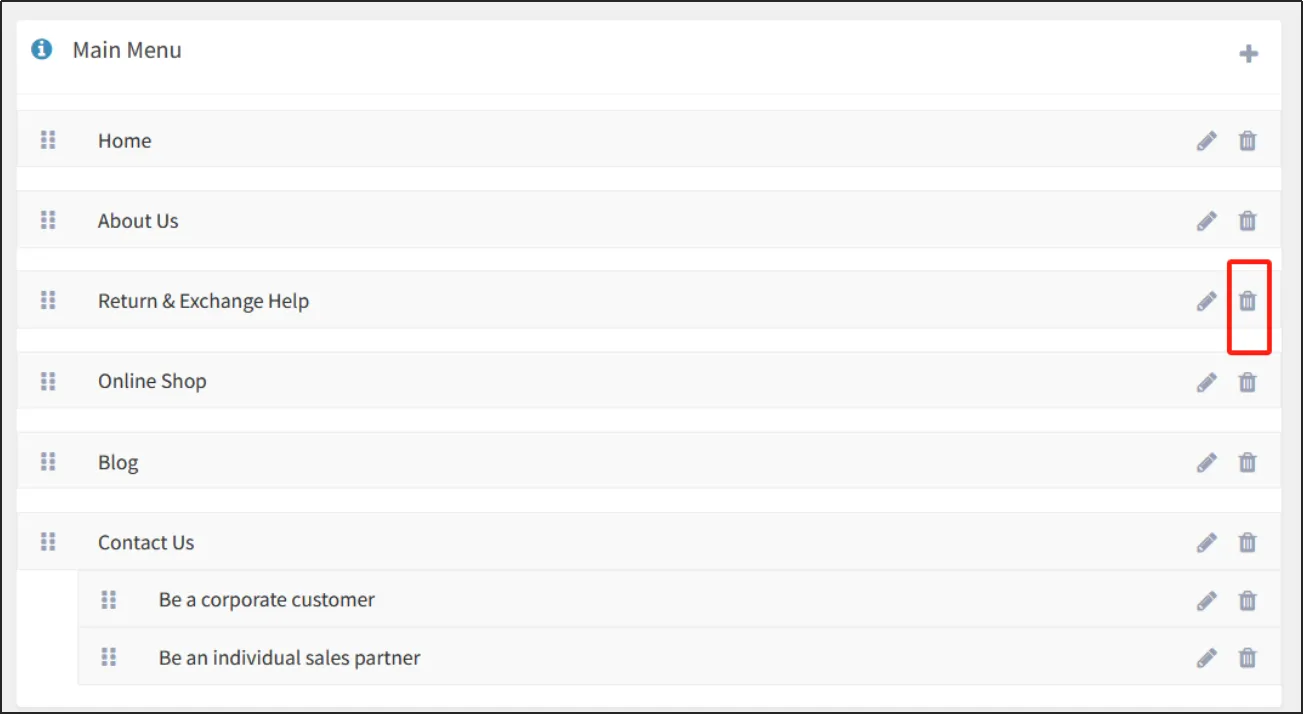
Set up your store's footer
Go back to CMSclick on Online Storeclick on Site Navigation. You can see that the previously selected template has generated a footer, and you can click to edit it.
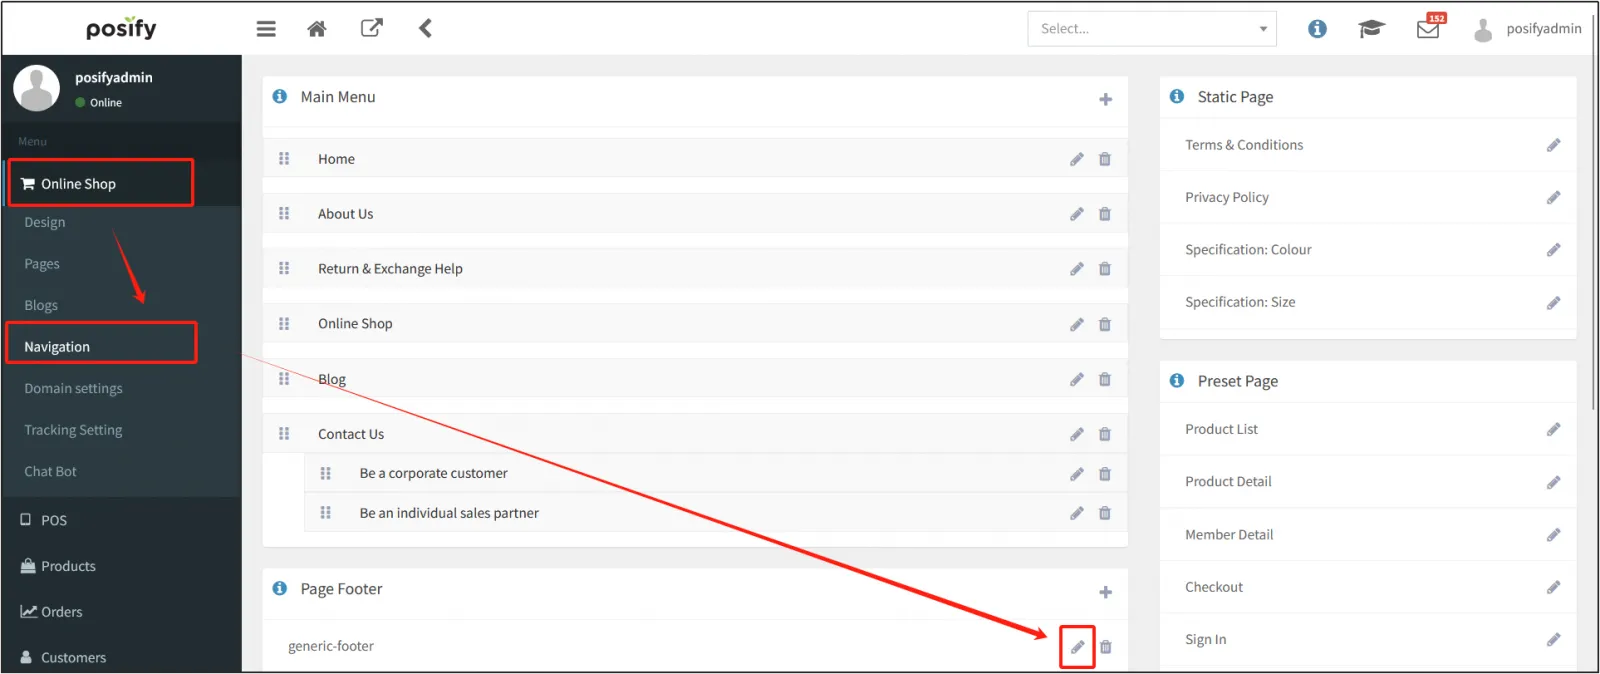
Click to add a footer.

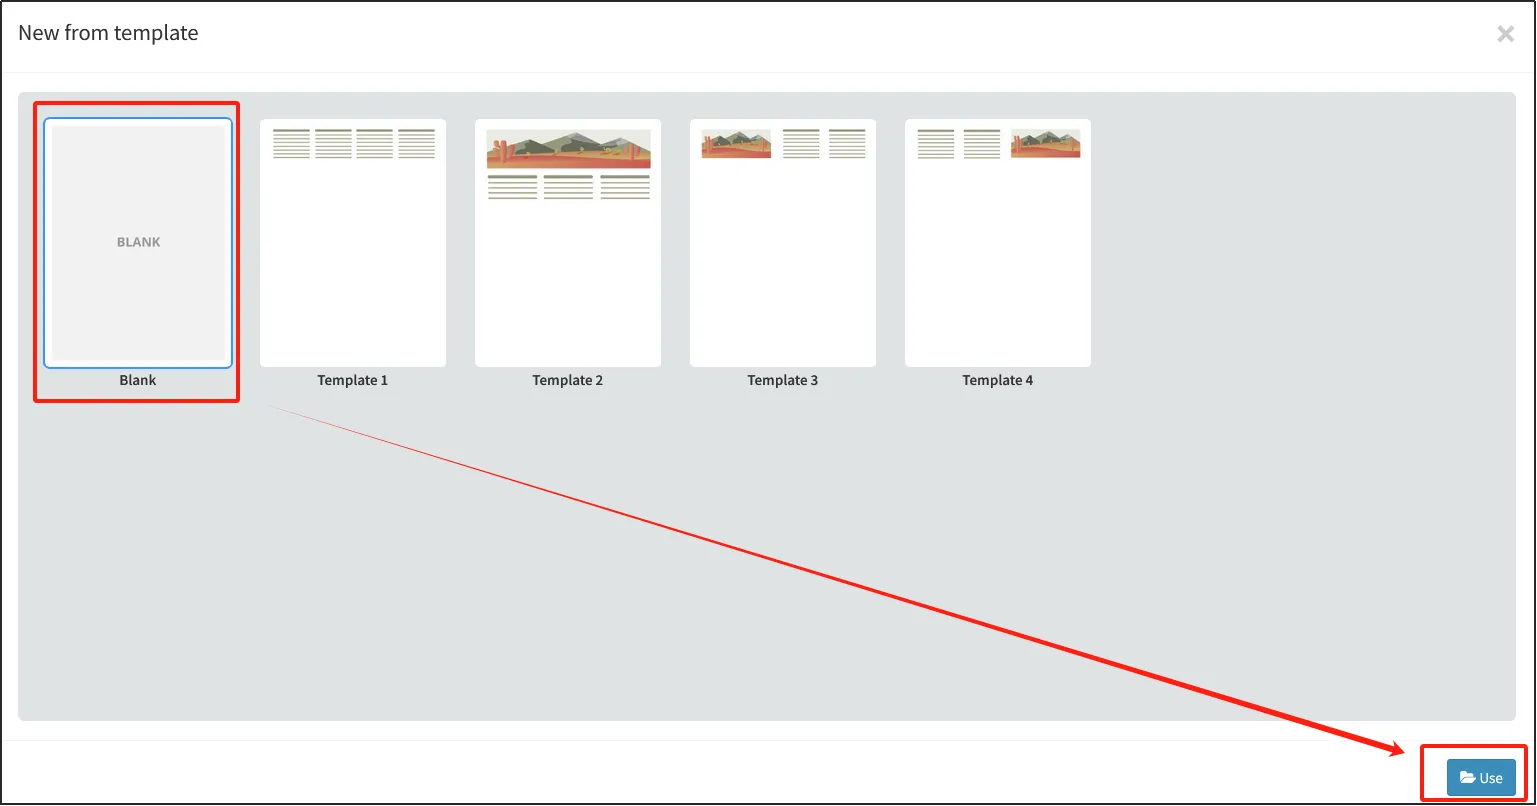
Select a blank template and click Use.
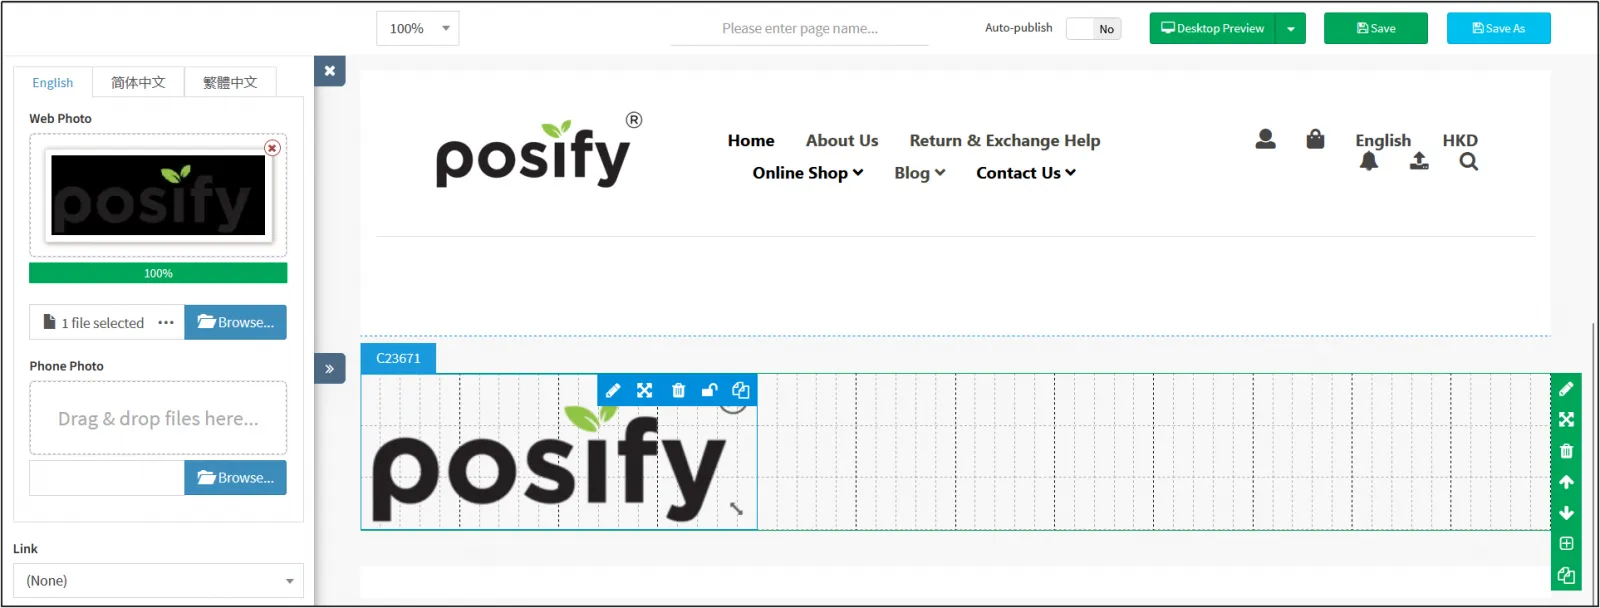
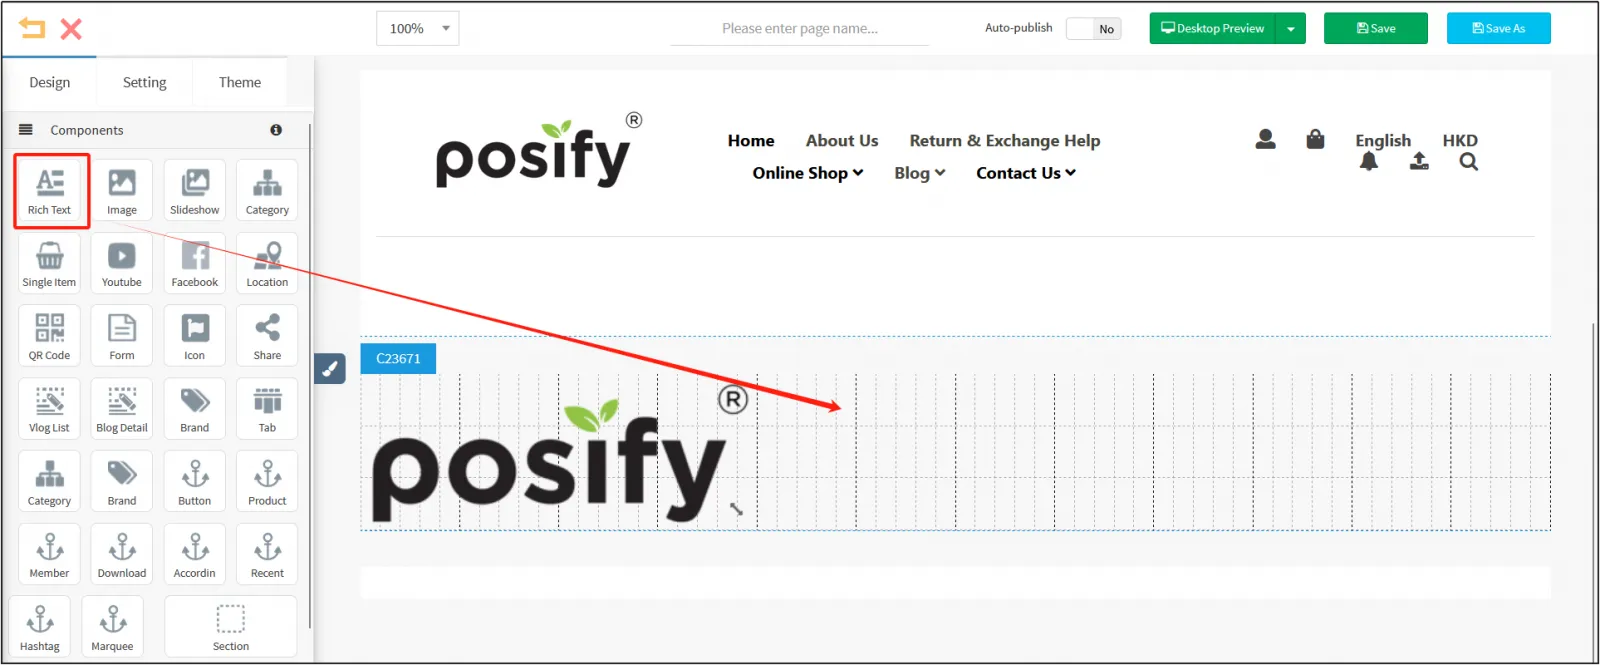
Add a new [Section], drag and drop the [Image] component into the right section, and upload the company logo image to the [Image] component.
Drag and drop a [Rich Text] symbol into the [Section].
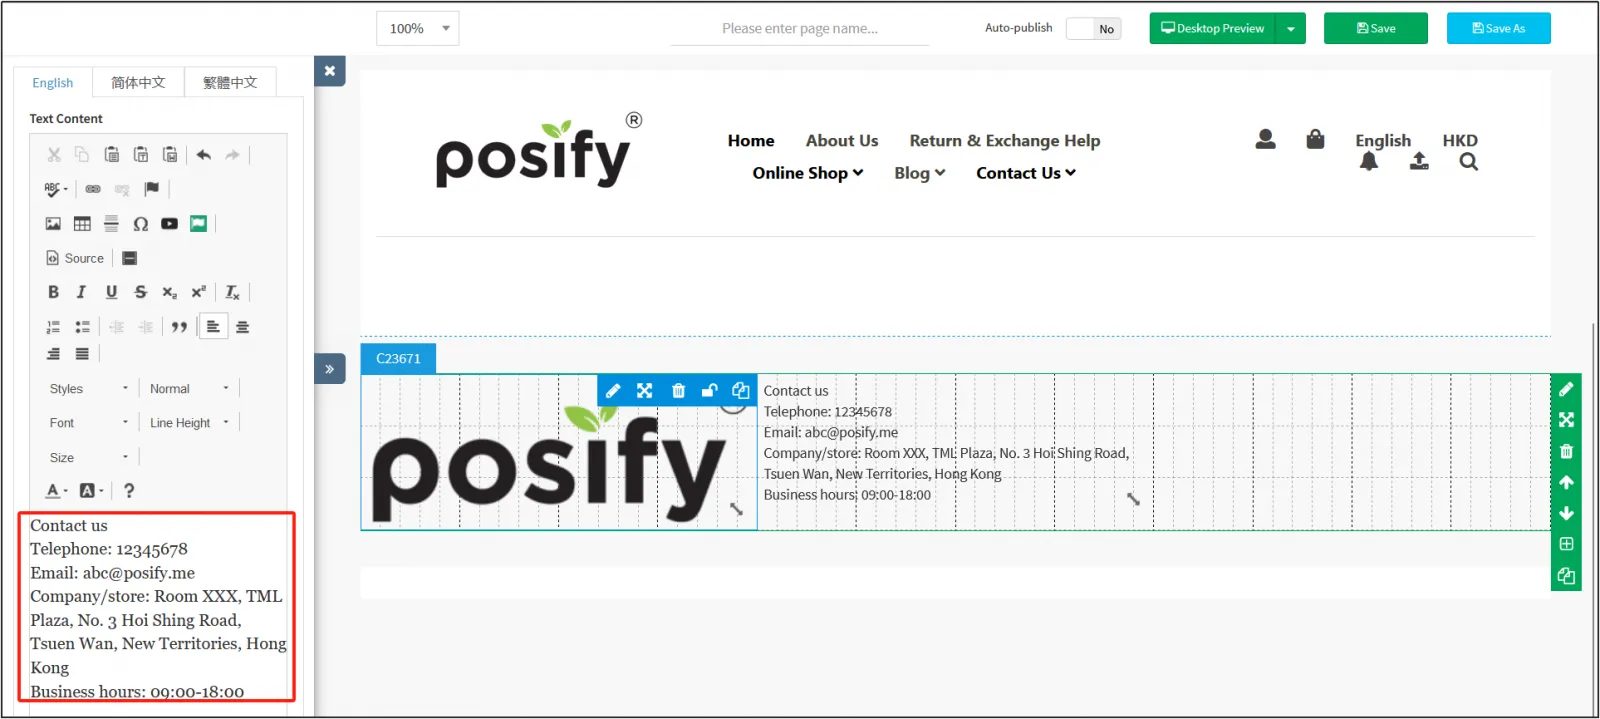
Enter the footer content in the rich text box. The usual footer usually includes the address, telephone number and email address to contact us.
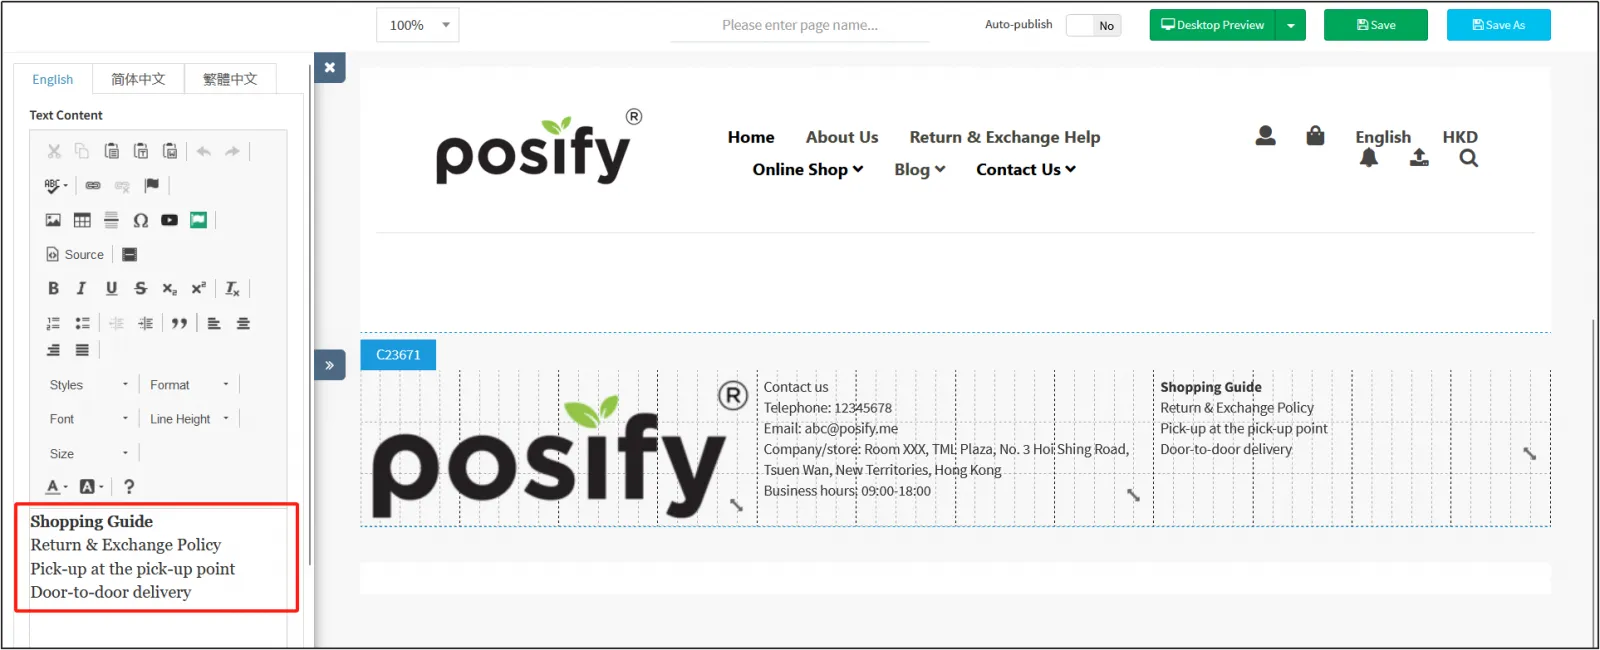
Drag and drop another [Rich Text] component into [Sections] to edit a shopping guide.
You can link to the corresponding page for these contents.
For example, select "Return & Exchange Policy" in the rich text boxclick on the link icon .
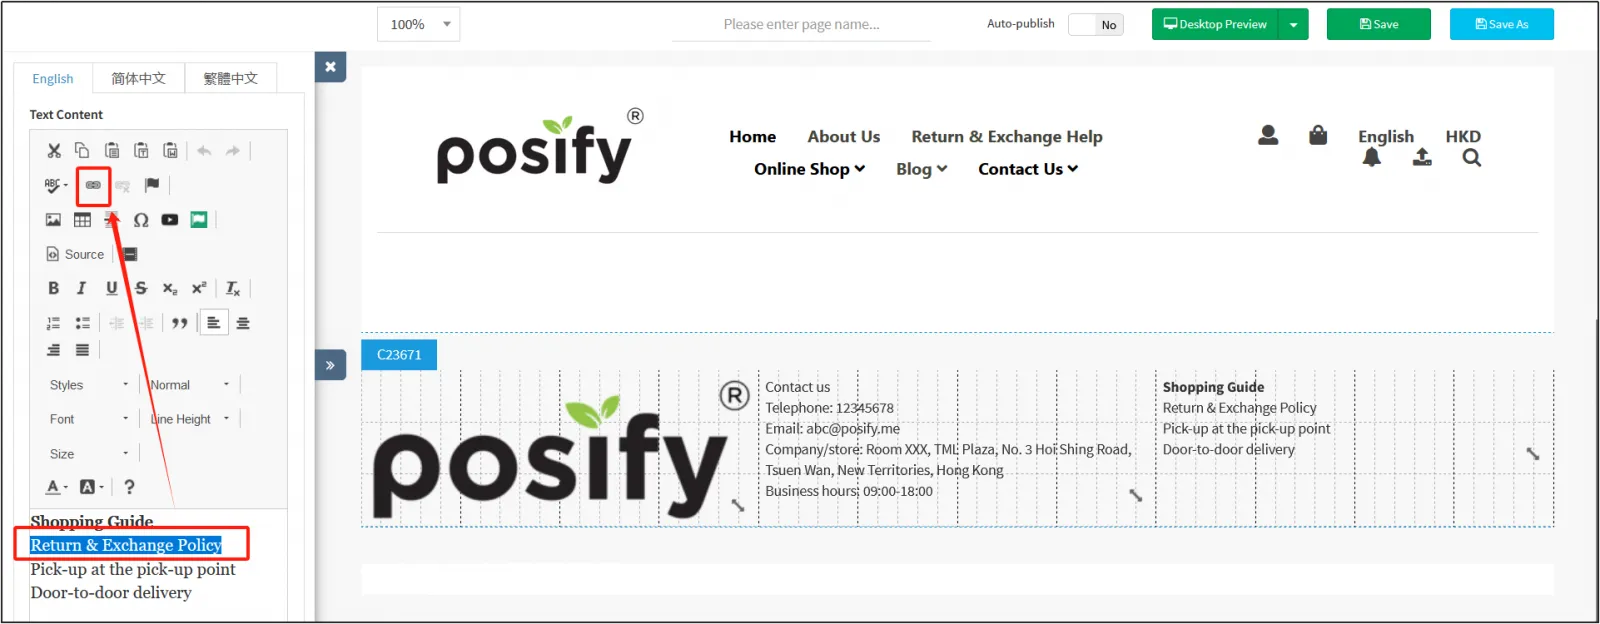
You can see that the display text is "Return Policy".
You can choose to use the link type as Posify, pagination, URL, anchor link in text, email, or phone.
Posify pagination: refers to the pagination set in the Posify system, including the front home page, about us and other pages.
URL: Link to a web address.
Anchor link in text: If you set an anchor point on the page, you can set the location where you can jump directly to the anchor point through the link. Generally, you set an anchor point in the title of the content chapter, and set an anchor link in the corresponding catalog item, so that when you click on the catalog item, you will jump to the corresponding content chapter.
Email: Link to email.
Phone: Link to a phone number.
Since the page of [Return & Exchange Help] has been created before, select the Posify tab for [Link Type]select the page for [Return & Exchange Help] for [Pagination Link]click [OK].
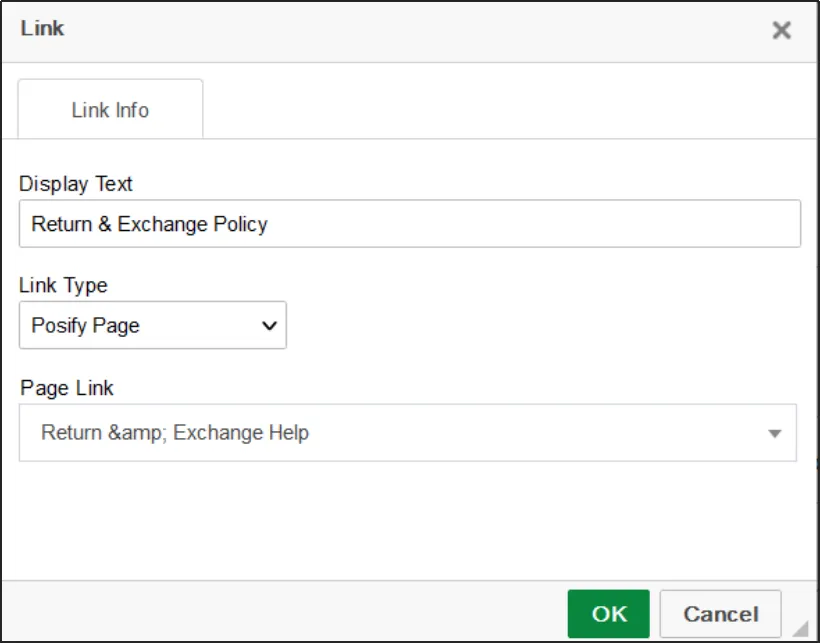
The text of the set link will be shown in blue.

Finally, you can add some [buttons] to the footer, such as Facebook, whatsapp, etc.
Drag and drop the [Button] component into the [Section] on the right.
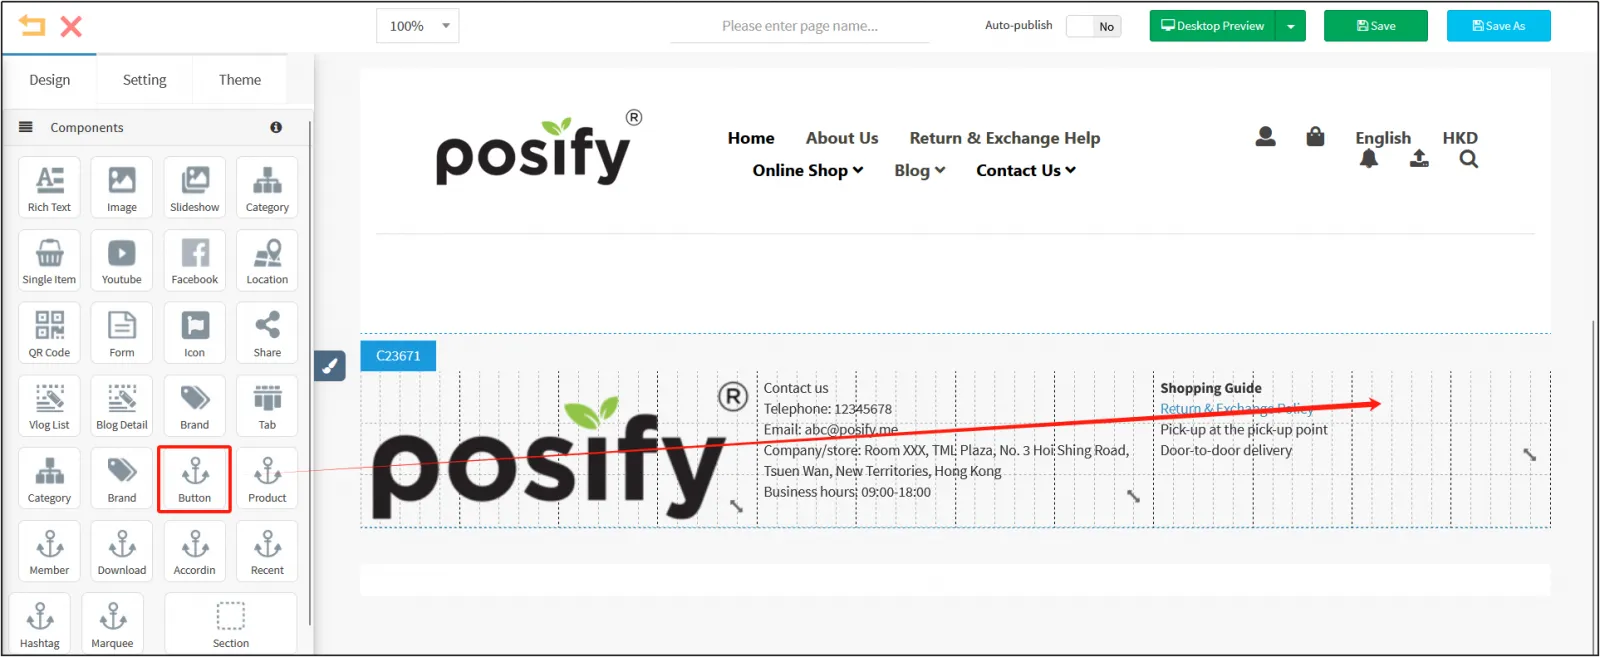
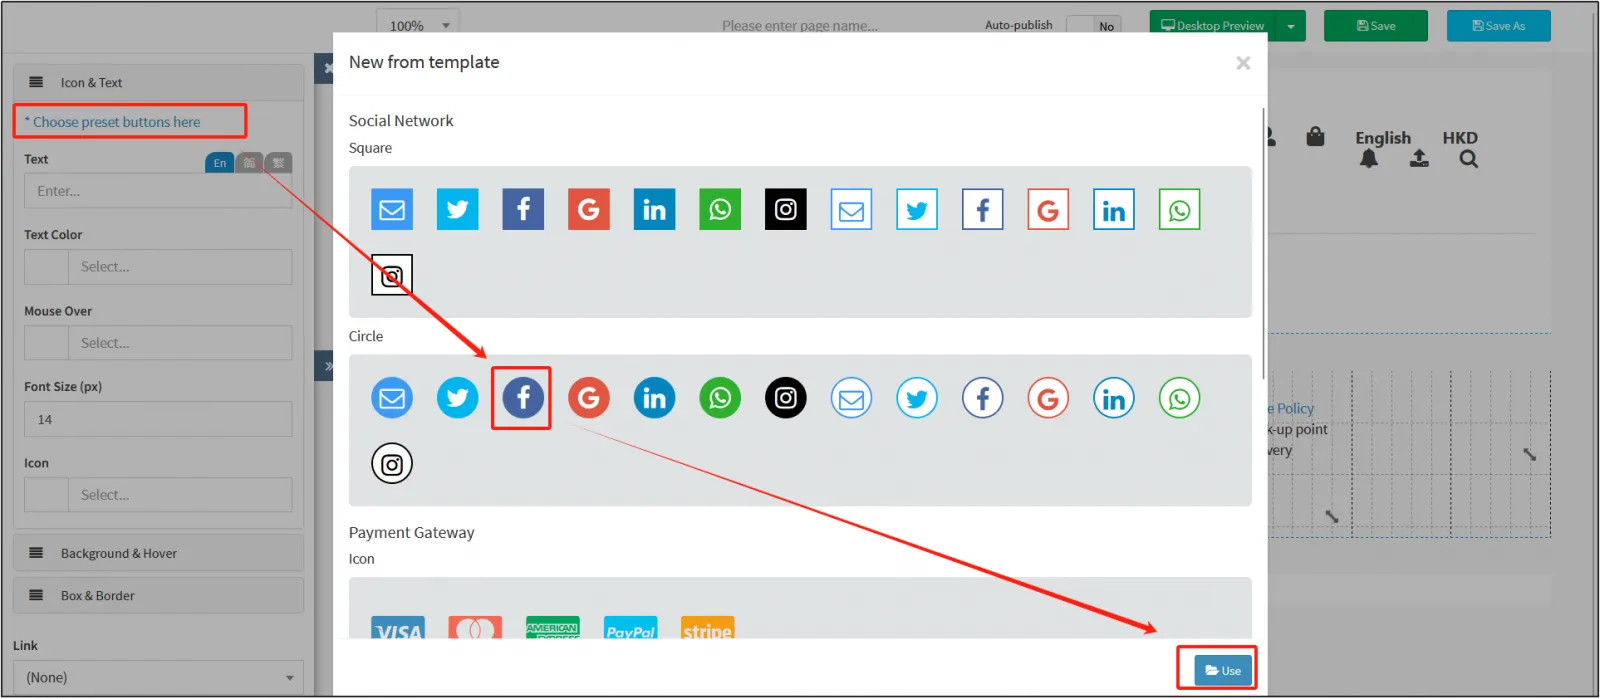
Click [Select Default Button from Here] to pop up the [Start with Template] pop-up, which includes many commonly used button templates. First, select a Facebook buttonclick "Use" to add to the footer.
In the edit panel on the left, click the drop-down box under Links.
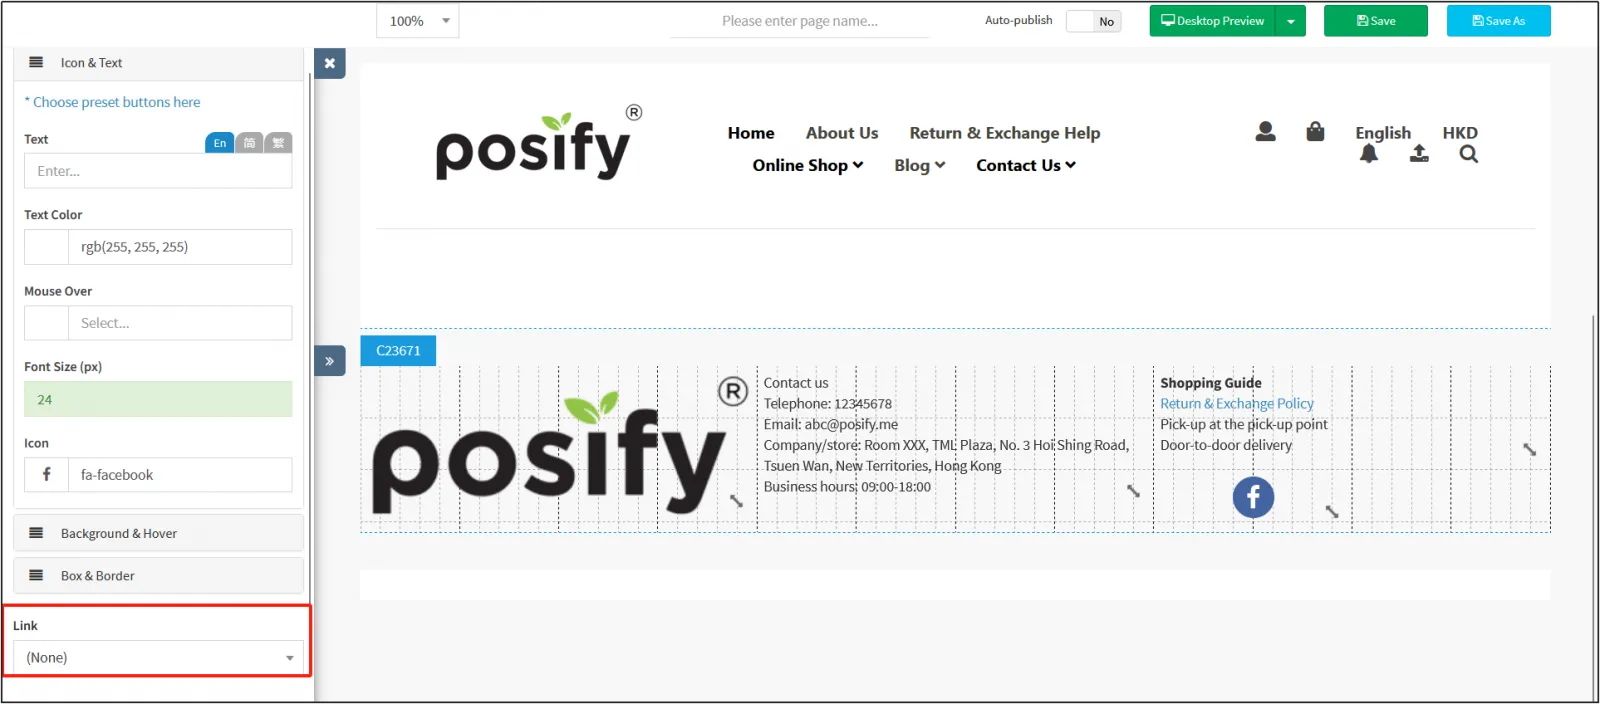
Enter your Facebook Page URL in the input box and click on the custom link so that guests will be redirected to your company's Facebook Page when they click on the button.
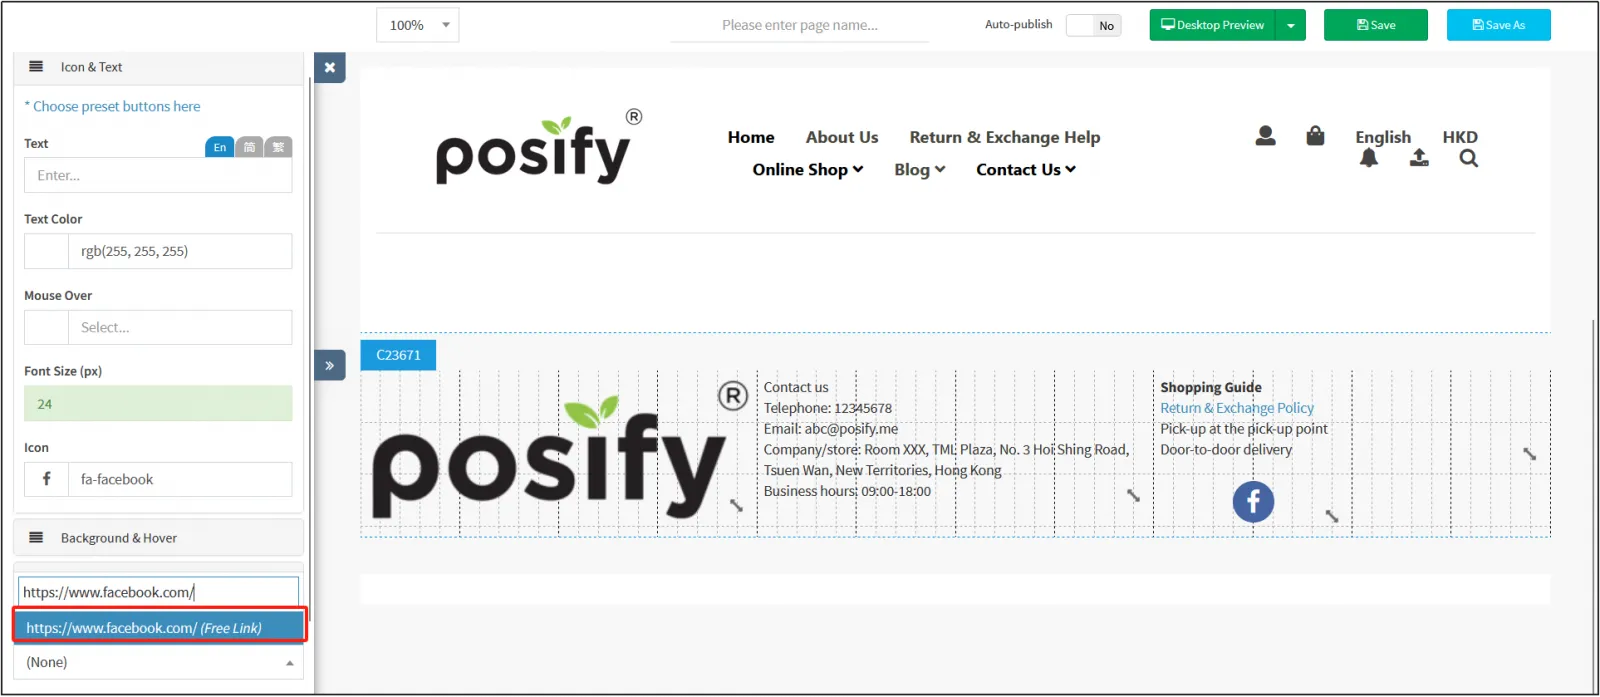
Finally, enter the page name: footer, select [Auto-publish] as Yes, and click [Save].

Follow the steps above and the website is ready.
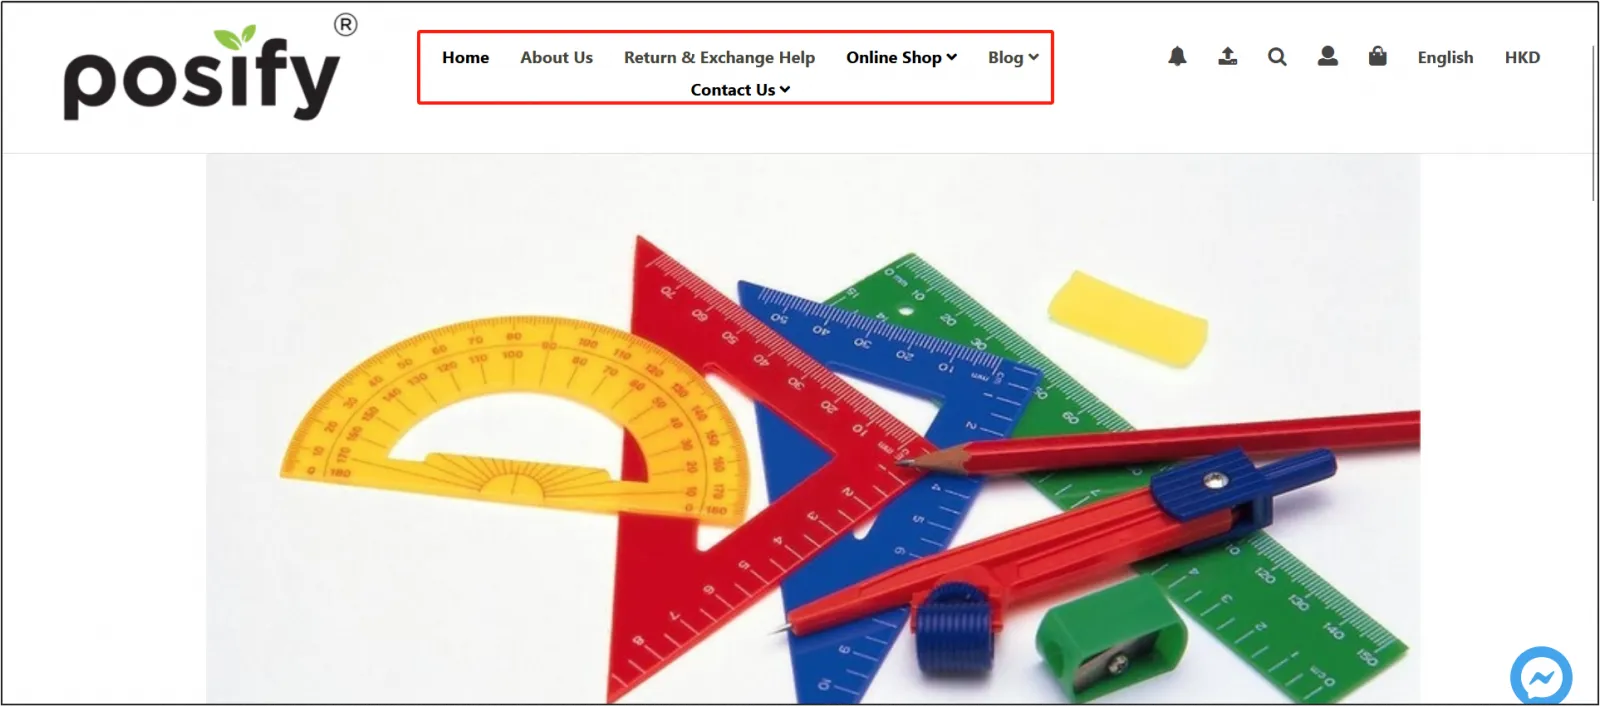
You can see the top navigation and ad image displayed on the website.
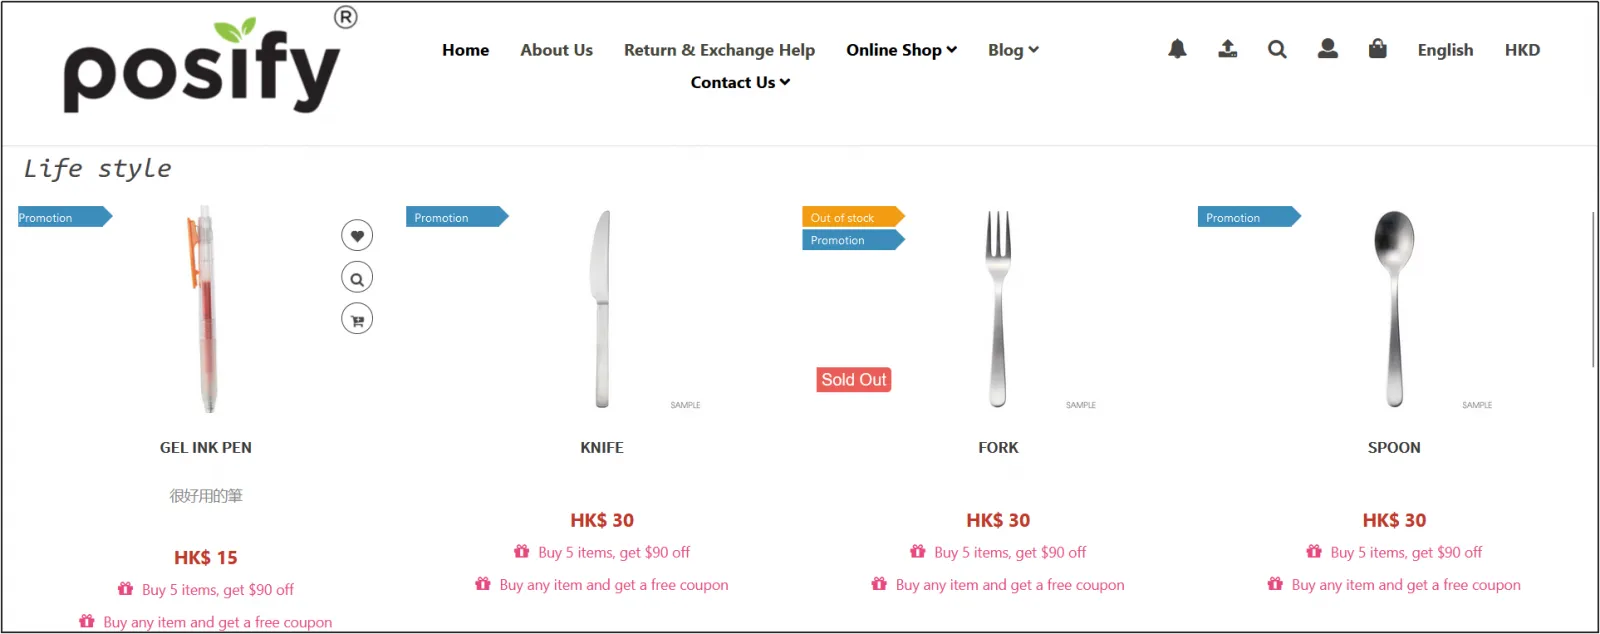
The website displays the content of Lifestyle.
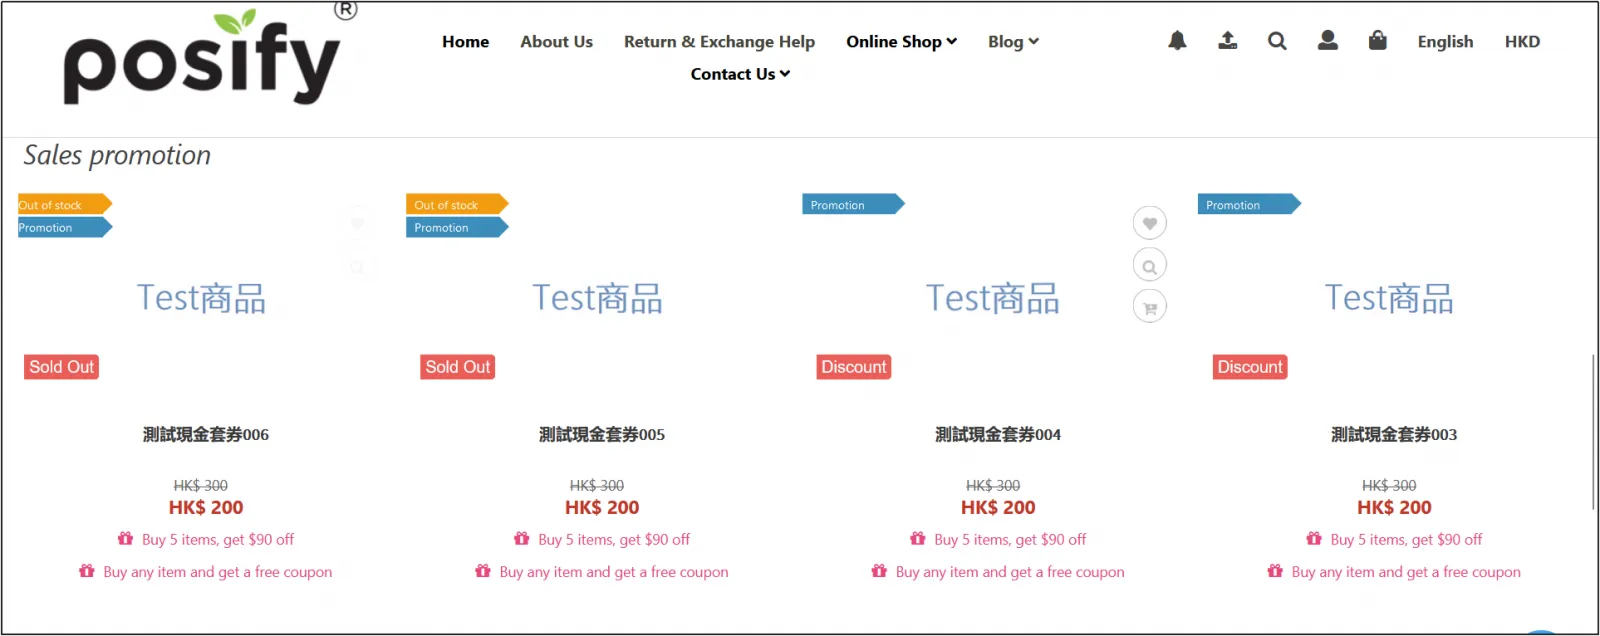
The website displays the content of the promotion.
The last footer content displayed on the site.

If you want the footer to be more colorful, then go back to the CMSclick on the online storeclick on the site navigationclick on the small pen icon after the footer of the page, go to the edit pageand click on the edit button in the footer section.
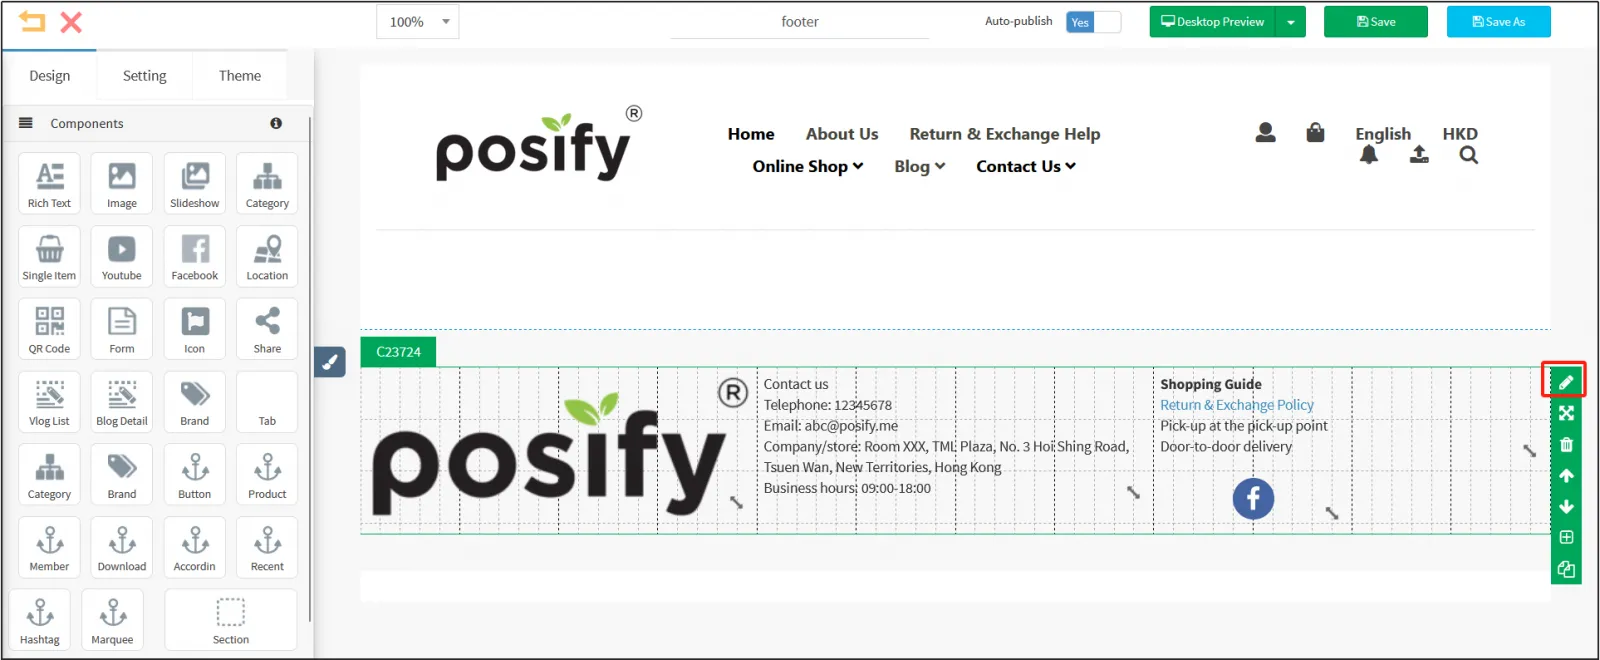
Adjust the background color in the footerclick [Save].
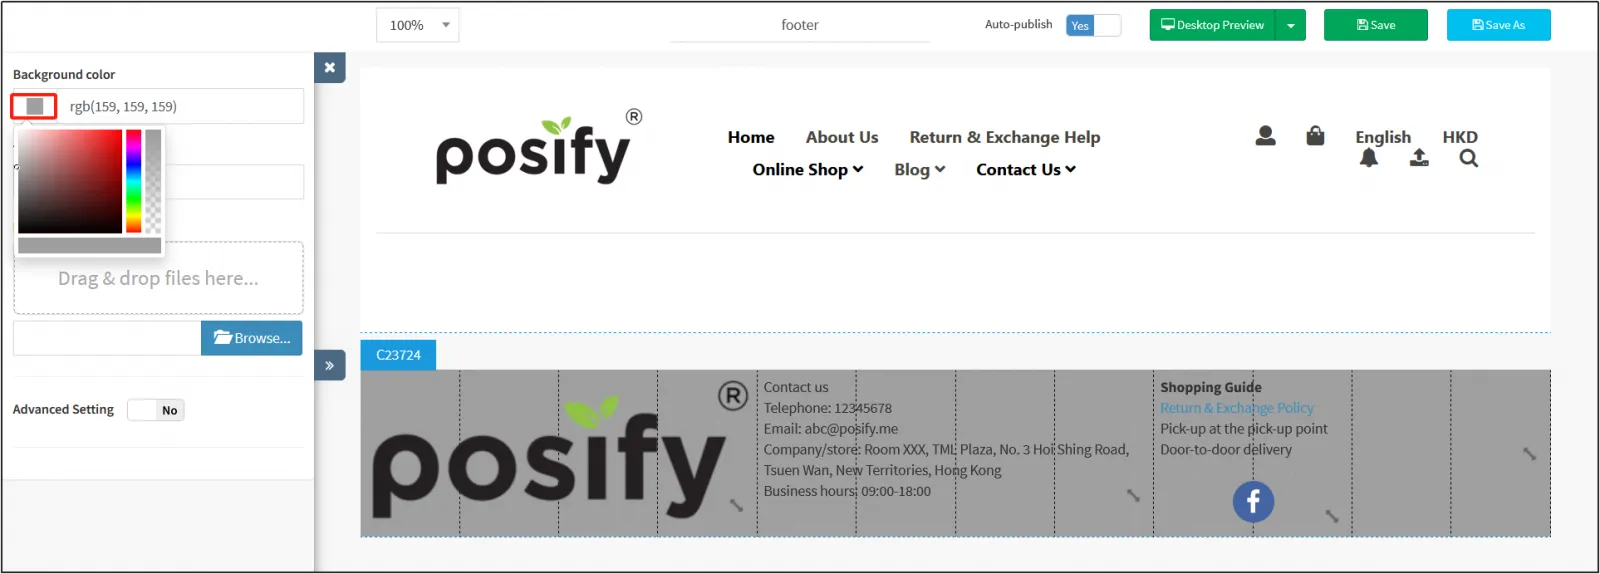
After that, you'll see the background color added to the footer in the online store.

View the privacy policy and terms and conditions in the online store
In the previous steps, we have made the [Privacy Policy Page] and the [Terms and Conditions Page].
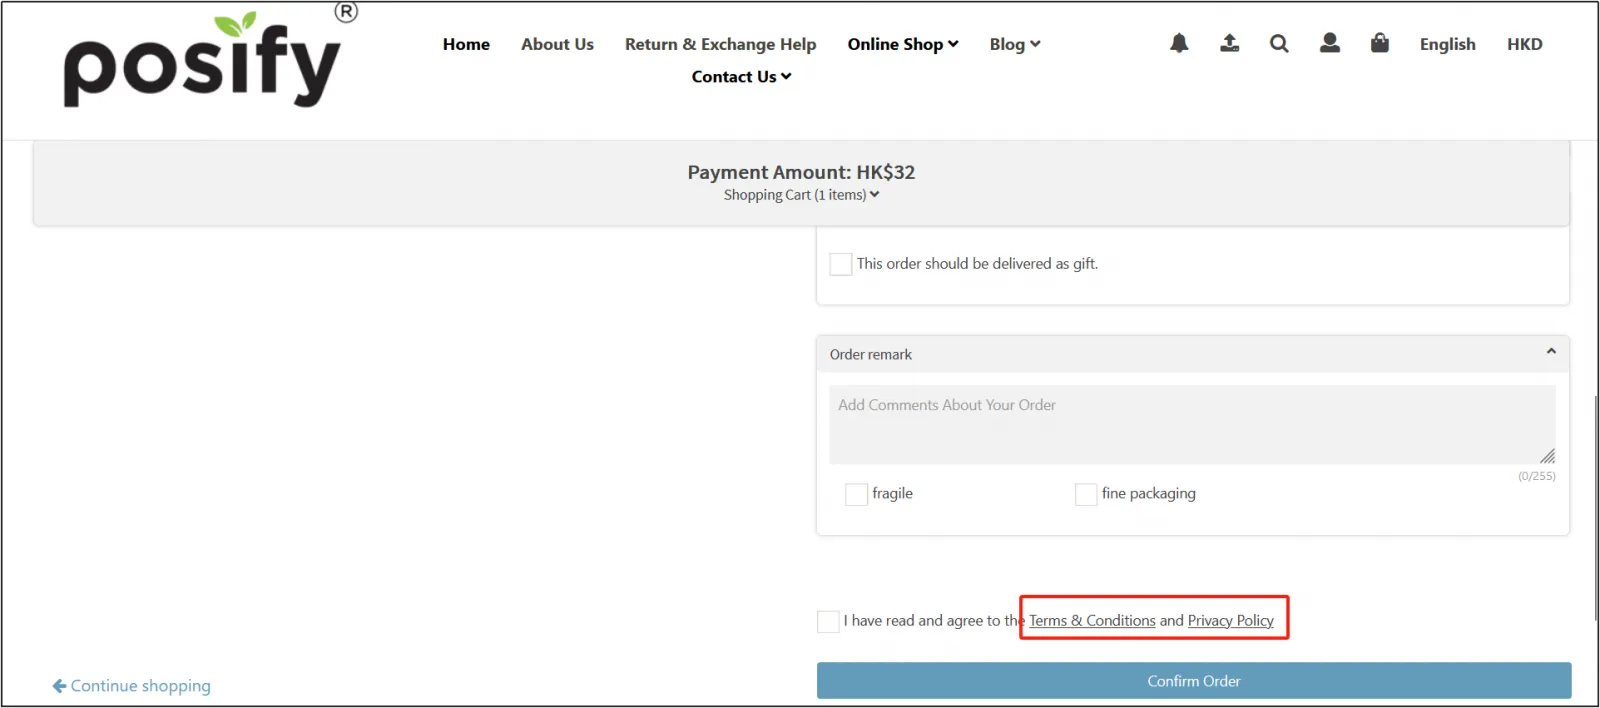
When customers make a purchase in the online store, at the last step of checkout, they can click on [Terms & Conditions] and [Privacy Policy] to jump to the corresponding page to view these policies and terms.