POS order process
The order process at a POS can be divided into two parts, placing an order, paying for the order, and shipping and picking up the goods.
Place an order and make a payment
The first is to choose the product, there are two ways.
The first method is to find products directly according to the category.
Click on the icon on the left to select a different category to select products under different categories.
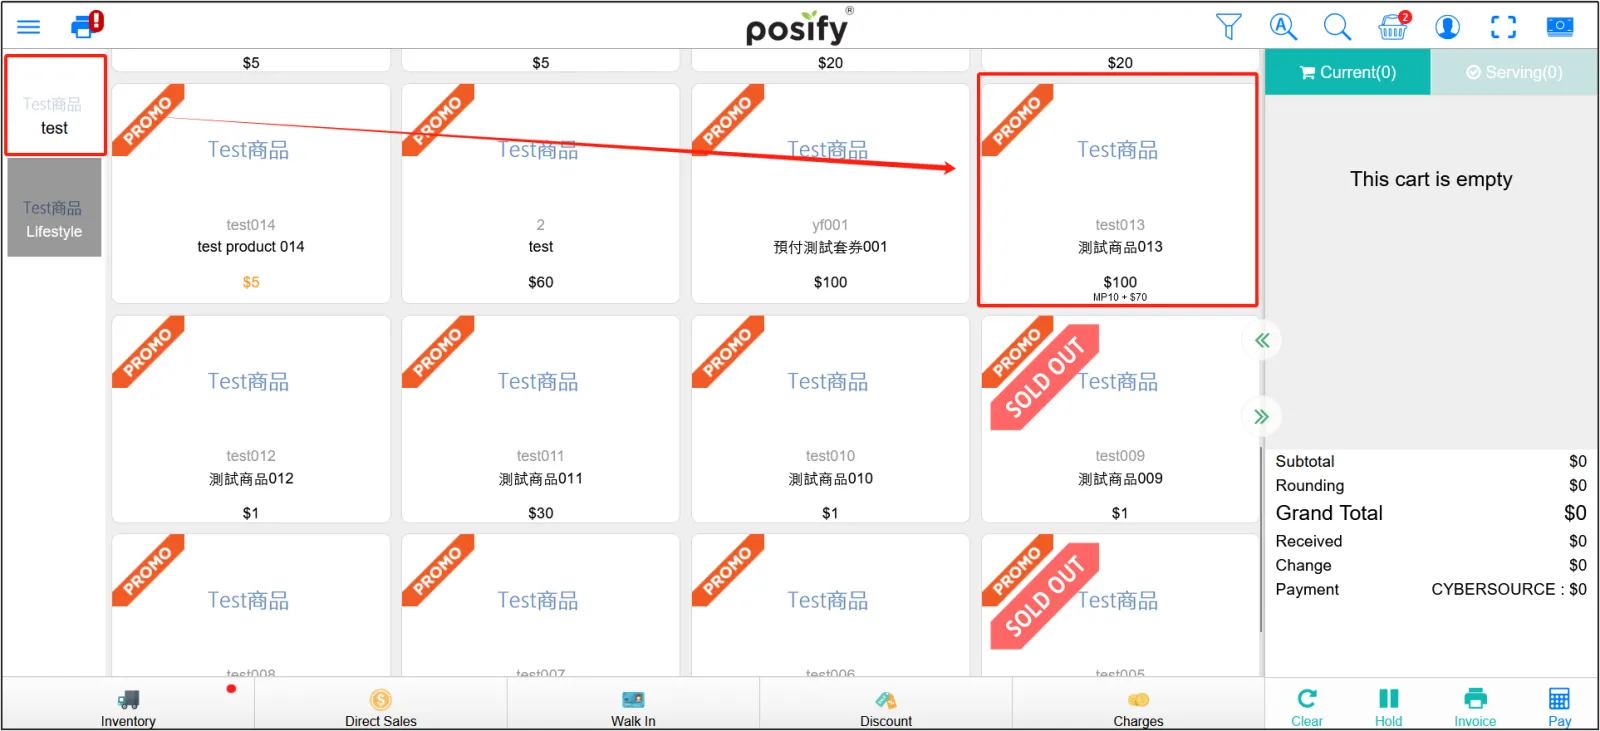
For example, if you want to select test product 013 and the category of test product 013 is test, you need to find and click on the test category first find and click [Test product 013] under the category of beauty care.
When you click on an item, it will appear in the shopping cart.
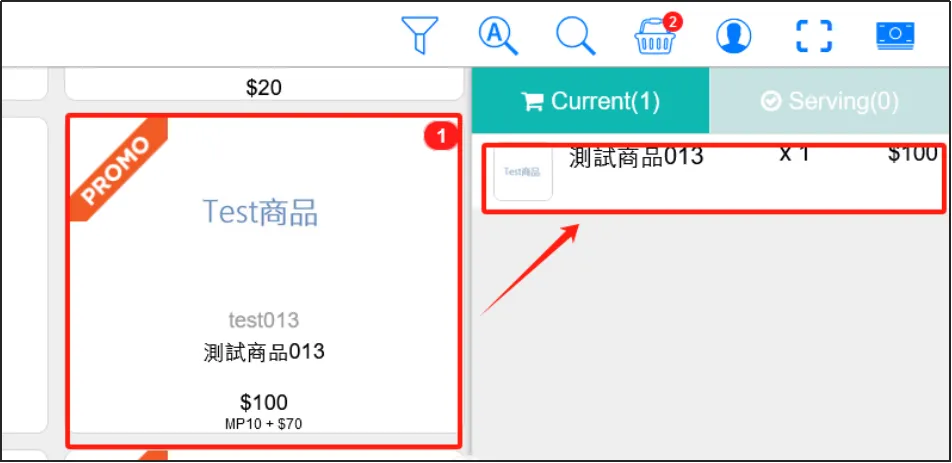
Click on an item in the shopping cart, and the upper right will display the data of the item's reservations, remaining stock, pending storage, and pending delivery. At the bottom left, you can adjust the quantity of purchased goodsClick "Save".
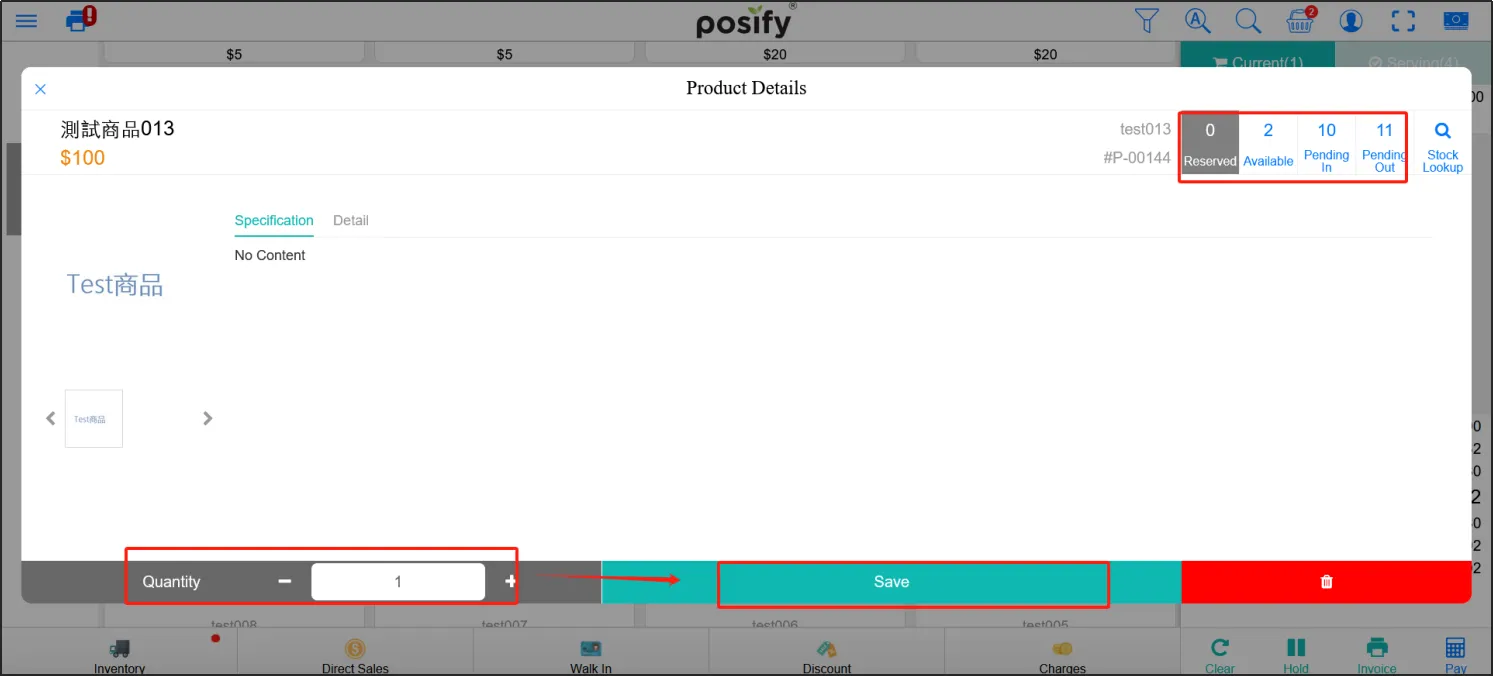
Remaining: The item is currently in stock and available for purchase.
To be warehousing: the number of products that have a warehousing plan but have not yet been warehousing. For example, if you transfer goods from other stores to the local area, but those goods have not been delivered, they are to be warehoused.
To be released: the number of products that have a plan to be released but have not yet been released. For example, if the goods have not been shipped or are still waiting for the customer to pick up, they are waiting to be shipped out.
The second way is to search for an item by entering the information.
Click  in the upper right corner enter the content you want to search in the input boxPress enter.

The searched is about the product, which can be the product ID, the product name, or even the information in the details.

For example: if you want to search for Nars foundation, enter "foundation" in the input box, you can search for products related to foundation, find Nars foundation in it, and click to add to the shopping cart.

In addition, Web Pos also supports scanning qr code with Scanner to obtain product information, and connecting with micro USB.
If you want to delete items in the shopping cart, there are also two methods.
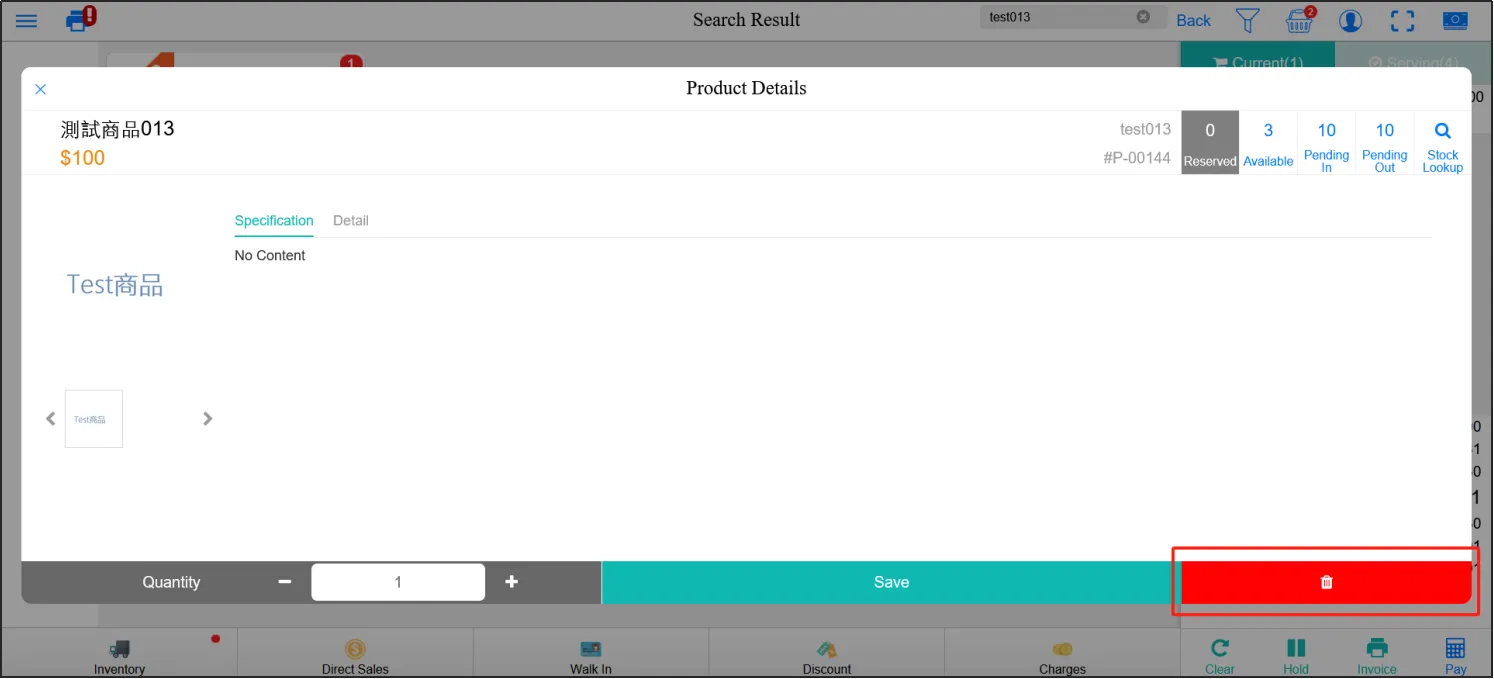
The first is to click on an item in the cartClick the trash can in the lower right corner.
The second is to press and hold the product you want to delete in the shopping cart and slide to the leftClick [Delete].

Once the purchased items have been added to the shopping cart, proceed to the next step.
If a customer has a registered membership, they can use their membership status to make purchases.
Click "Visitor".

Enter the customer's name, card number or phone number in the input box and press Enter to search for the customer's membership information.

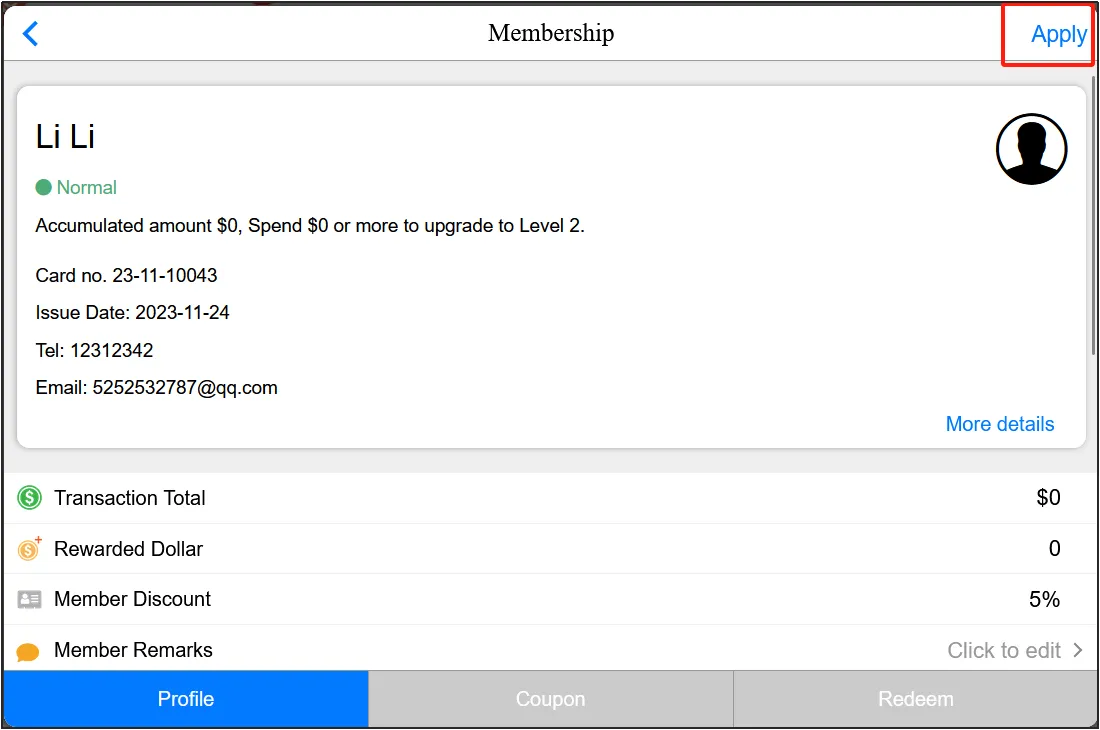
Click and open the member informationclick [Apply] in the upper right corner to purchase products as this member.
Next, you'll want to choose a pickup method, discounts and coupons, and other charges.
First of all, look at the delivery method.
There are three pick-up methods: dropshipping, self-pickup, and delivery.
Direct selling: shopping on the spot, the customer picks up the goods and leaves directly after payment.
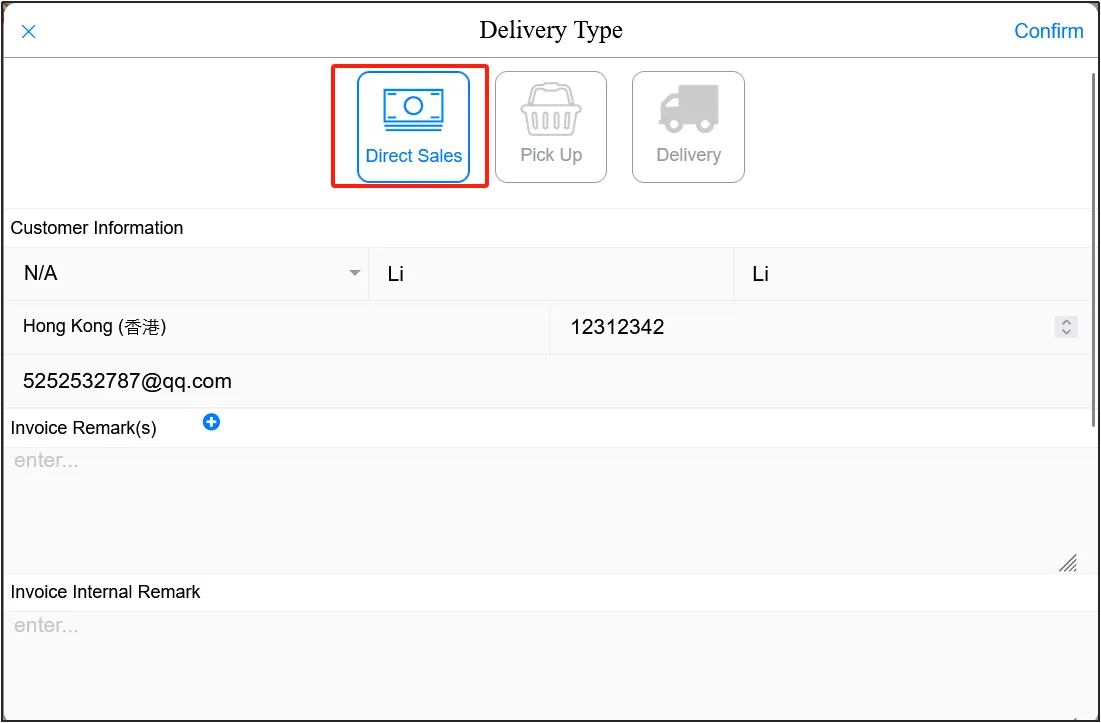
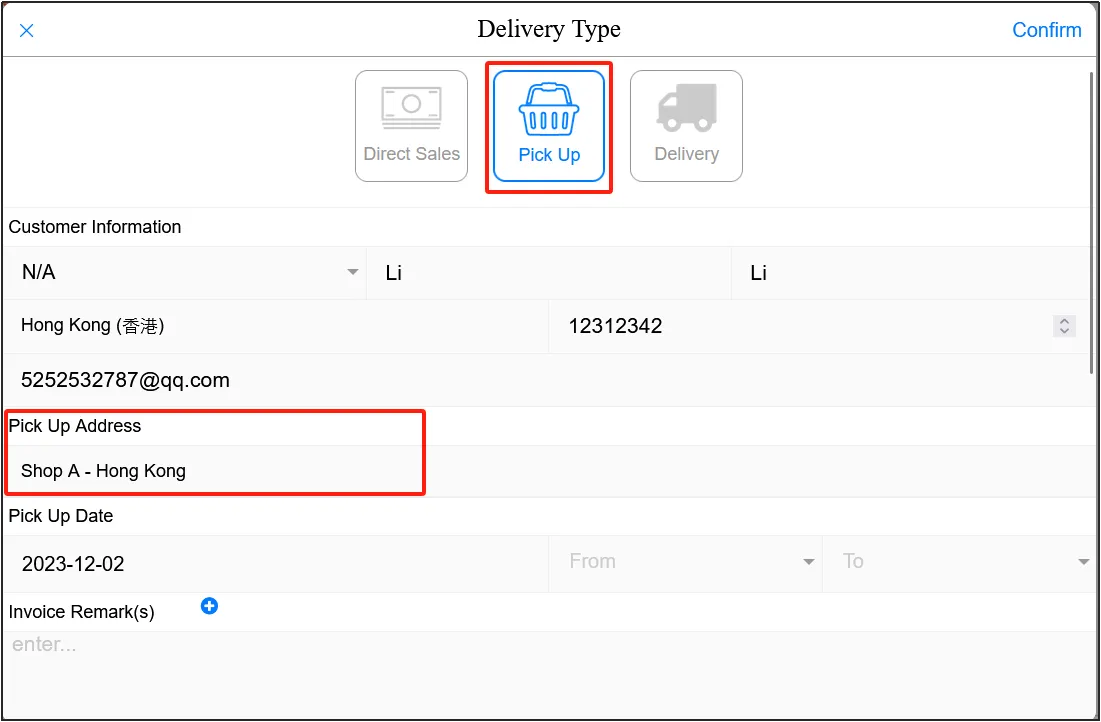
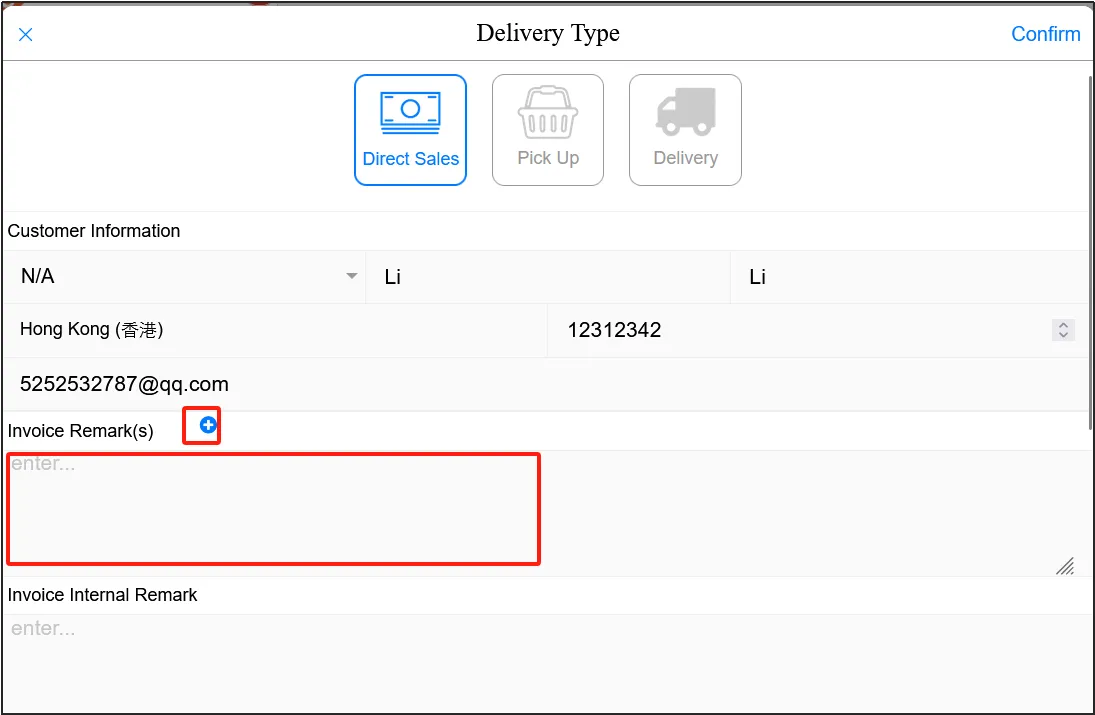
Self-pickup: Customers set the time and store and pick up the goods by themselves. The store where the goods are picked up may not be the same as the store where the order is placed and paid for. Click the location shown in the red box in the figure below to choose the self-collection address.
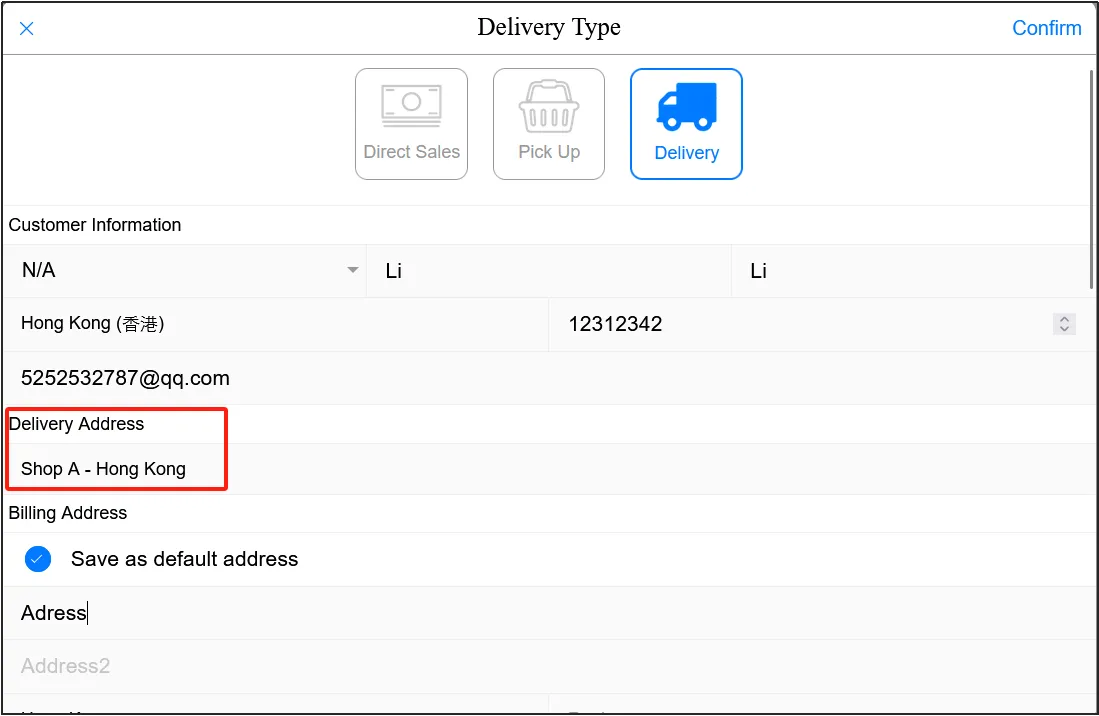
Delivery: Customers leave their contact information, confirm the delivery method and date and time, and the merchant will deliver the goods to the designated address on time. The delivery address can be determined according to the merchant's situation. Click the position shown in the red box in the figure below to select the shipping address.
If necessary, you can enter a comment in [Order Notes], or press the "+" on the right side of [Order Notes] to select a preset note.
Here's how to preset notes:
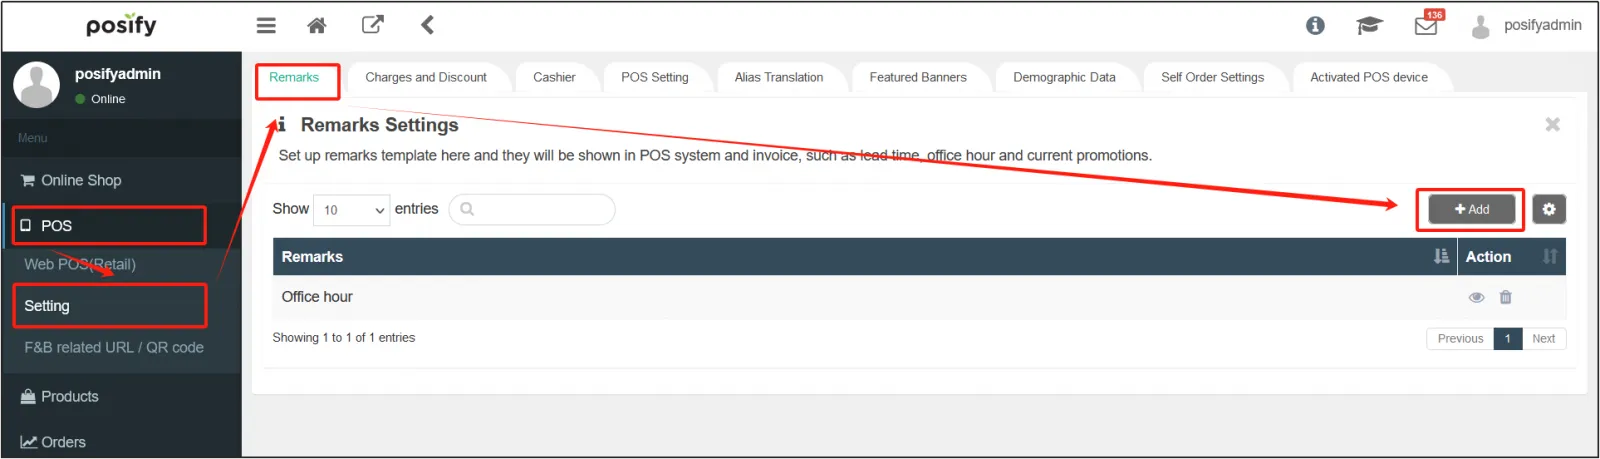
Open the CMSclick POSclick Settingsclick Notesclick [Add], and add a new preset note.
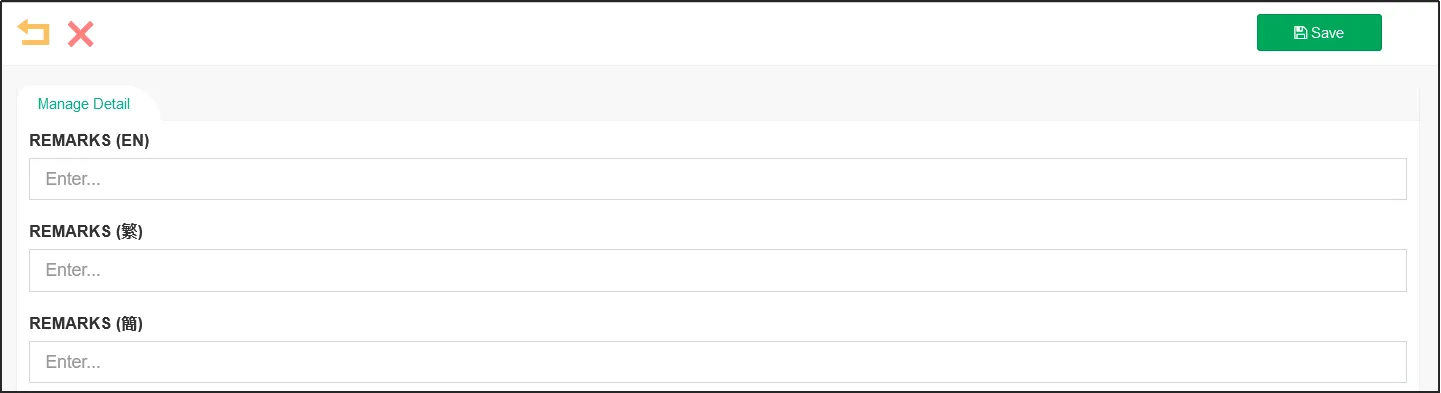
Enter the notesclick [Save].
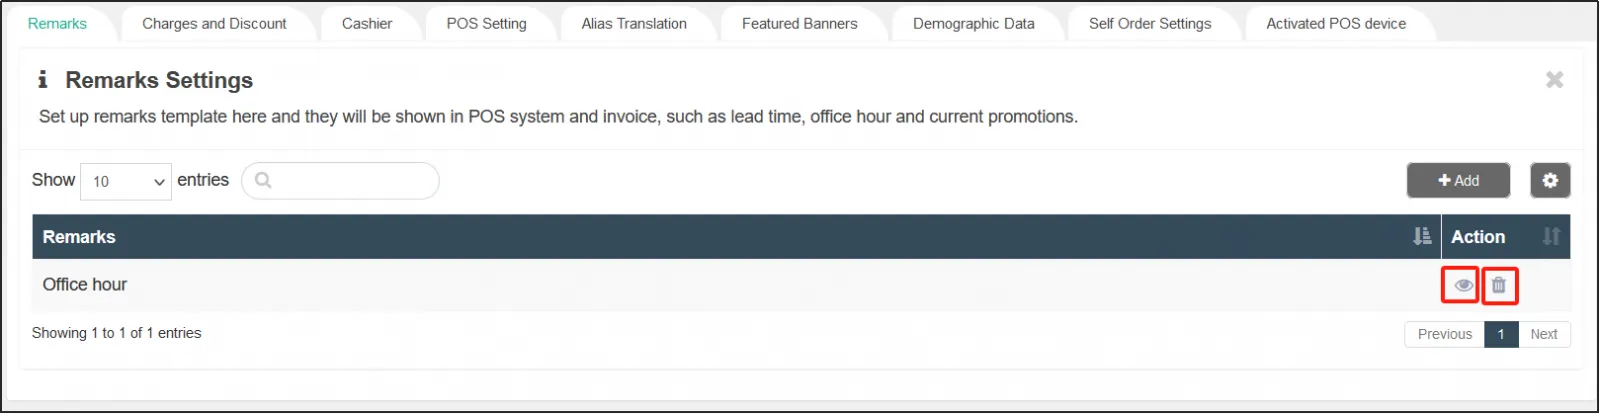
Click  to the right of the note to edit the note, and click
 to delete the note.
Click "Discount” to select coupons or presets (discounts)to participate in the promotion.
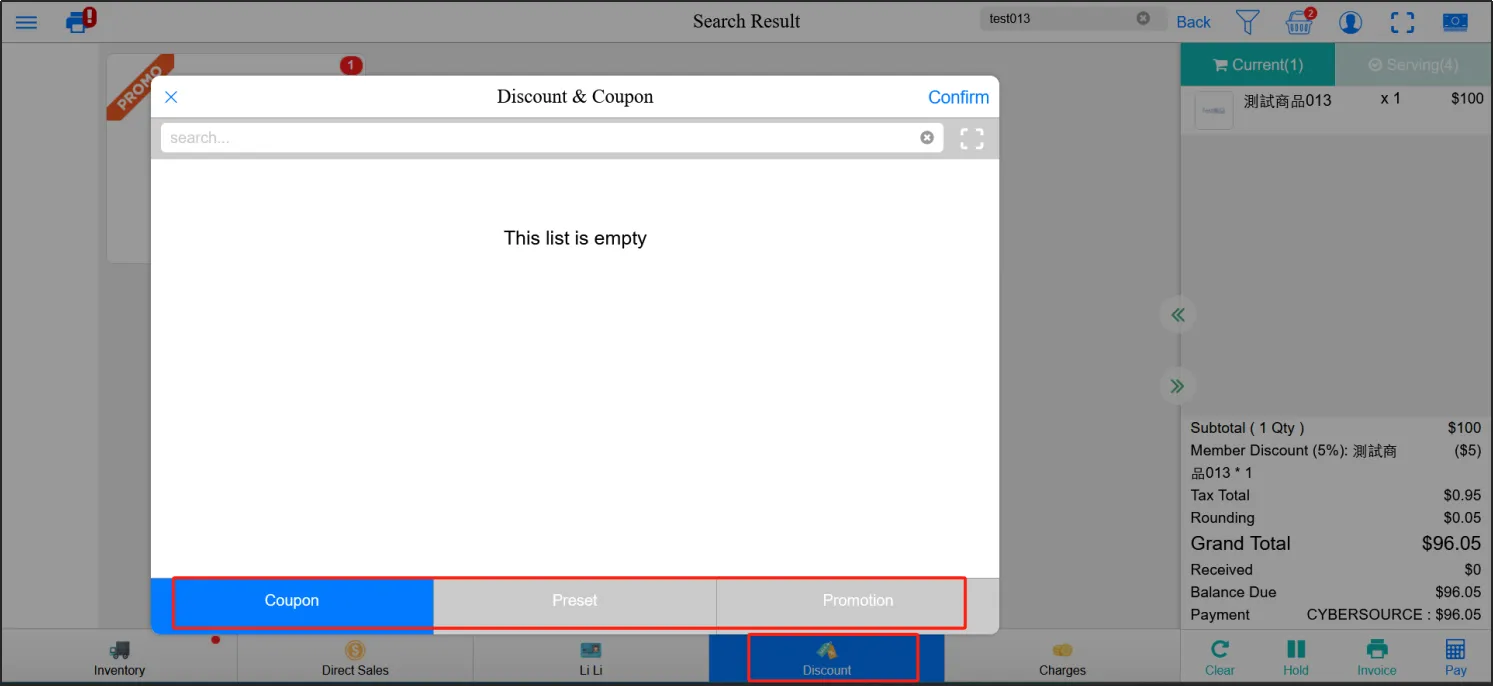
Coupons and promotions are part of marketing. and for details on how to set up coupons and promotions, please refer to themarketing- related playbook.
While the preset (discount) and other subsequent charges that follow are preset in the CMS.
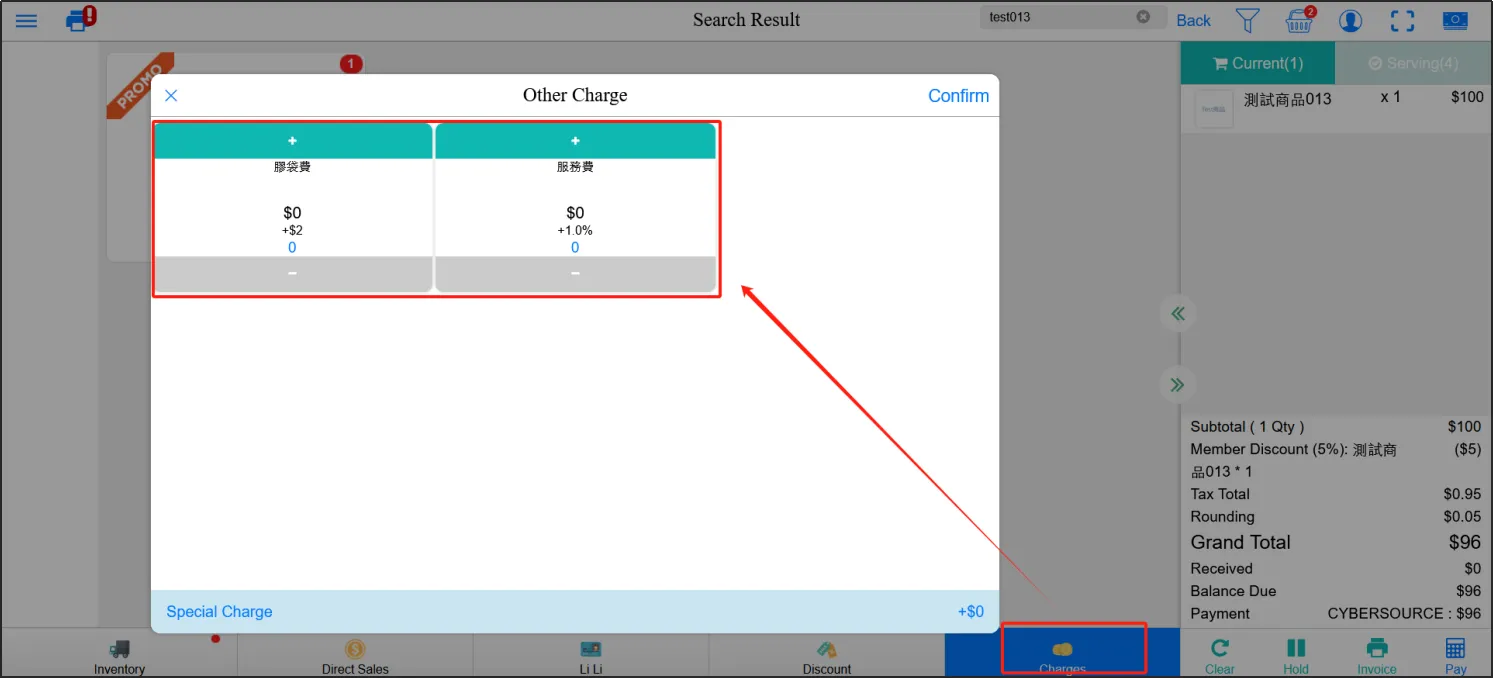
The following describes how to preset presets (discounts) and other charges.
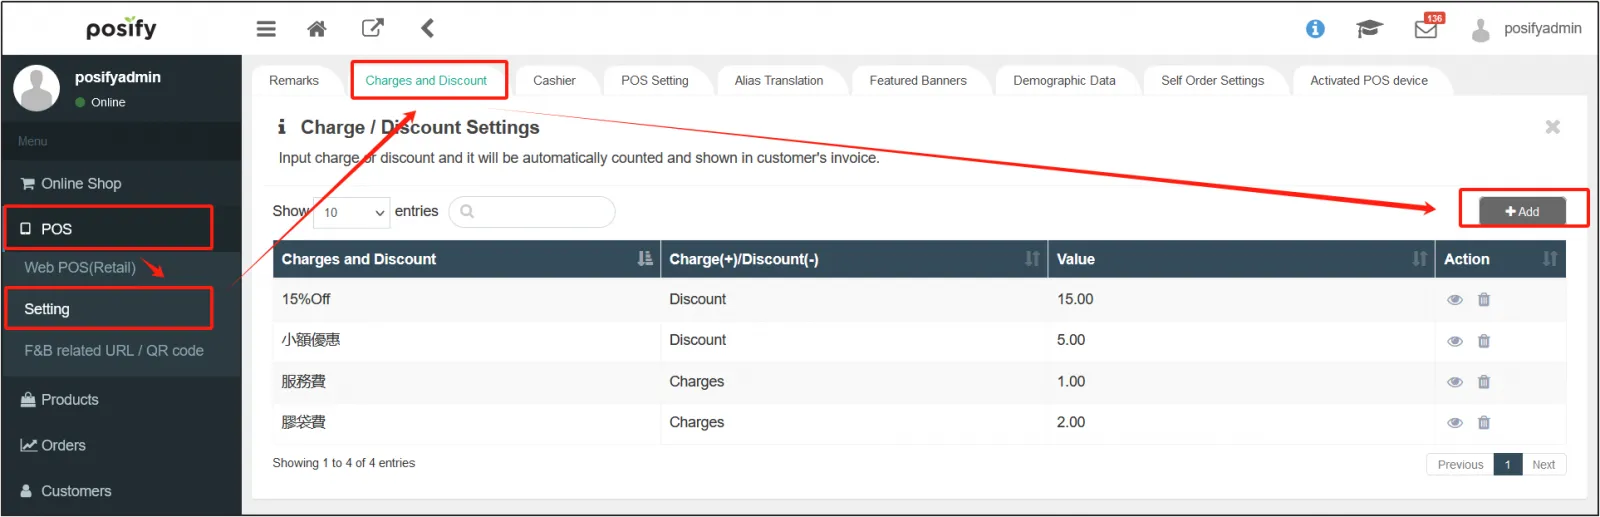
Click POSClick settingsclick Settingsand click the tab to display additional charges and discountsClick [Add] on the upper right to add a fee/discount.
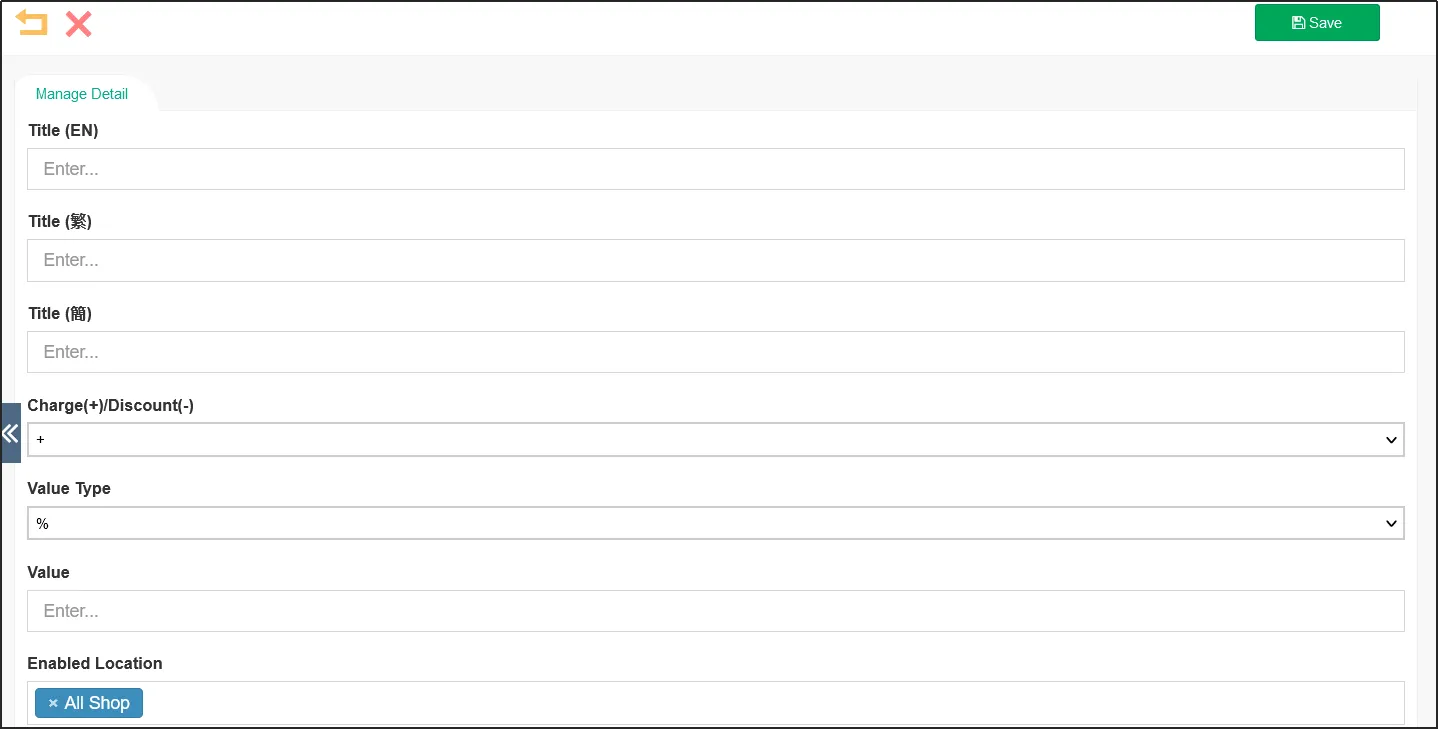
Enter the nameand select whether it is a charge or a discount.
If you choose to charge, it is other charges, and if you choose discount, it is preset (discount).
Select percentage or actual amountto enter the set value.
For example: I choose discount, percentage, and enter the set value "20", which means a preset discount of 20%.
Select an available locationand click [Save] on the upper right to complete the setting.
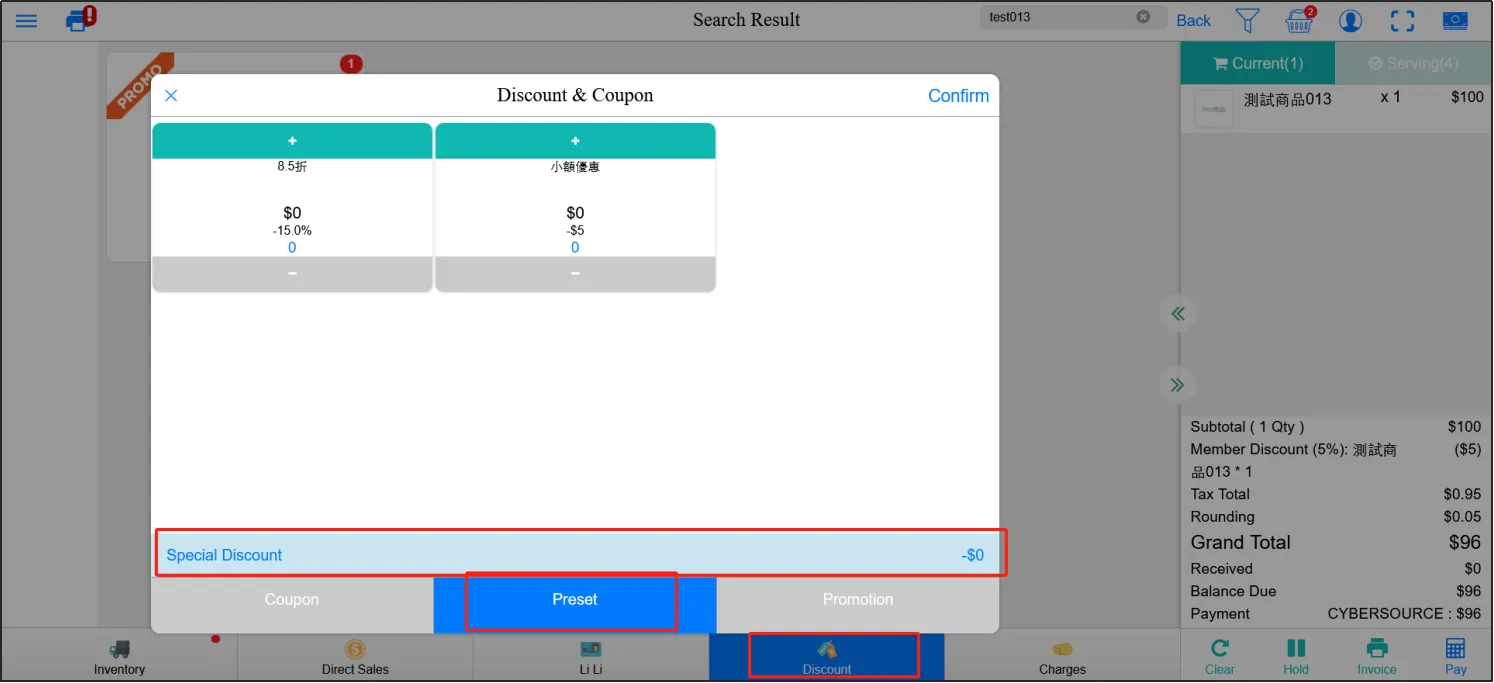
If there are no preset presets (discounts) or other charges, you can also set up special offers and special fees.
Tap [Discount]Click [Preset]Click [Special Offer] to set a discount for the current order.
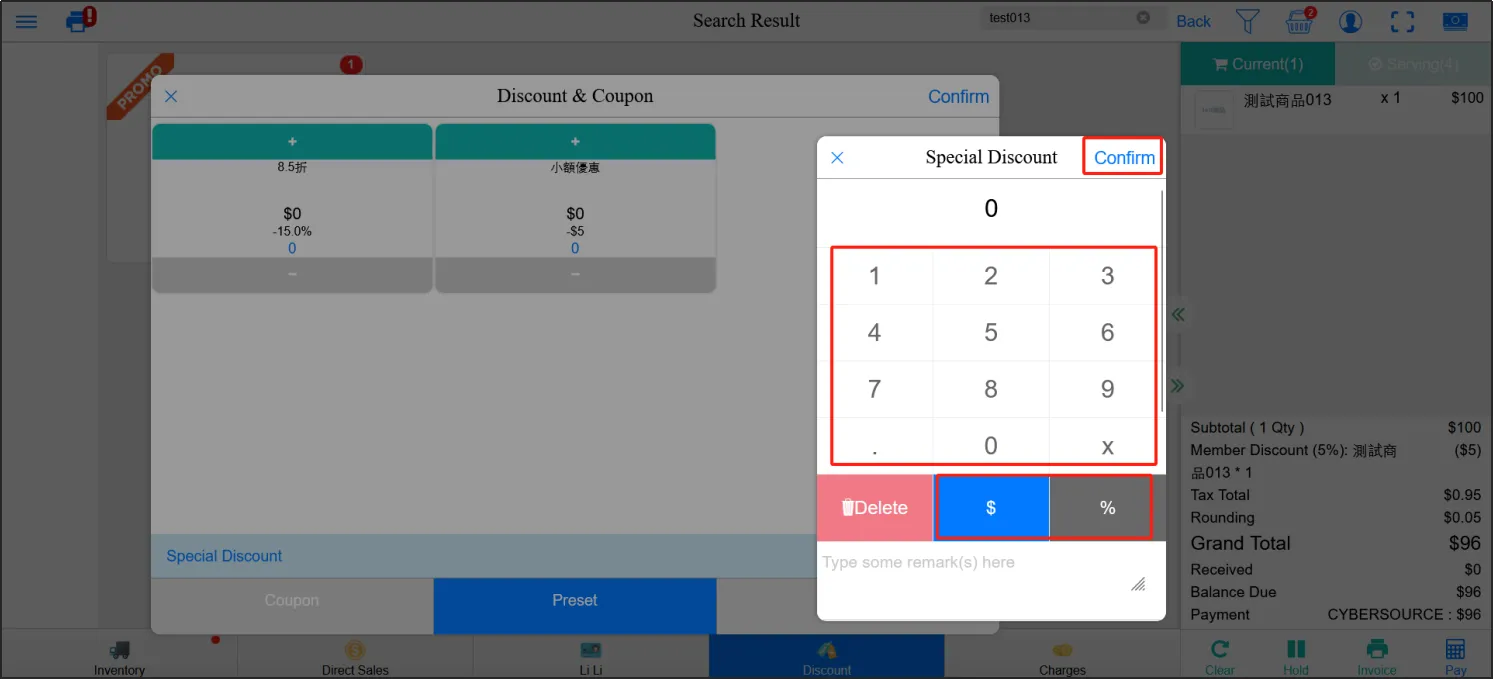
Enter your settings, select an actual amount or percentage, and click Confirm to complete the setup.
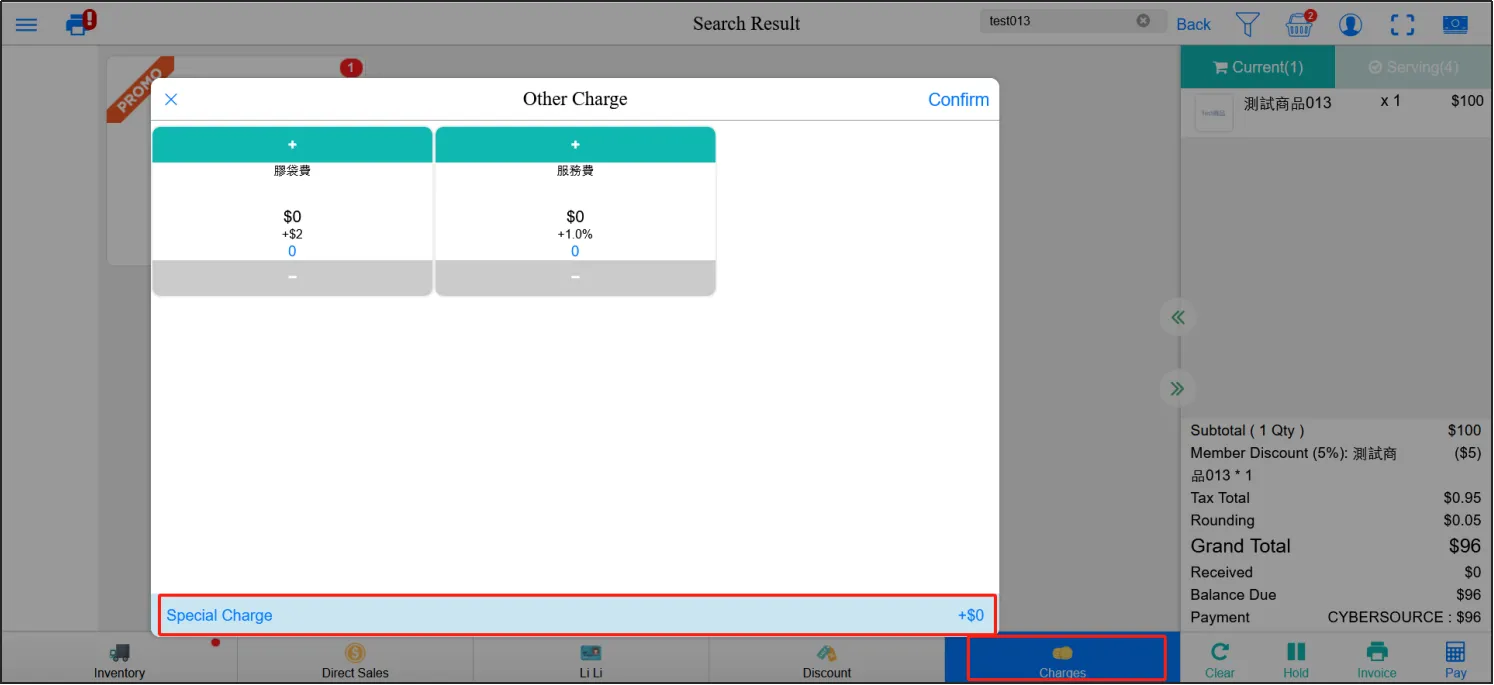
Click [Other Charges]click [Special Charges] to set a charge for the current order, and the setting method is the same as for the special offer above.
Click Payment methodsselect one or more payment methods. If you choose to pay in cash, you need to fill in the amount of money received (actual collection), and the amount of money to be found (redemption) will be automatically displayed after filling in. Other payment methods do not need to be filled.
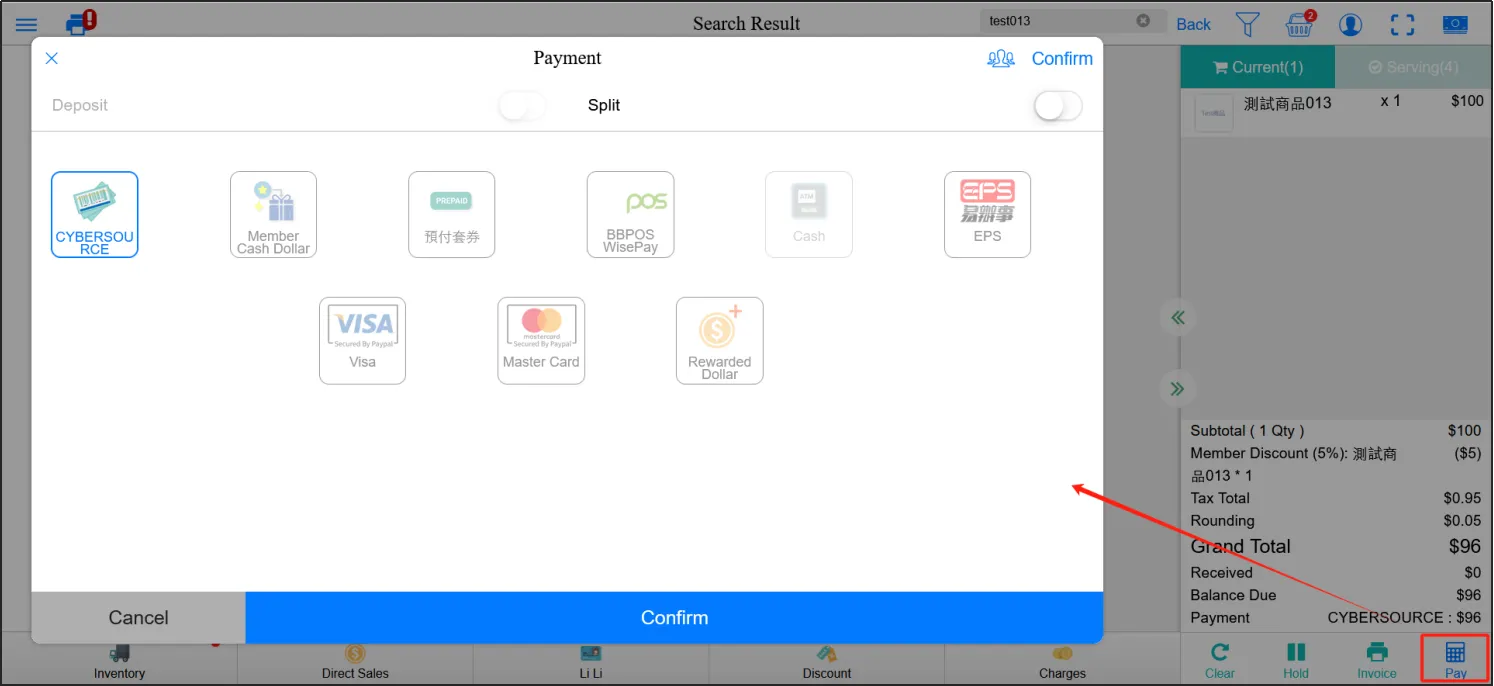
If you choose multiple payment methods, you need to click the separate button on the upper right toill in the amount paid by each payment methodclick confirm and pay.
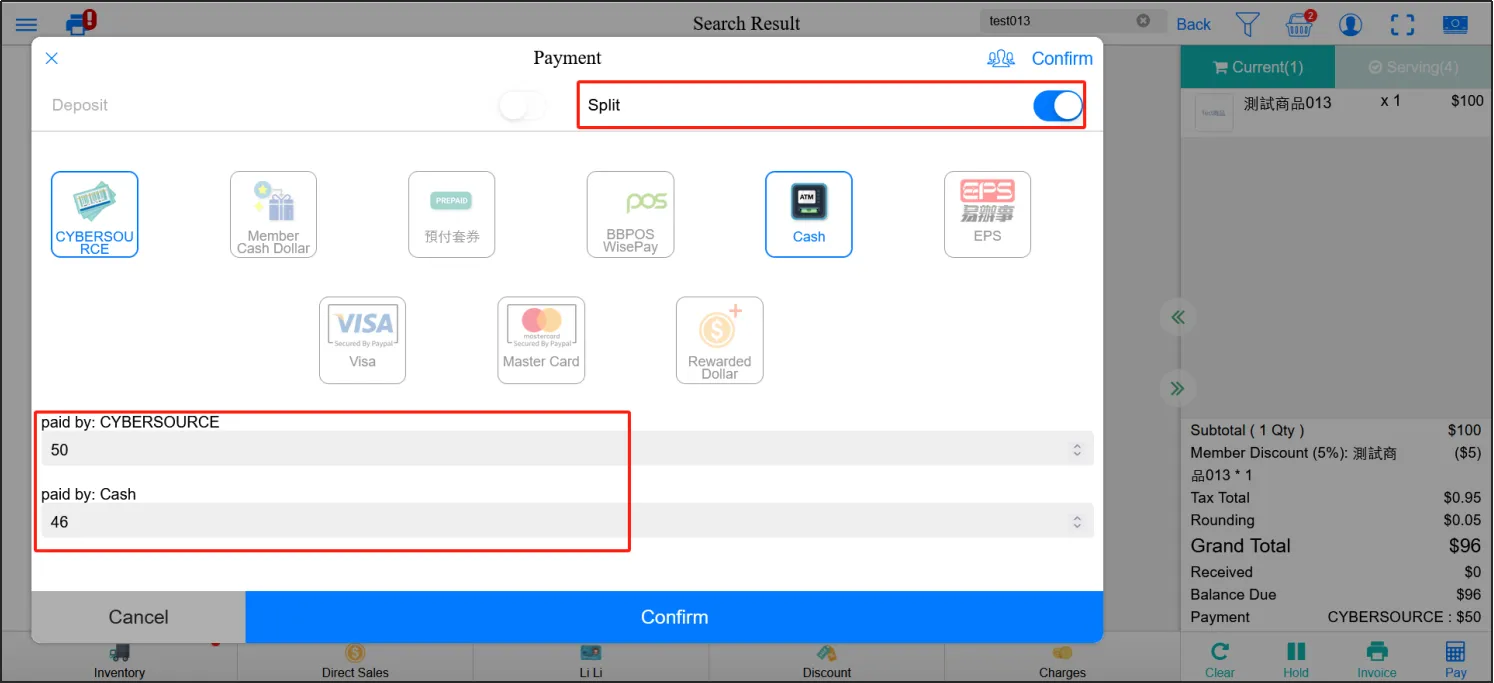
After the payment is successful, a new window will pop up showing the receipt. If necessary, you can click the printer icon in the upper right corner to print.
Pickup and Delivery
If the pick-up method is self-pickup, at least the surname and mobile phone number must be filled in, and the store for self-pickup must be selected. It is possible to place an order at store A and pick it up at store B.
You can also leave the customer's email address, choose the date and time of self-pickup, and fill in additional notes.
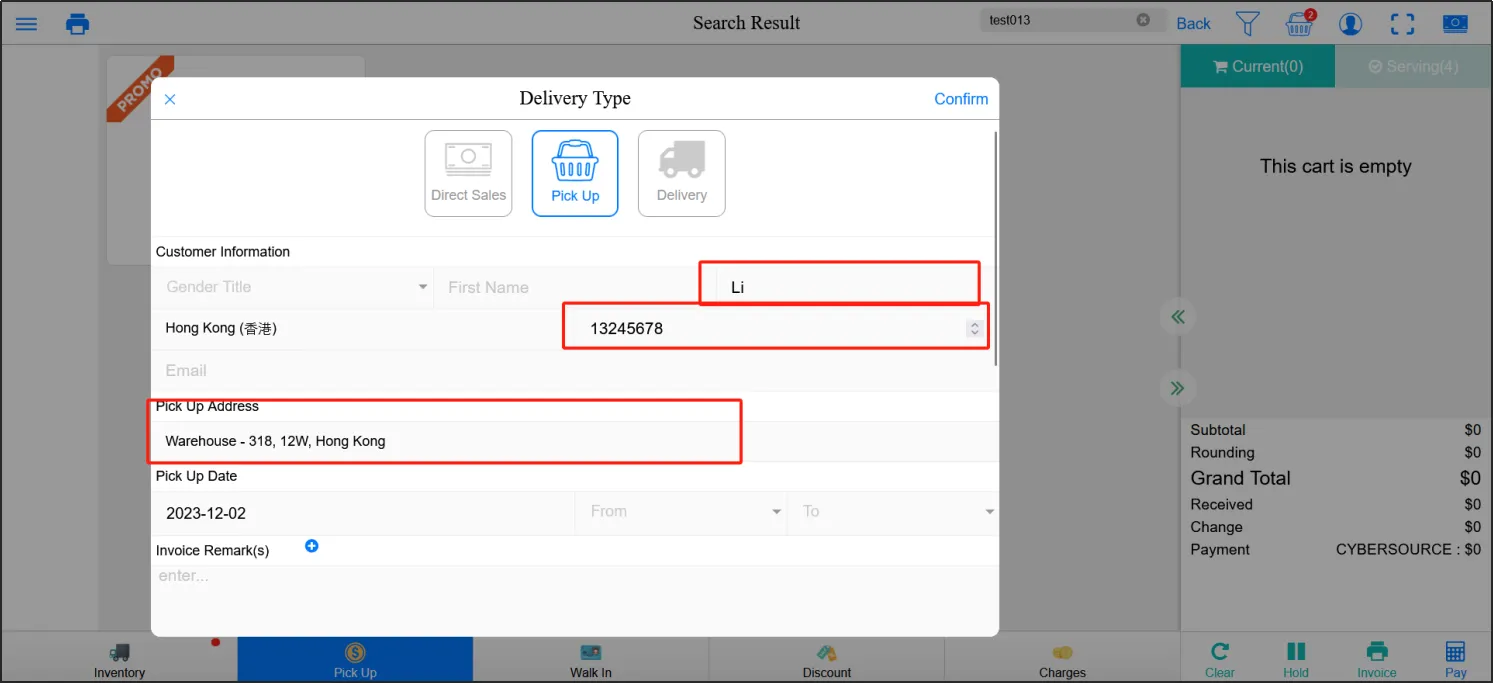
After the payment is completed, you can see on the POS of the selected store that a red number is displayed on the flower basket icon in the upper right corner, which represents the number of self-pickup orders currently waiting to be picked up.
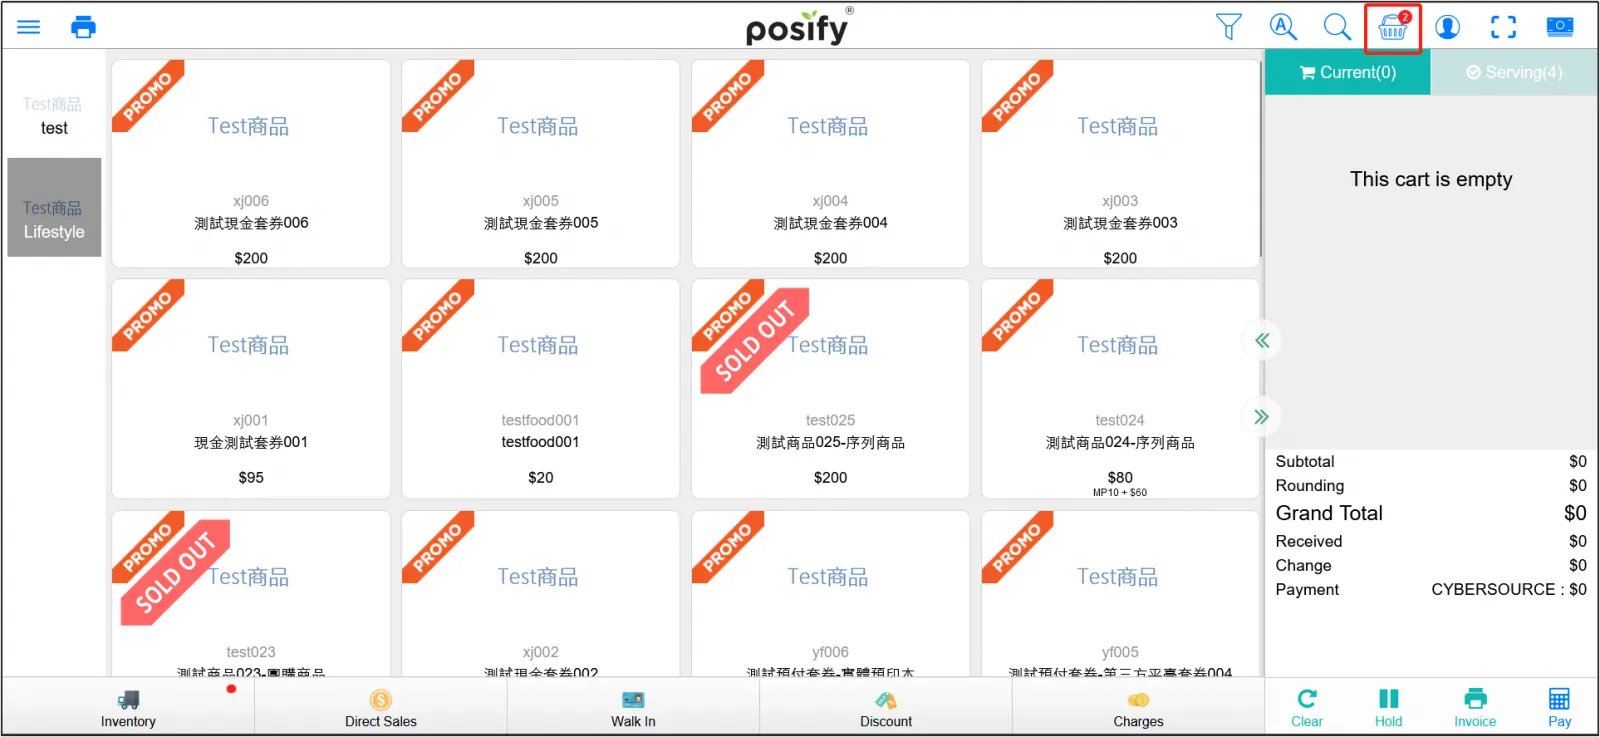
Click the flower basket iconenter the self-pickup page, find and click the self-pickup order of the customer who came to pick up the goods. You can enter the order number, customer name or phone number in the input box.

Click to open the pick-up order, the default is to take out all the goods, but you can also adjust it yourself, check the goods you want to pick up, and the quantity to take out. The remaining goods that have not been picked up can be taken out again next time, and the goods can be picked up multiple times until all the goods have been removed.
Click [Confirm] to take out the goods.
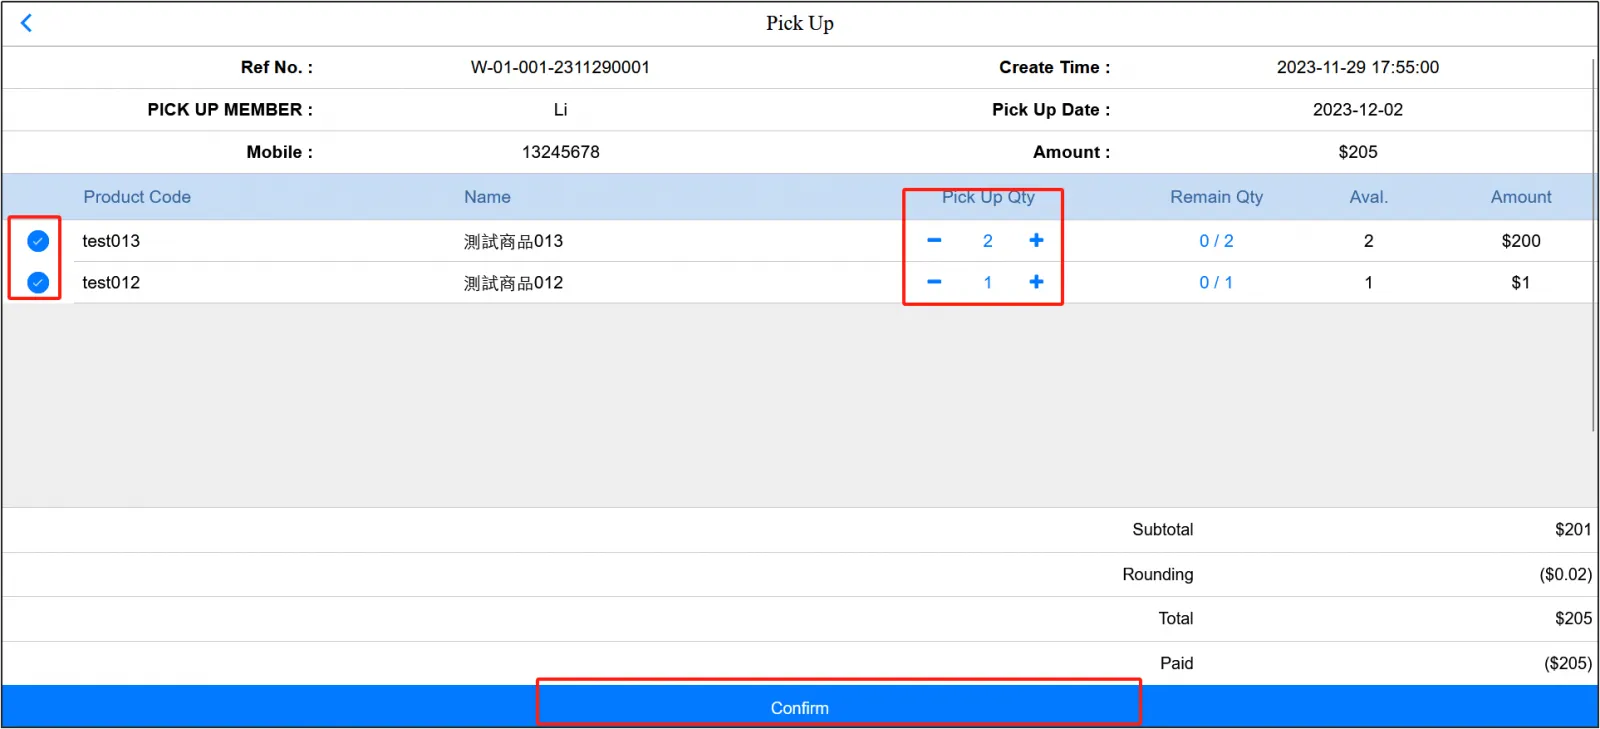
Once all the goods in the order have been removed, the order can be fulfilled.
If the delivery method is delivery, at least the surname, mobile phone number, delivery method and address must be filled in. The merchant can choose a different delivery address according to the situation, and can also leave the customer's email address for easy contact, and fill in additional notes.
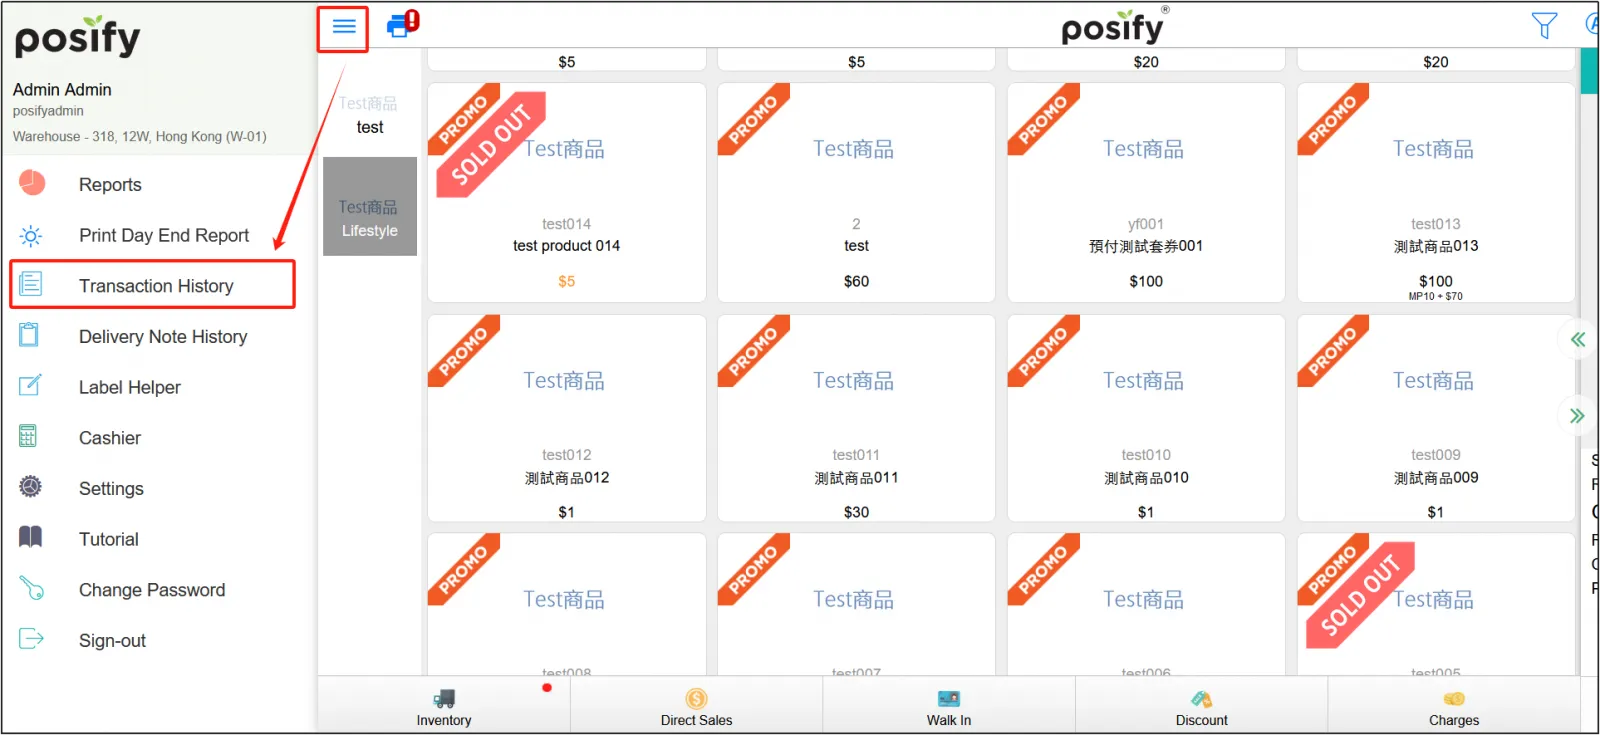
Once the purchase is complete, click on the three bars in the upper left cornerClick on Transaction History.
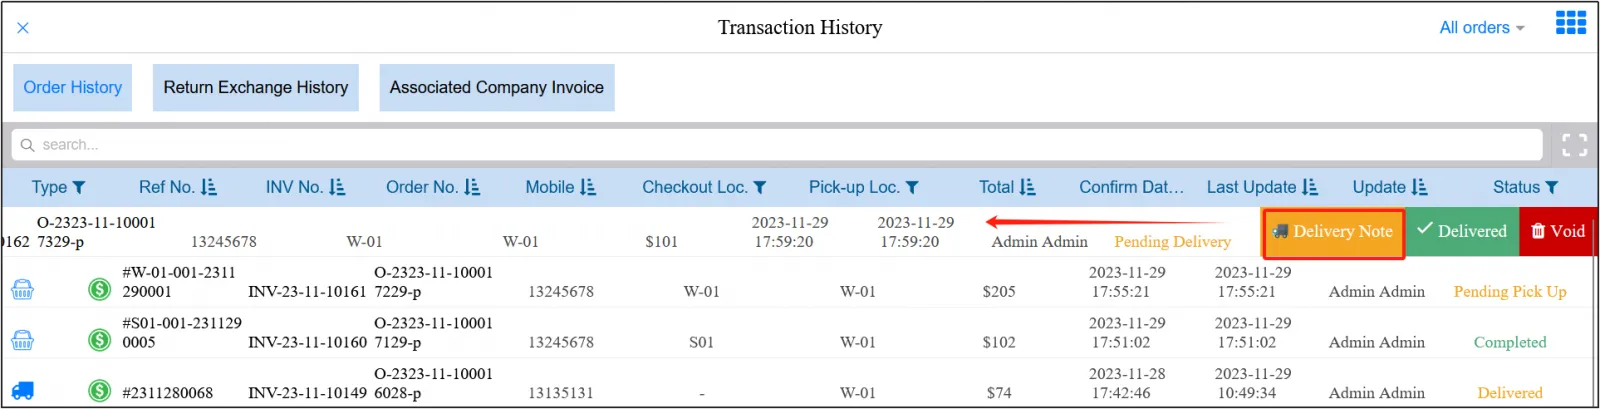
Find the order just now, press and hold to the leftclick [delivery note] to create a delivery order.
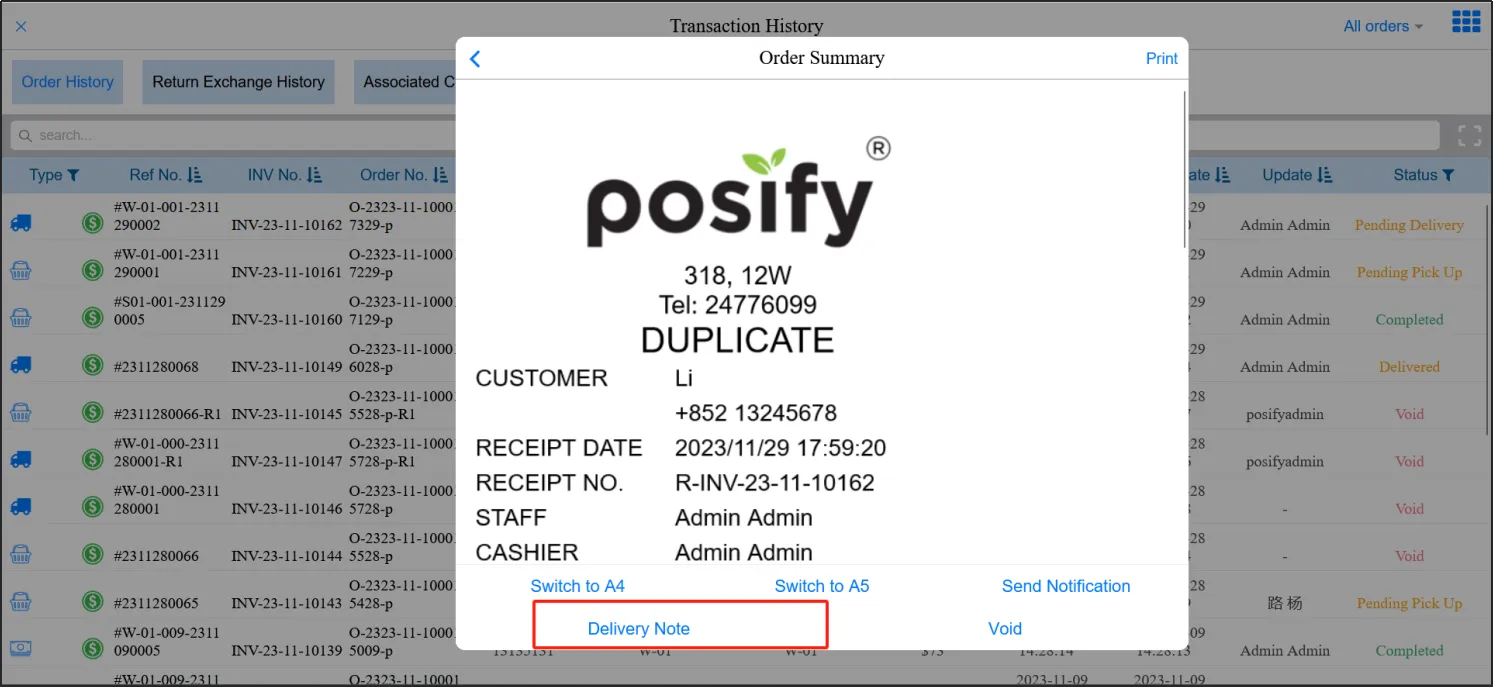
You can also create a delivery note by clicking on the order directly, opening the order summary,Then click [Delivery Note] below.
Return to the POS homepageclick [Inventory]click [Warehouse].
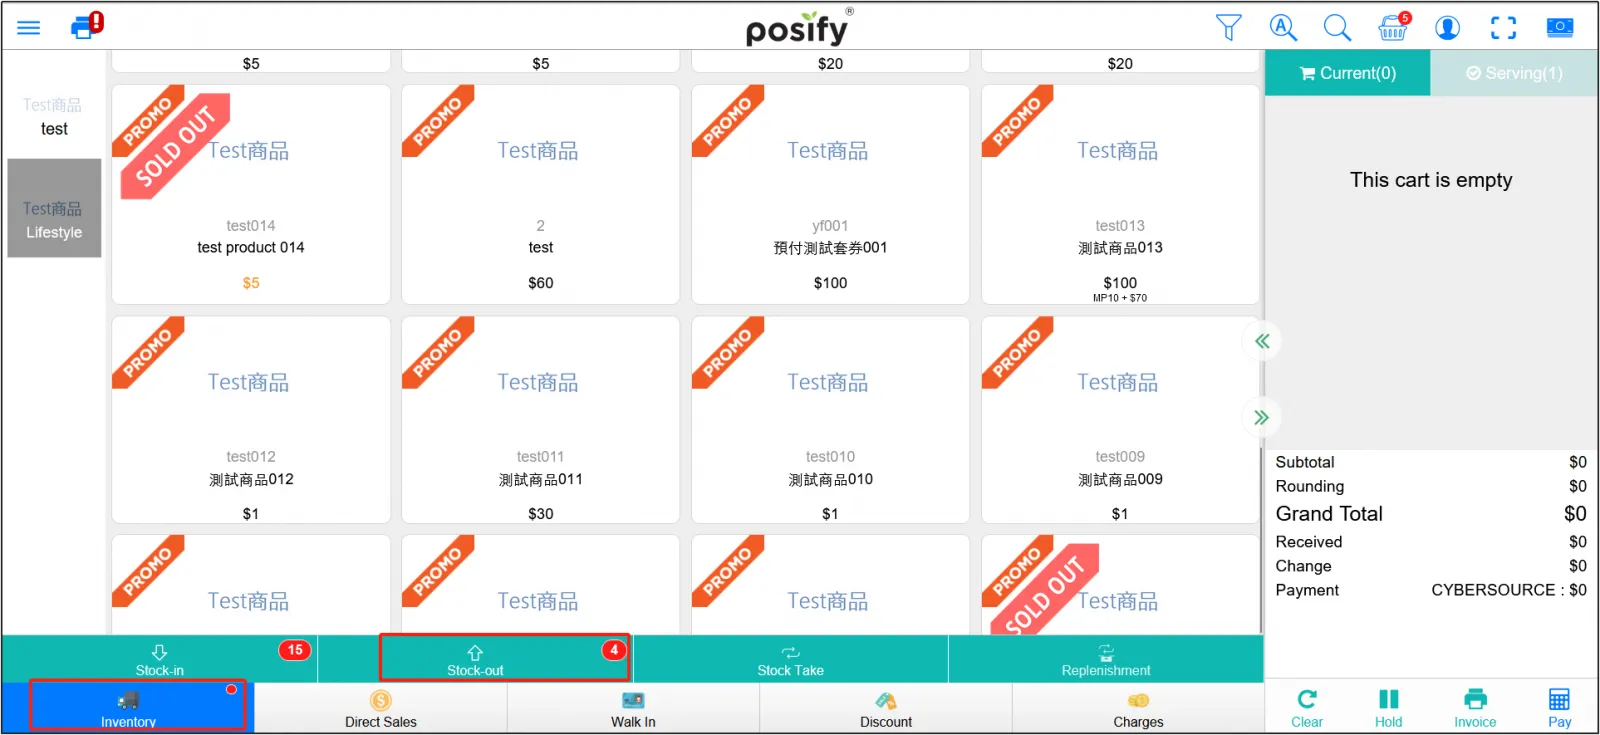
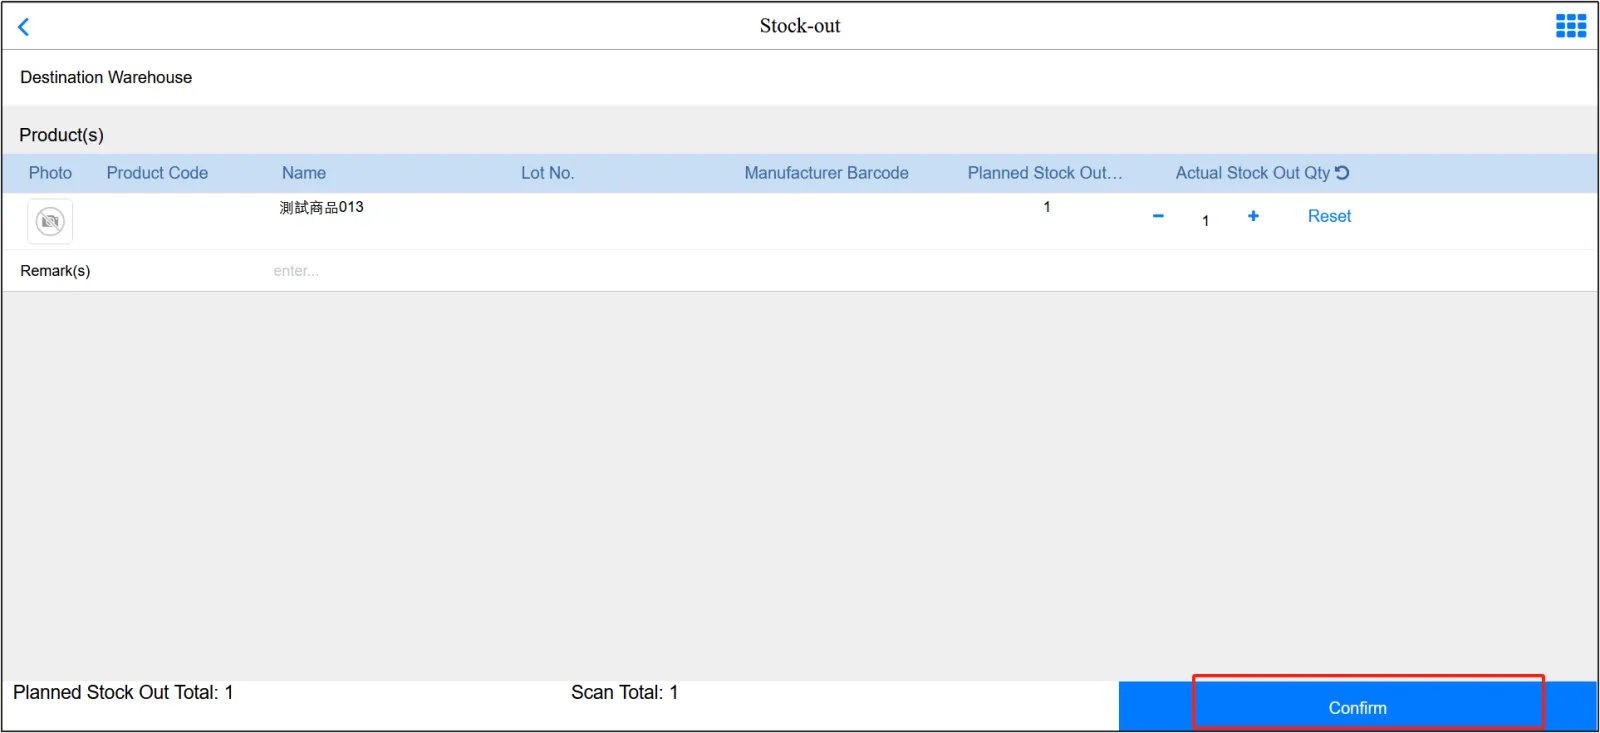
Find the warehouse order corresponding to the orderClick the arrow on the right to open the outbound order details.

Click [Confirm] to complete the exit.
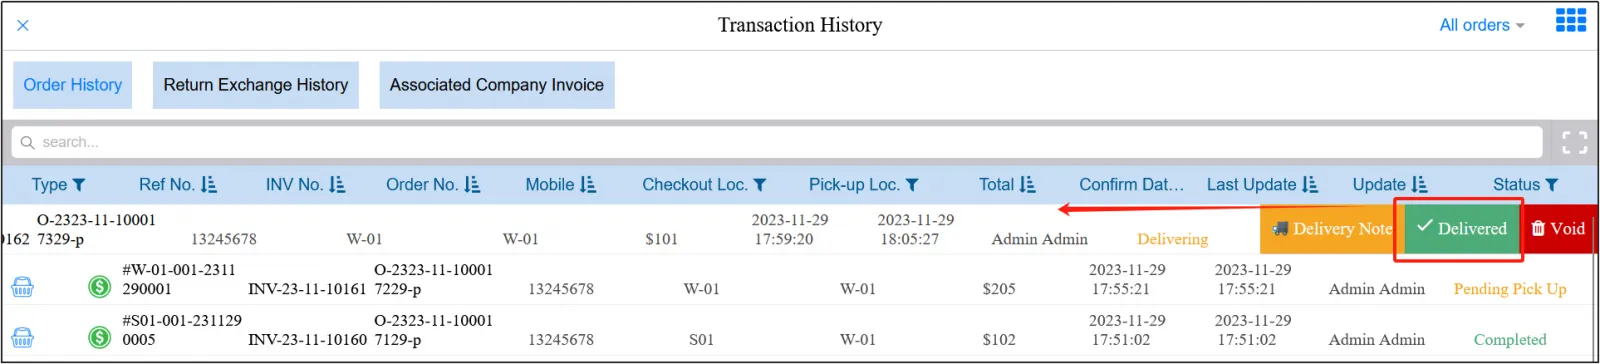
Go back to the home pageclick on the three horizontal lines in the upper left cornerClick Transaction Record ,Find the order just now, you can see the status is delivery .After the goods are delivered, press and hold the order and pull to the leftclick [Delivered] to complete the order process.
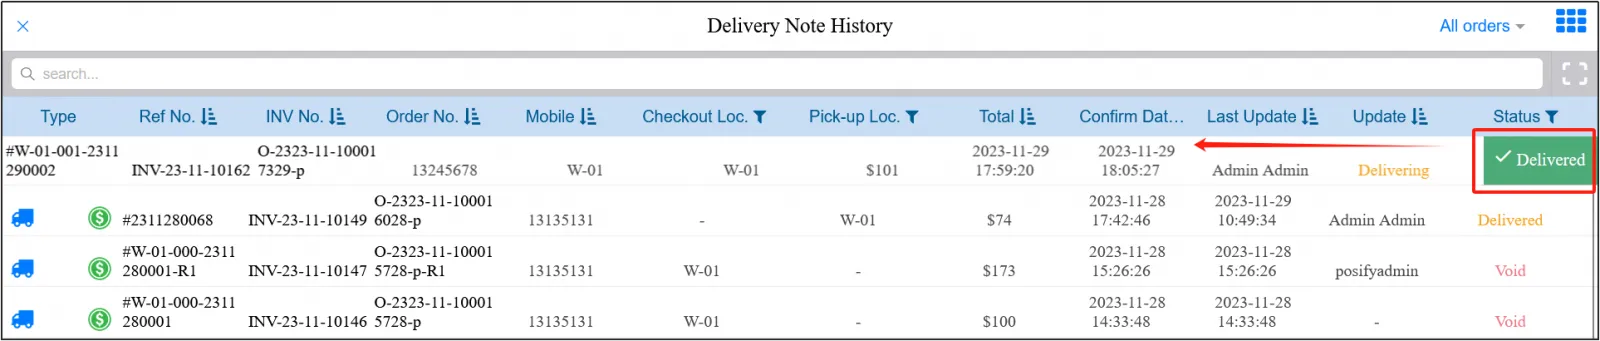
Or go back to the home pageClick on the three horizontal lines in the upper left cornerClick delivery note record ,Find the delivery note corresponding to the order you just orderedhold and pull leftClick [Shipped] to complete the order.
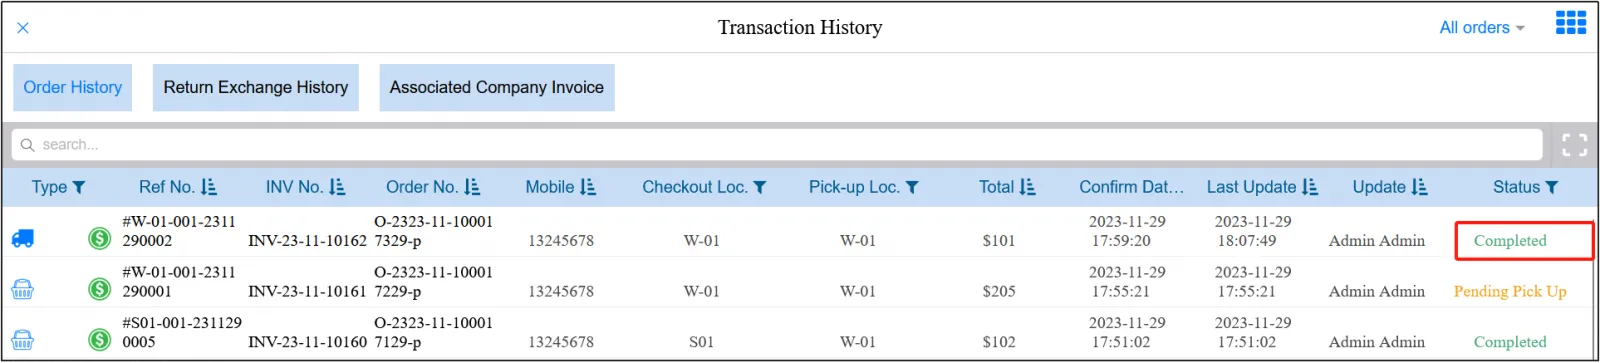
When you click [Delivered], you can see that the order status is completed .
Orders are partially picked up and partially delivered
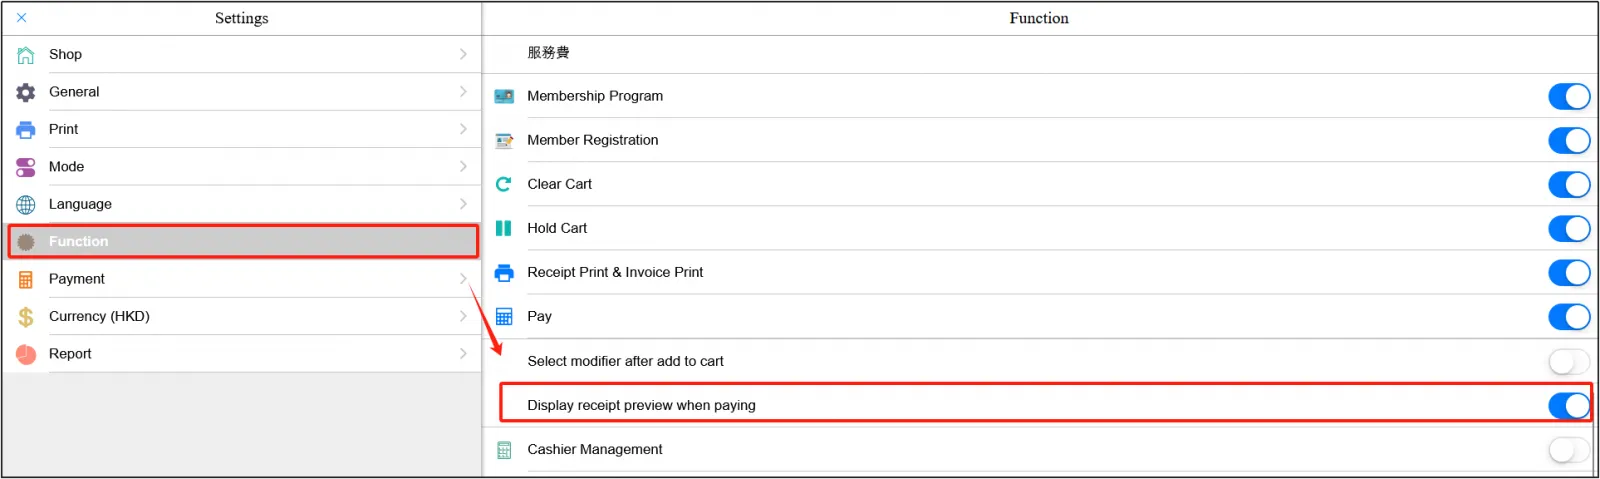
In the POS settingsclick the functionenable "Show order preview when paying".
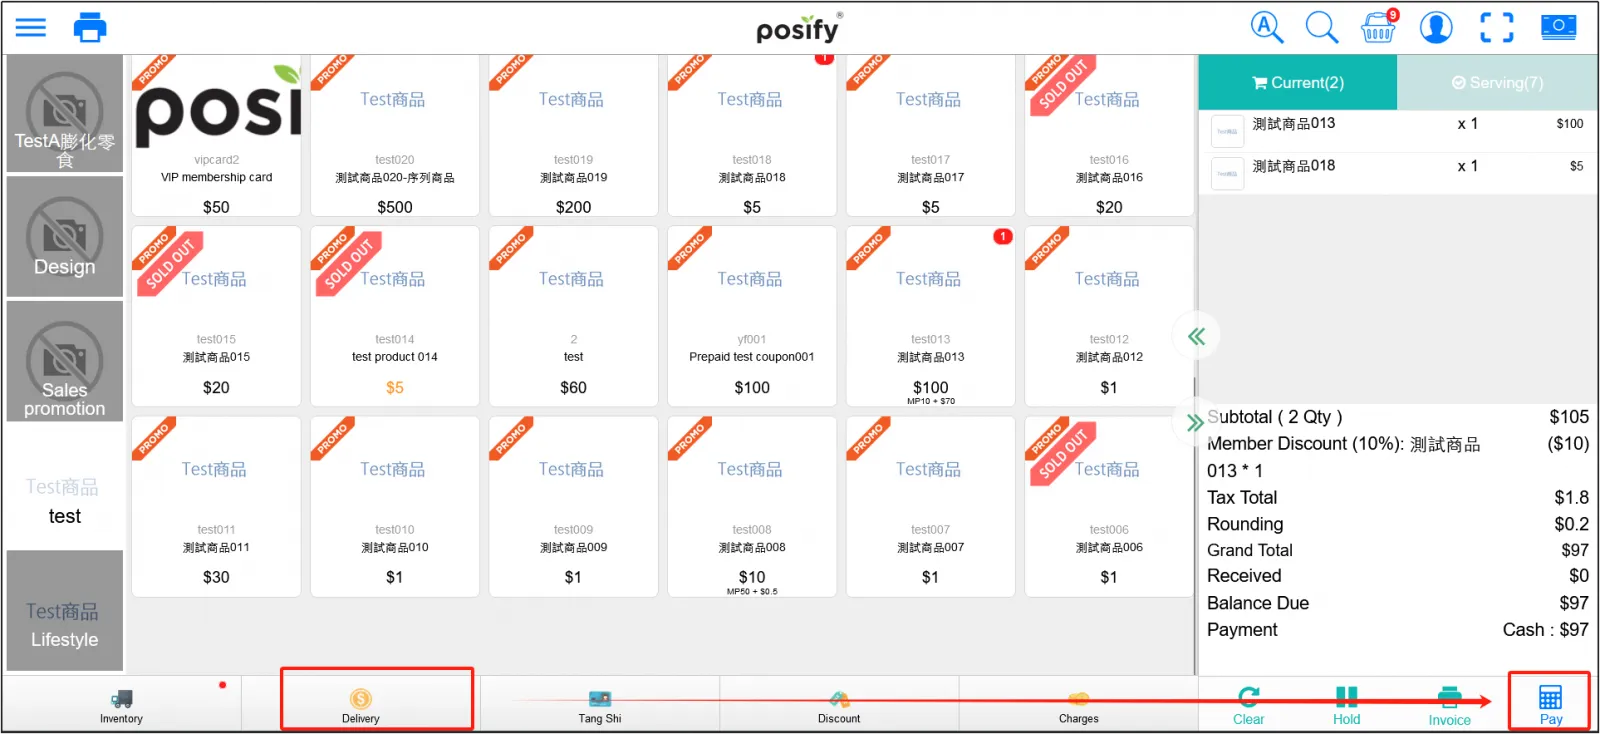
Change the order pickup method to delivery click [Pay].
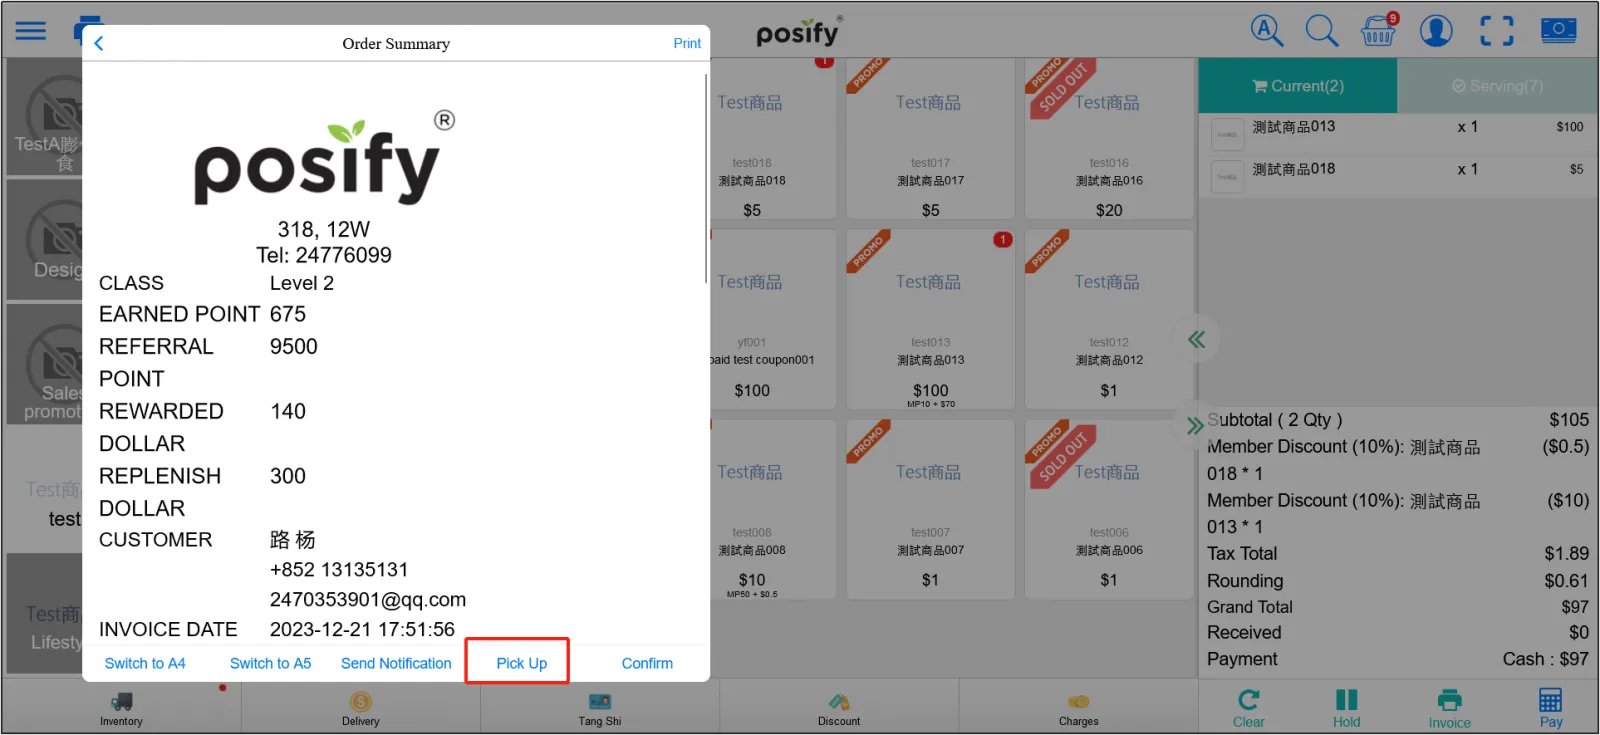
Click [Pickup] below the order summary.
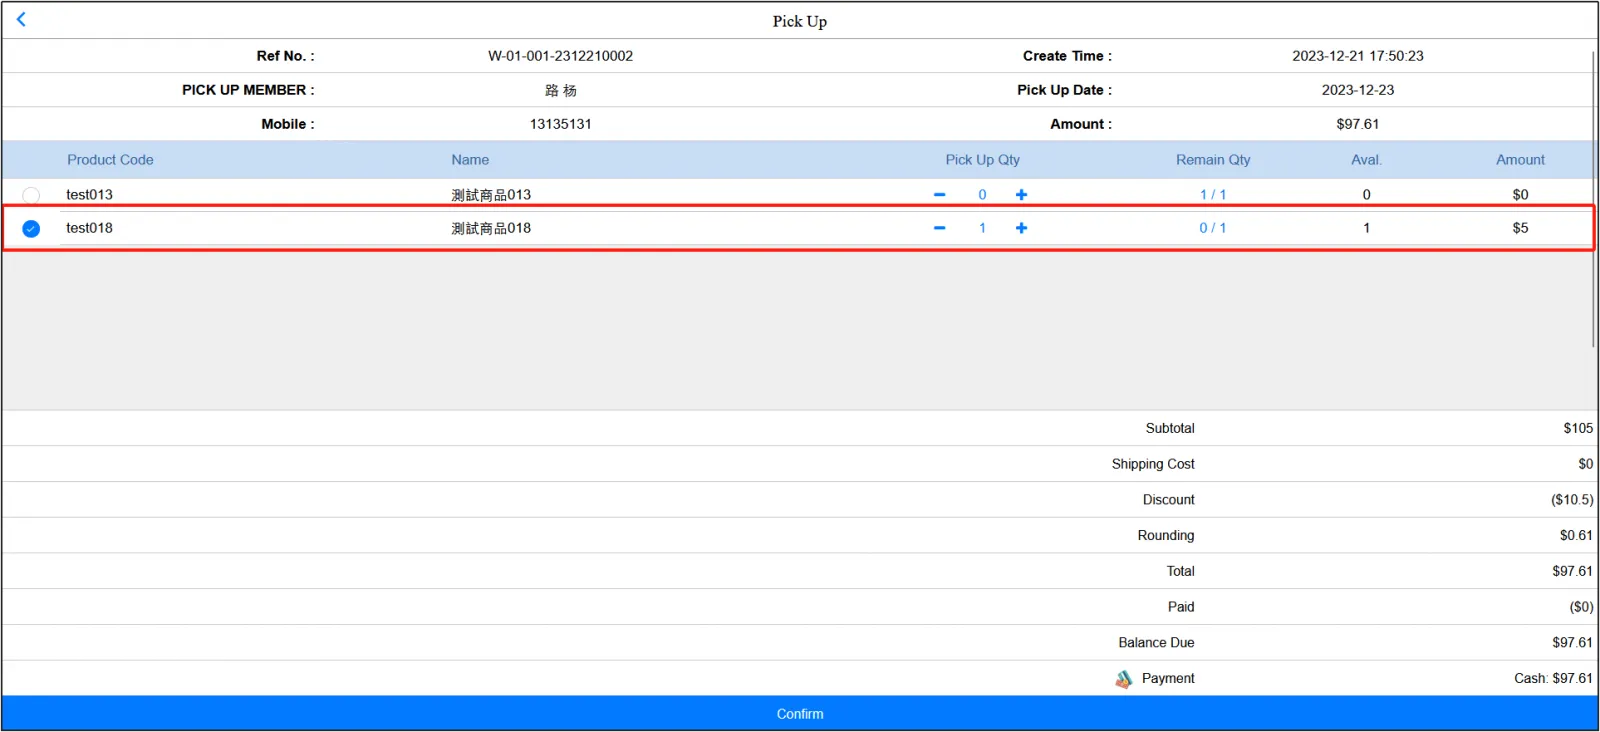
Select the items you want to pick up click [Confirm]. The rest of the goods will be delivered as normal.
If you want a void order, you can go back to the home pageClick on the three horizontal lines in the upper left cornerClick order record ,Find the order just nowhold and pull leftClick [Cancel] to cancel the order.
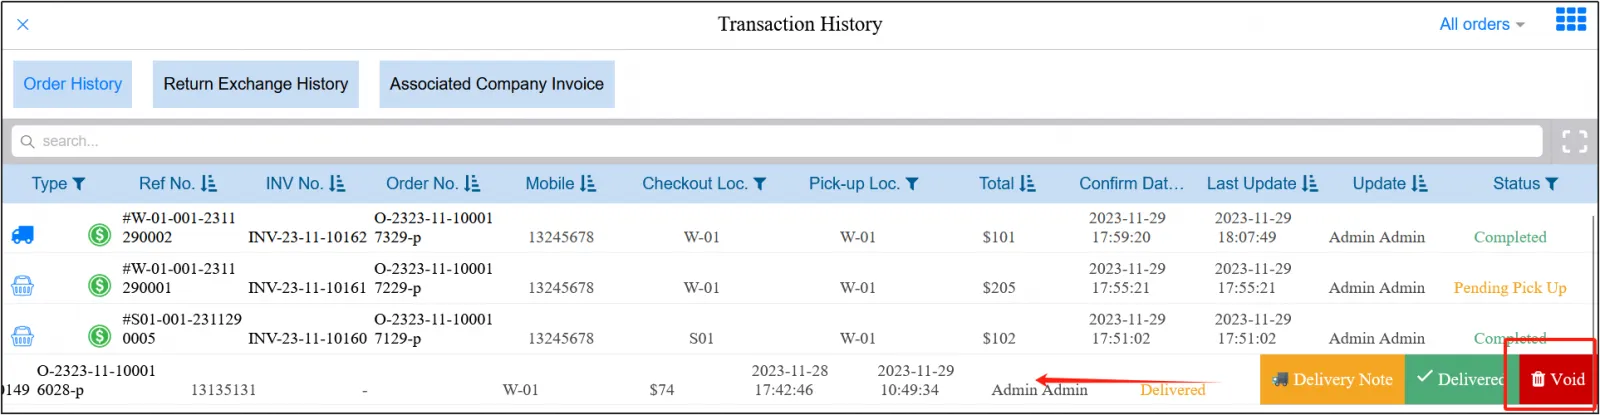
After canceling, the status of the order is displayed as cancelled.

After logging out and clicking Reopen, the items in the canceled order will be put back into the shopping cart.
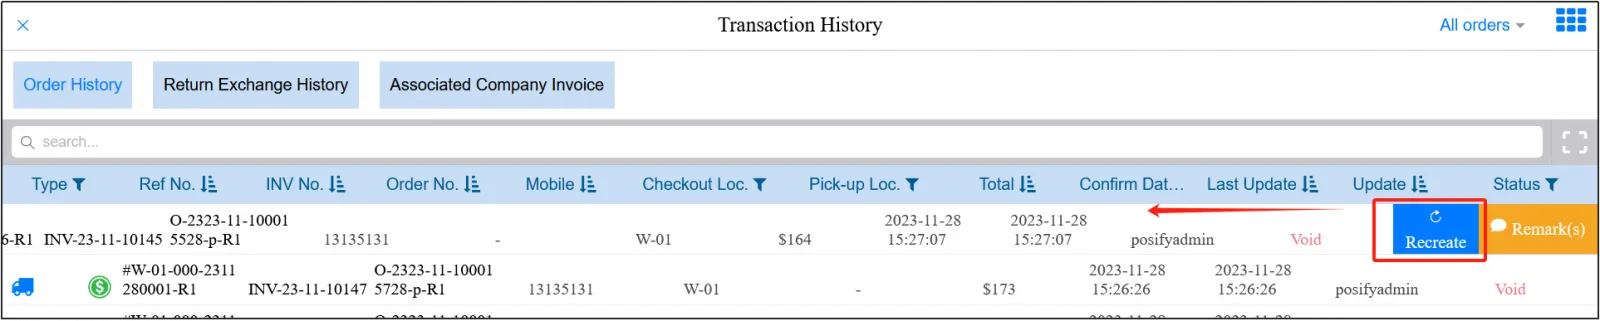
Others
In addition to one-time payment, merchants can also provide customers with payment methods such as deposit-final payment.
When selecting the payment method, click [Deposit] in the upper left cornerselect the payment methodenter the received deposit amountclick [Confirm and Pay] to pay the deposit.
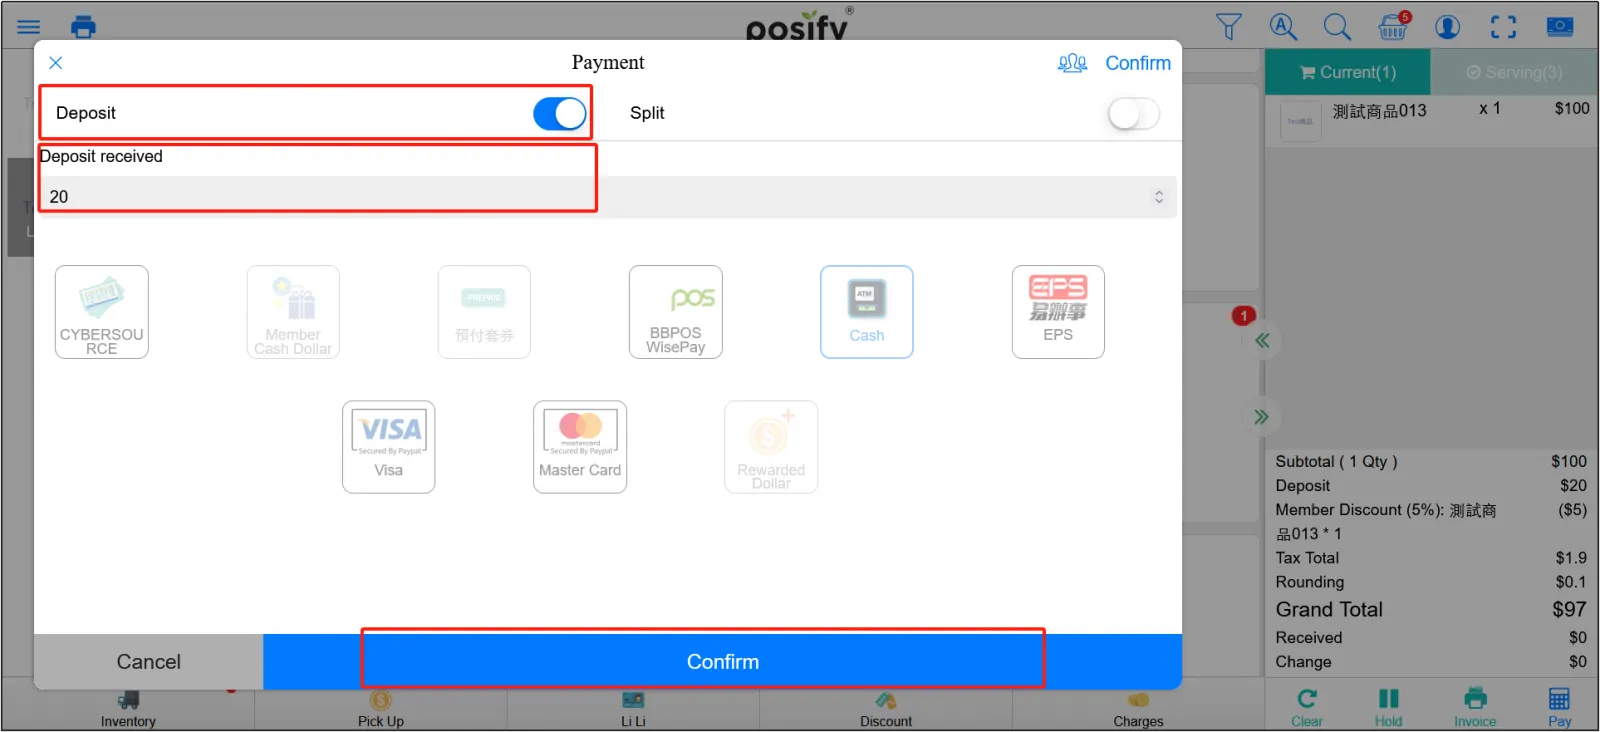
Since direct selling is to pick up the goods directly after one payment, and the deposit-final payment mode is to pay in two installments, so the premise of choosing the deposit-final payment mode is that the delivery method is self-pickup or delivery. If the delivery method is direct sales, you cannot Optional deposit.
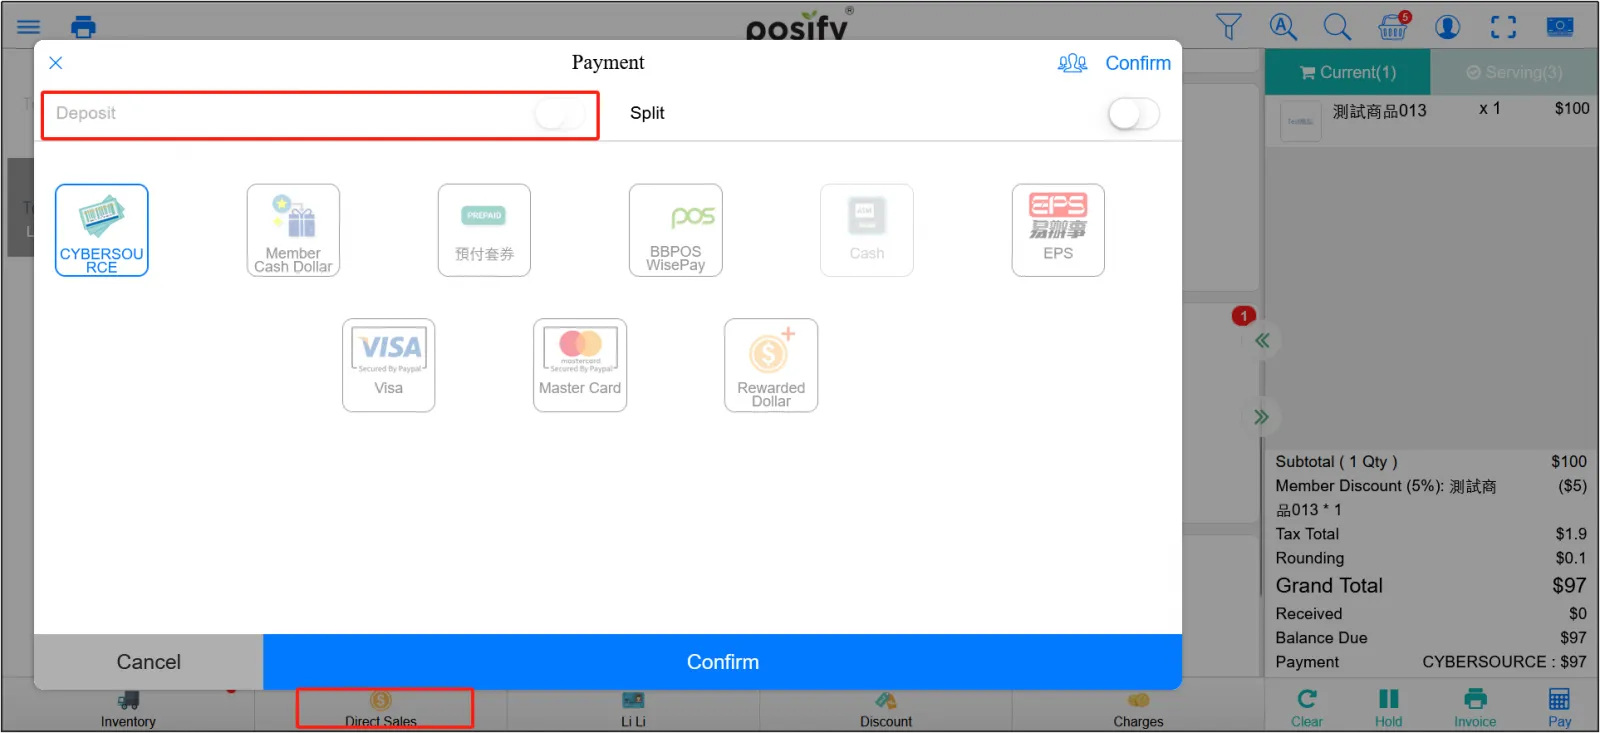
If the pick-up method is self-pickup, the customer can pay the balance when picking up the goods, and the payment method of the balance can also be selected.
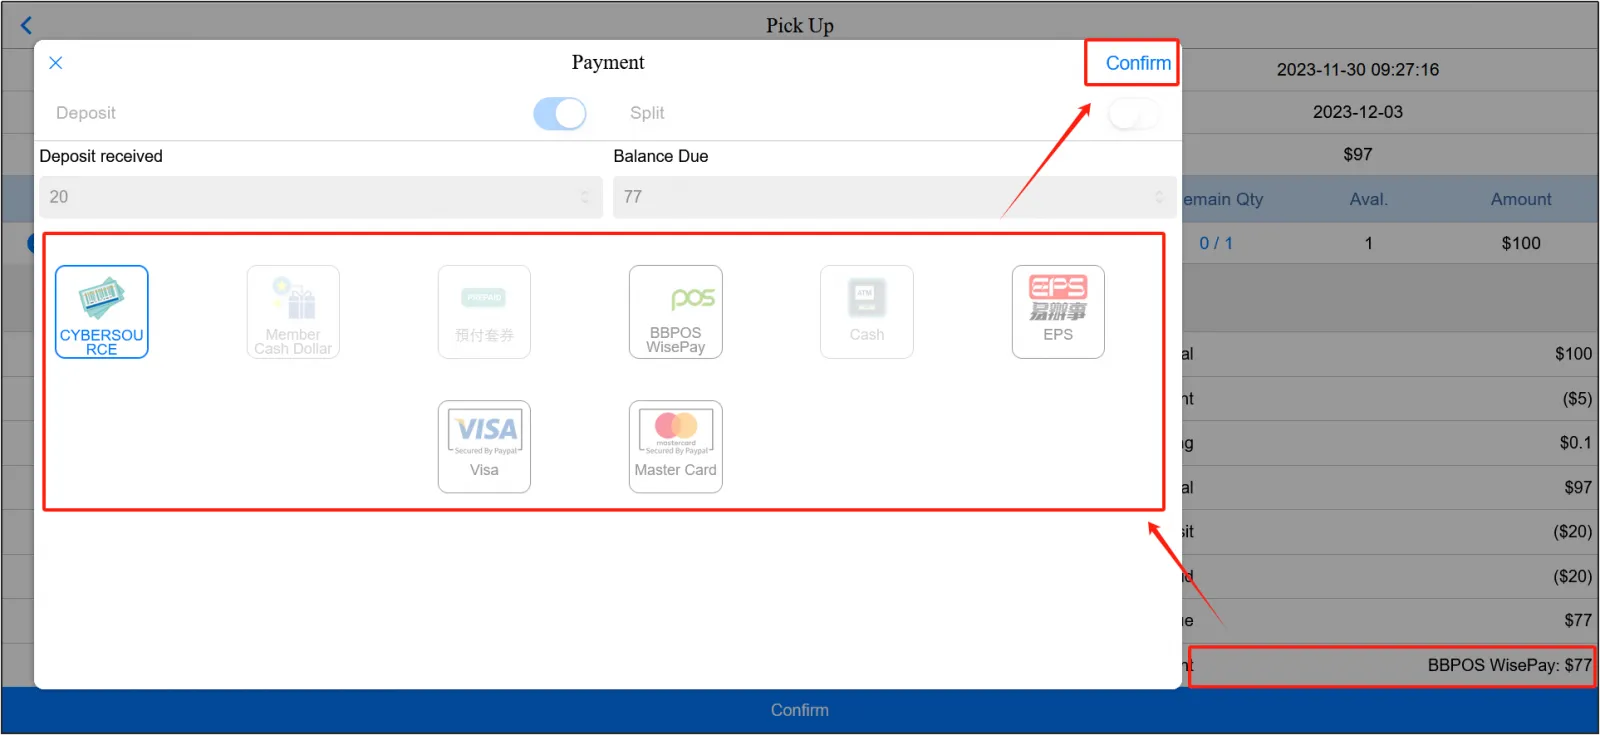
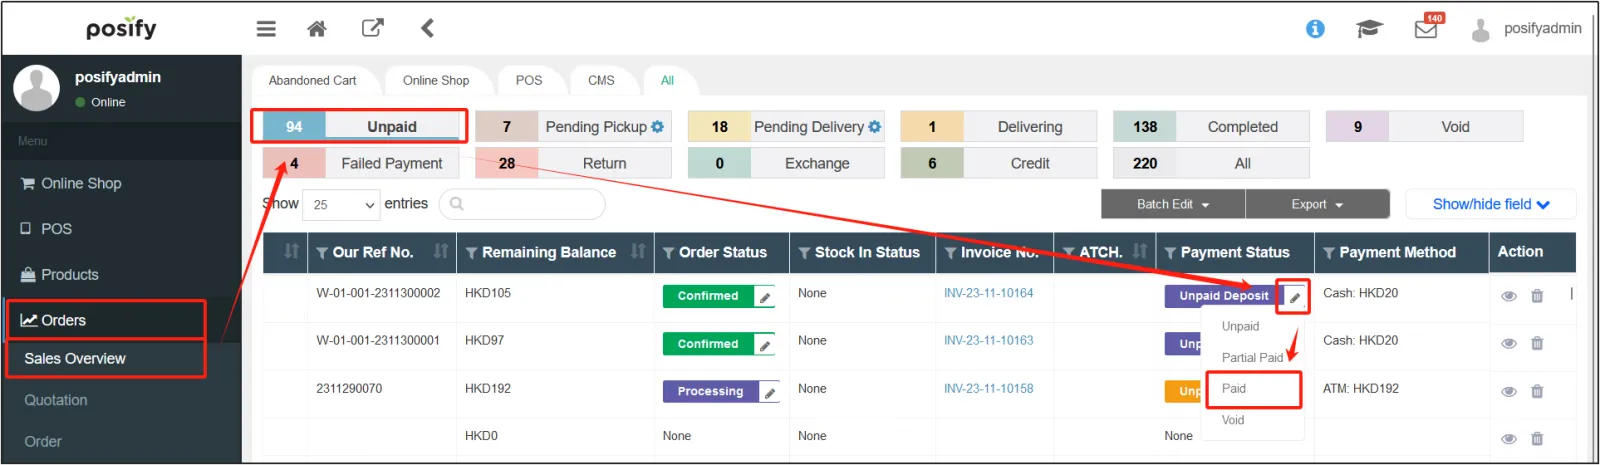
If the pickup method is delivery, the order is processed in the same way as the delivery order above. After receiving the final payment, click on the CMS Order - Sales Overview - Pending PaymentFind the payment status column of the orderClick the small pen on the right of the partial paymentJust change the status to Received .
Sometimes a product is out of stock in a local store or warehouse, but the customer wants to buy it, so you can choose to make a reservation, that is, to ship or transfer the product from another store or warehouse that has surplus stock to the location where the customer wants to pick it up.
As with the deposit, the pre-order function can be used only if the pick-up method is self-pickup or delivery, and cannot be used if the pick-up method is direct sales.
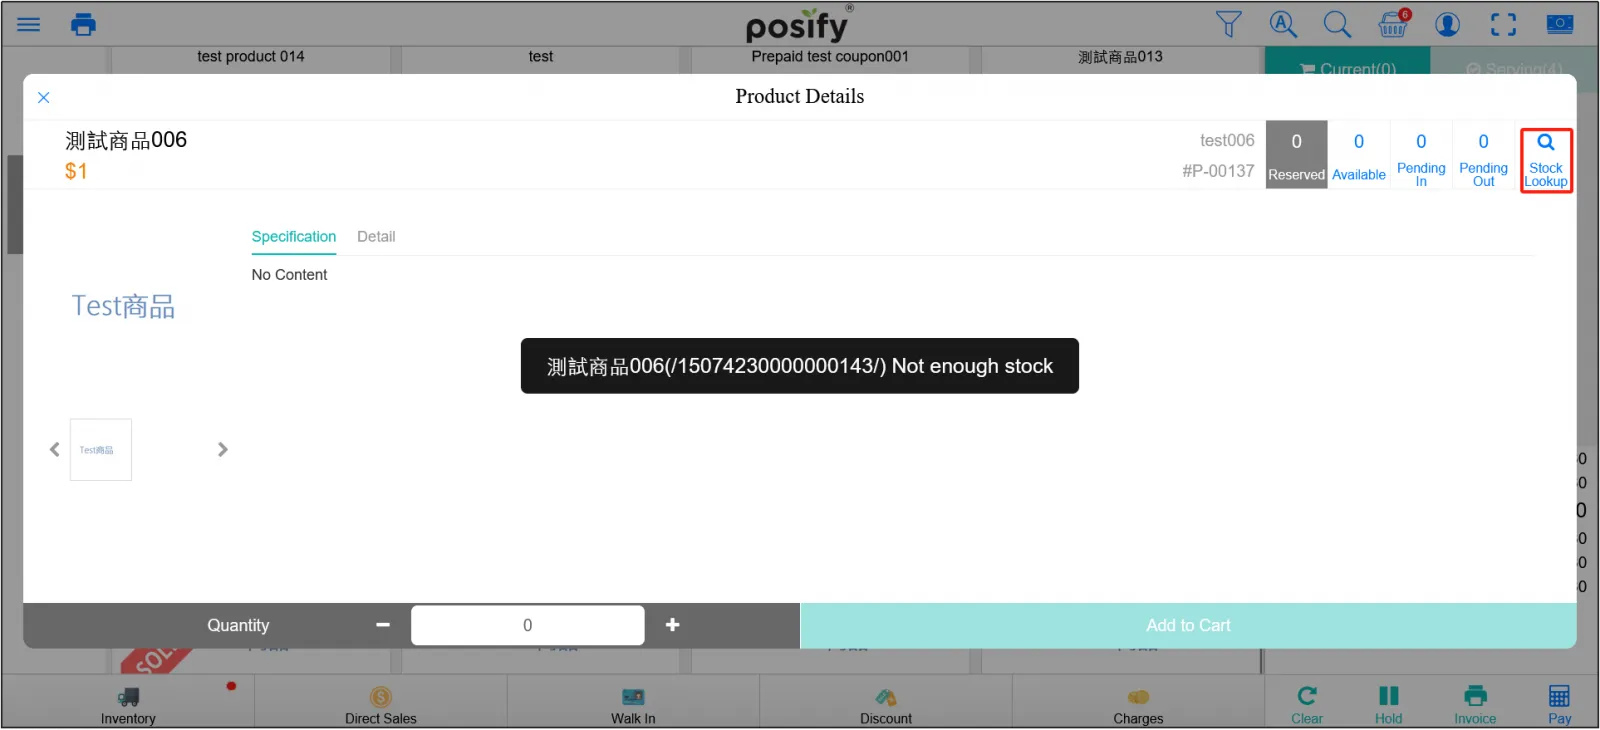
When you select a product that is sold out, the system will indicate that the stock is insufficient, so click [Search] in the upper right corner.
You can see the inventory status of the product at various locations, and you can see which locations still have the product in the remaining stock column. Find the place where the product is still in stock, and click [Reserve] on the right.

Select the quantityclick [Save].
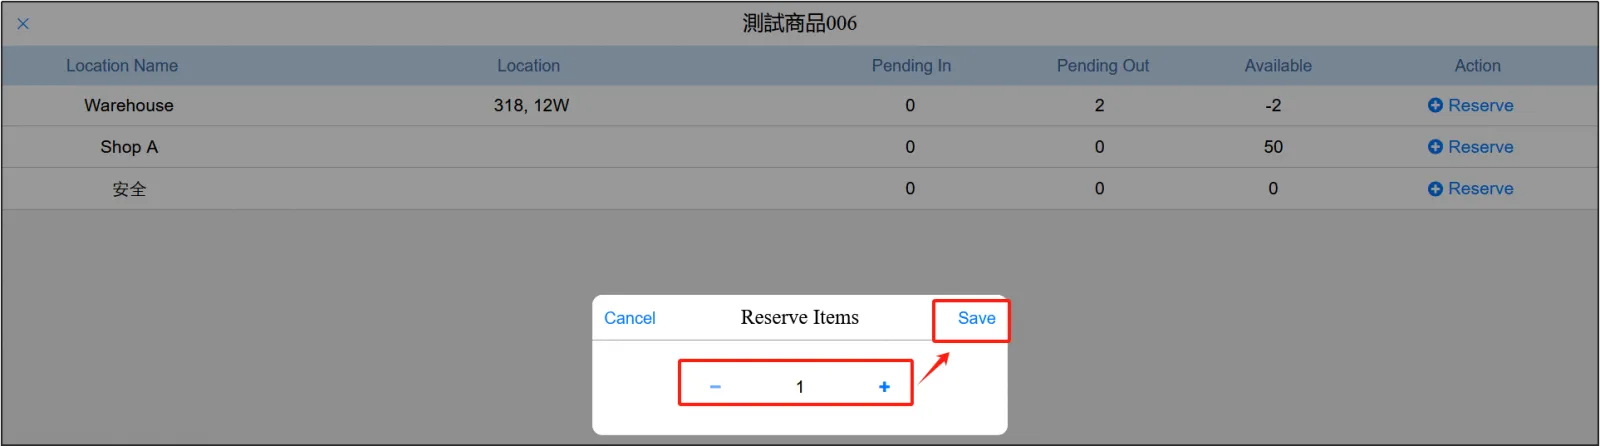
This adds to the cart.
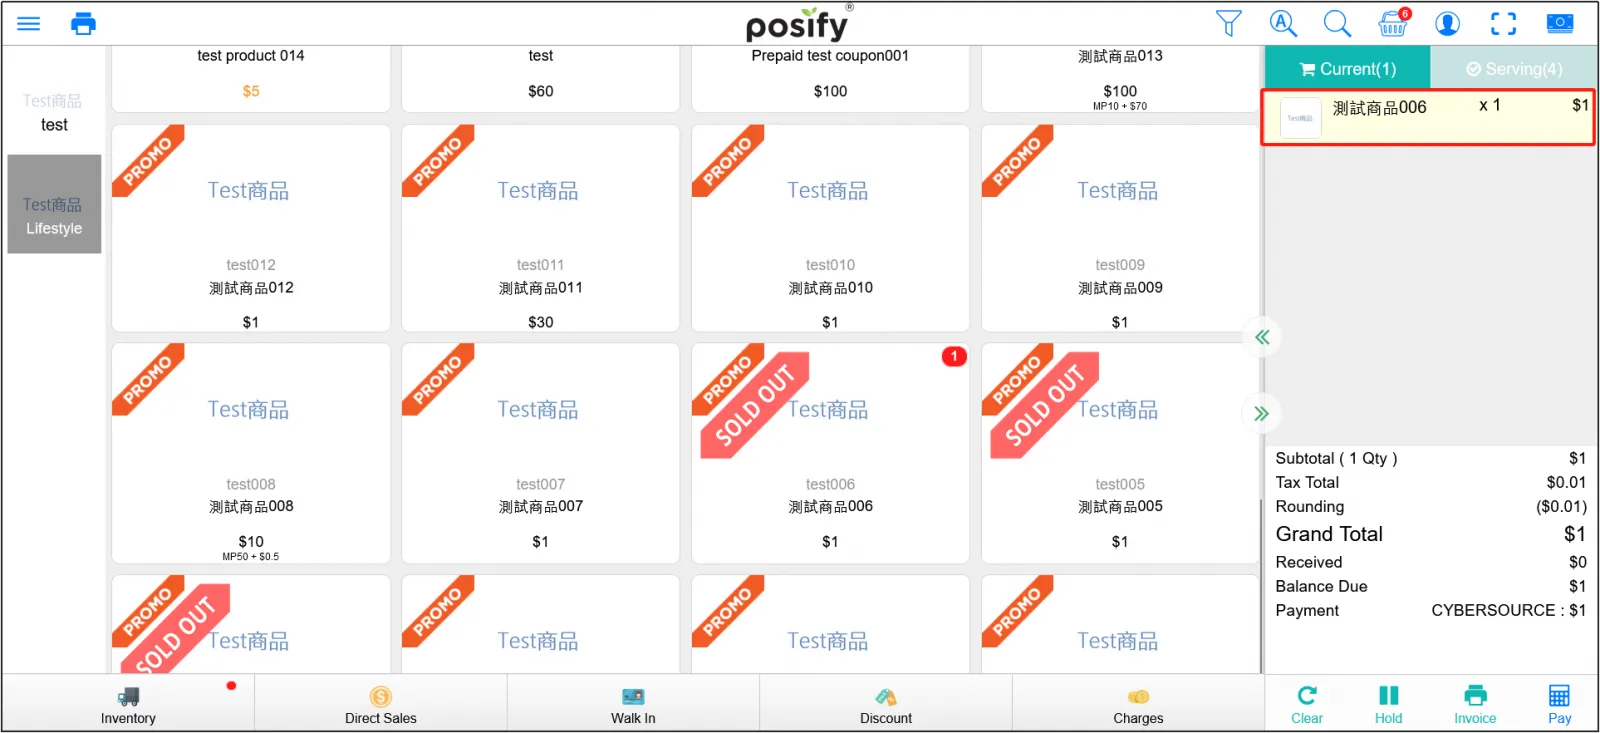
If the reservation is made by self-pickup, the reservation method will be to transfer the goods from the reservation store to the self-pickup store.
First of all, the store that made the reservation will receive a warehouse receipt. Open the POS of the reserved storeClick [Inventory] in the lower left cornerClick "Warehouse".
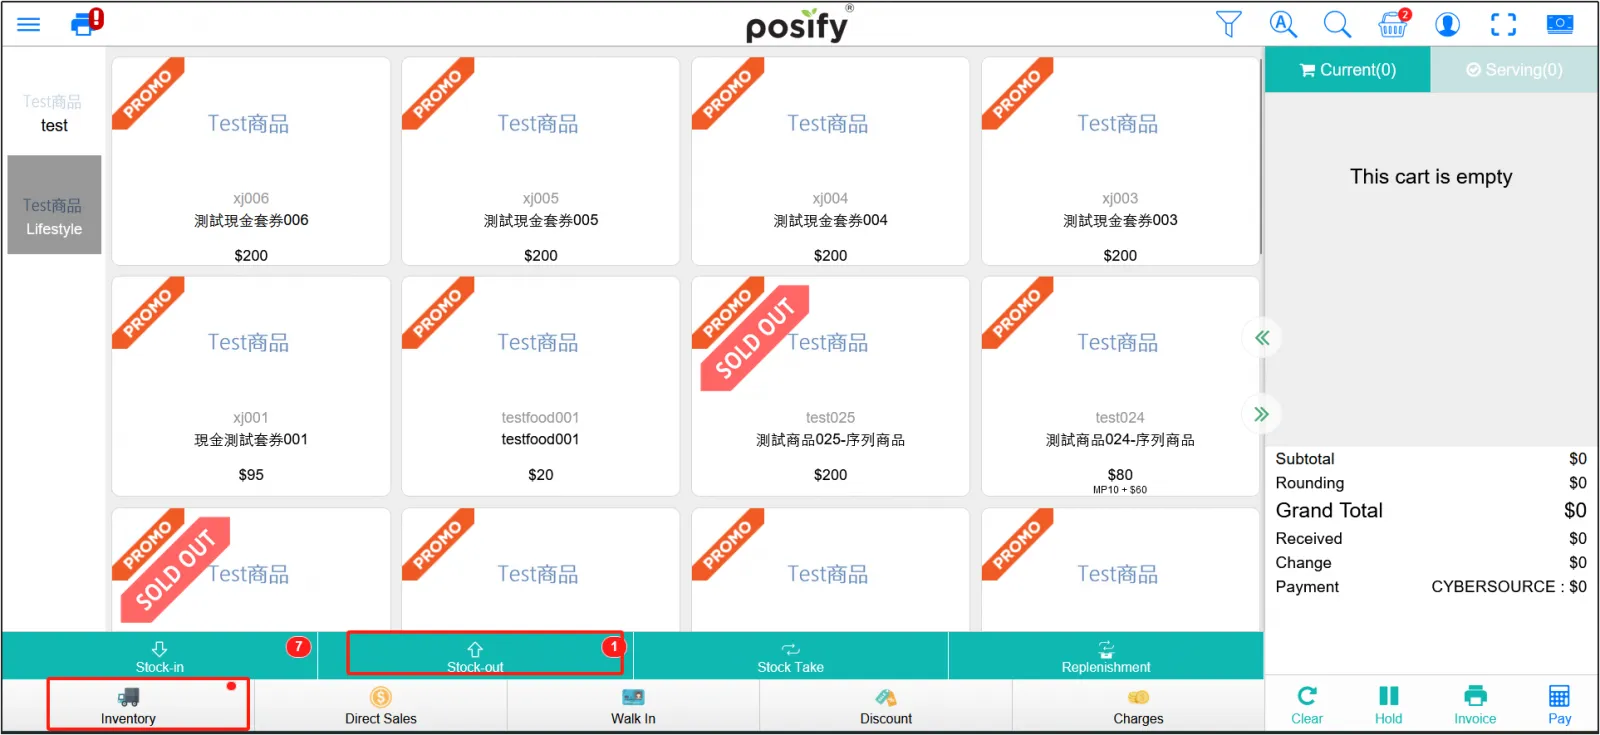
After the goods are out of the warehouse, click the arrow on the right side of the corresponding orderopen the outbound order.

Click [Confirm] to complete the exit.
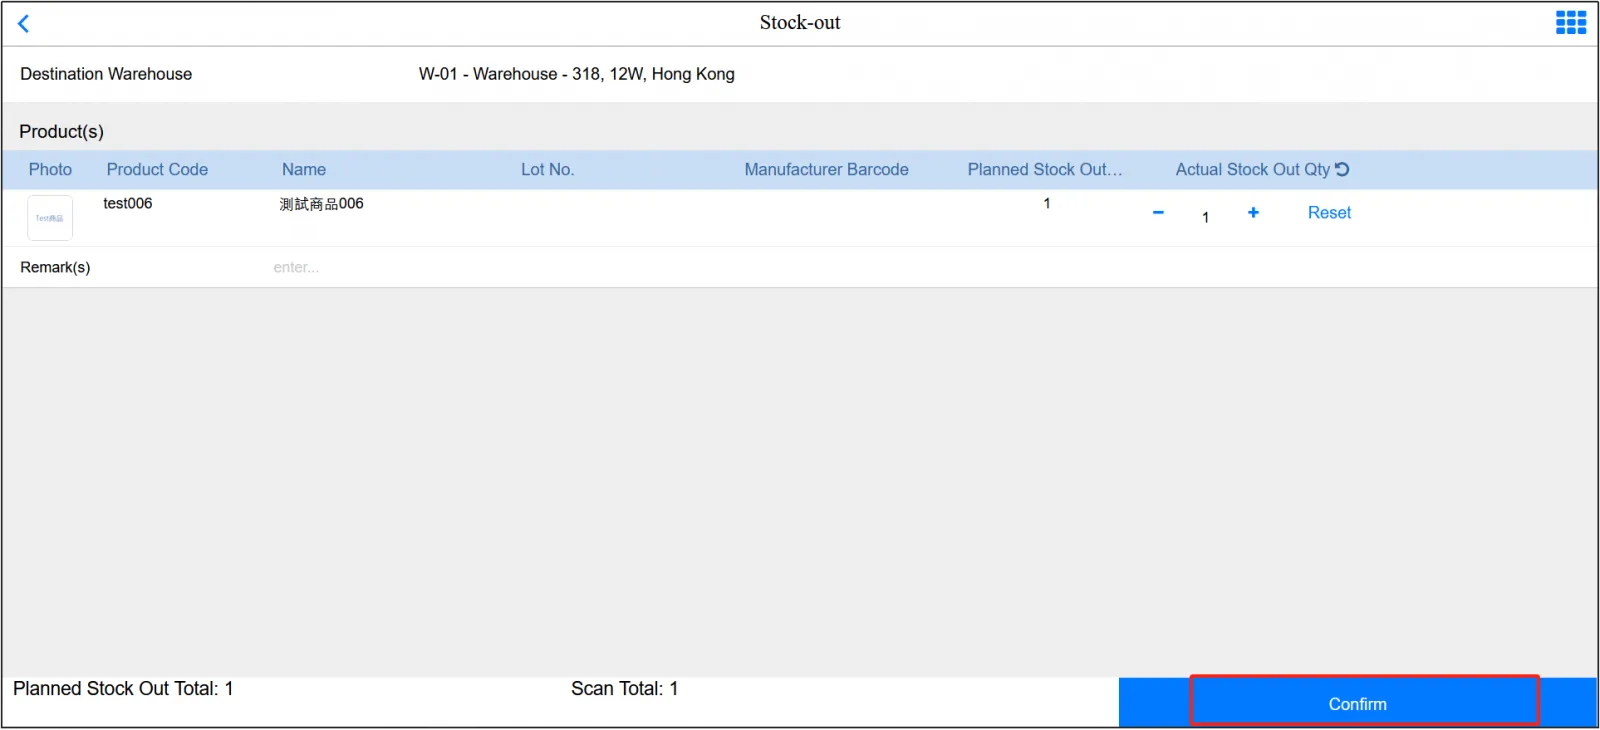
After leaving the warehouse, the goods are delivered to the pick-up store, and the warehouse-in operation can be performed on the POS of the pick-up store.
Click [Inventory] in the lower left cornerclick [Enter Warehouse].
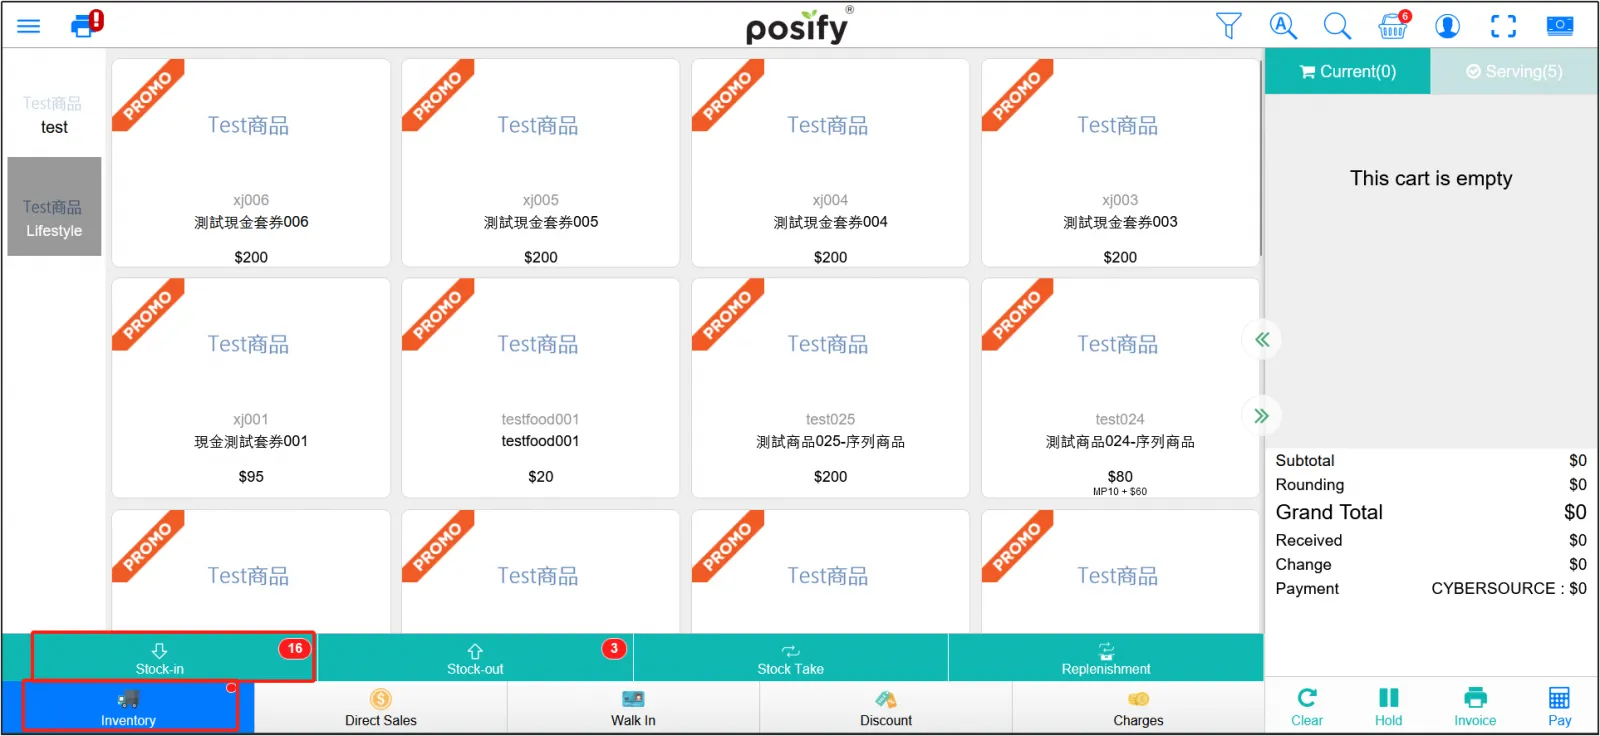
Click the arrow on the right of the corresponding order to open the inbound order.

Click [Confirm] to complete the deposit.
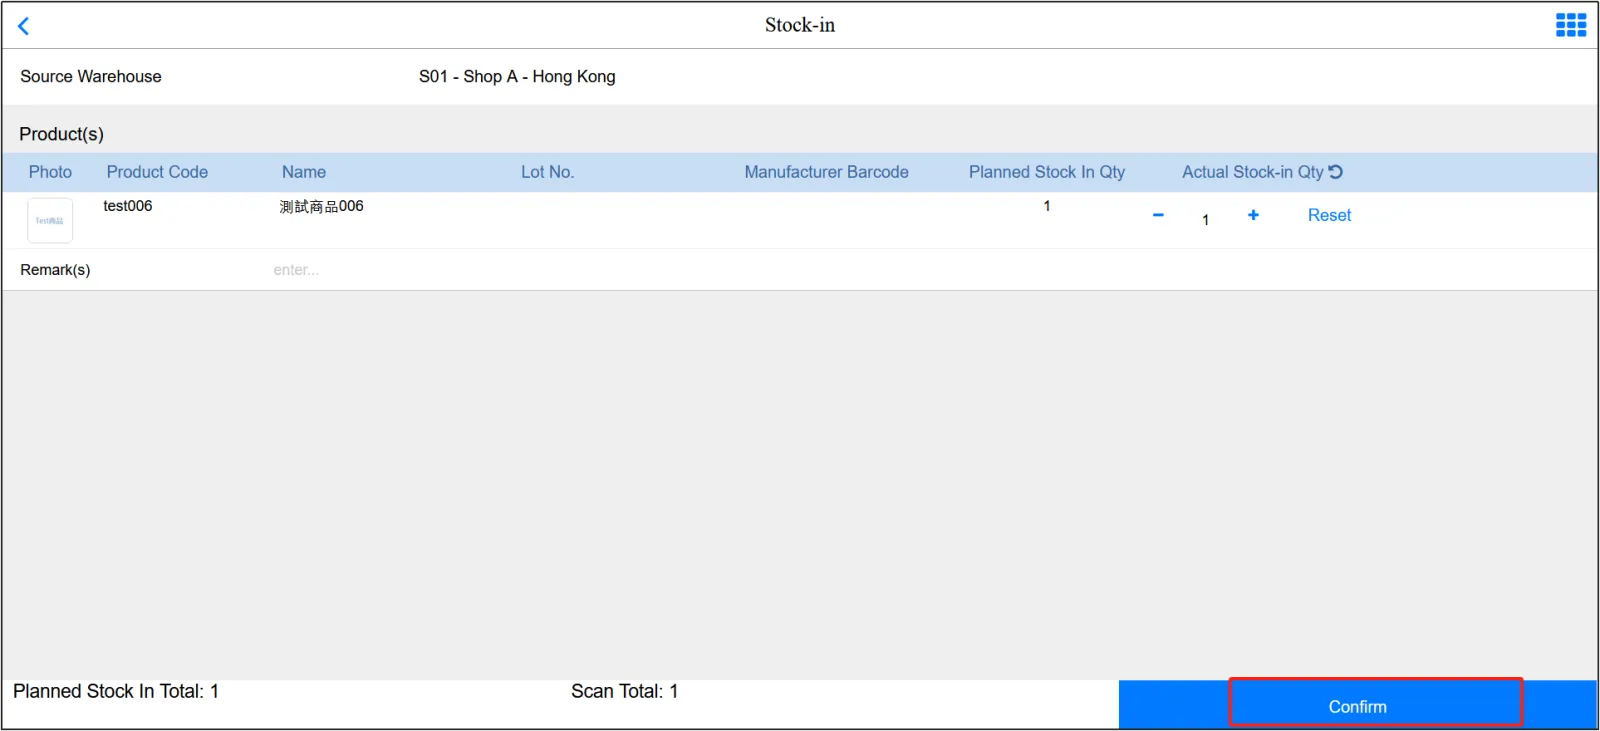
When the customer comes to pick up the goods, click the flower basket on the upper right to perform the self-pickup operation. The specific process is the same as the above order self-pickup.

If you are booking by delivery, you can simply select the location where the goods are available at the shipping address.
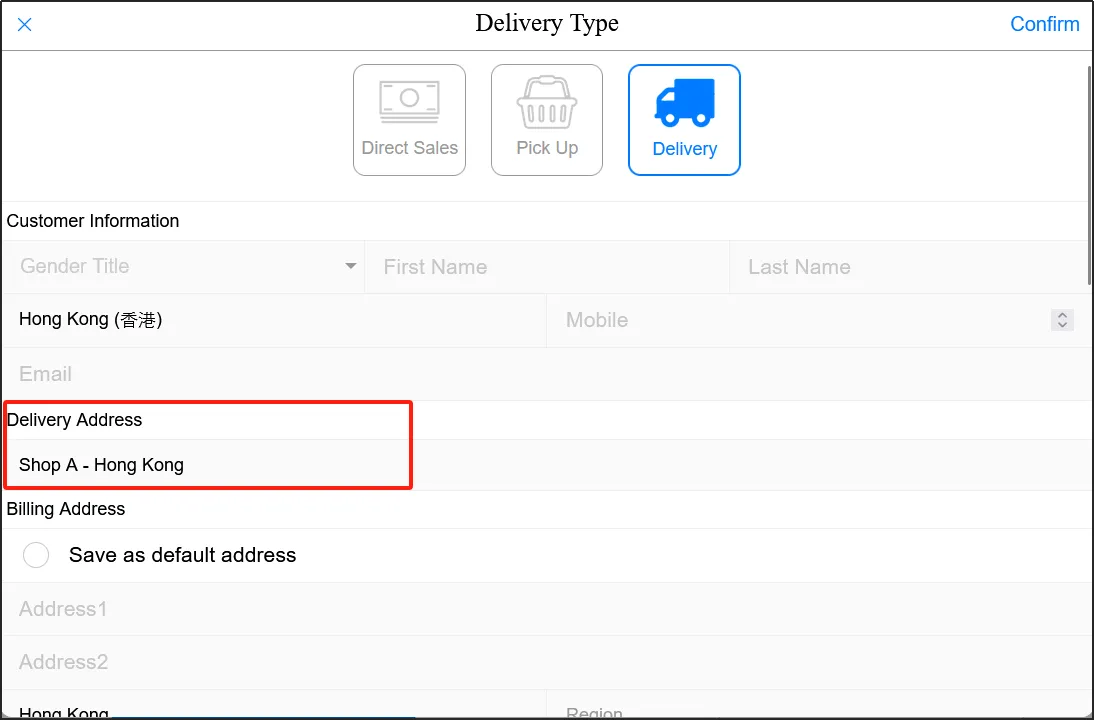
After that , the process is the same as for order delivery.