vendor
Businesses that provide goods or related services to the store.
Default vendor
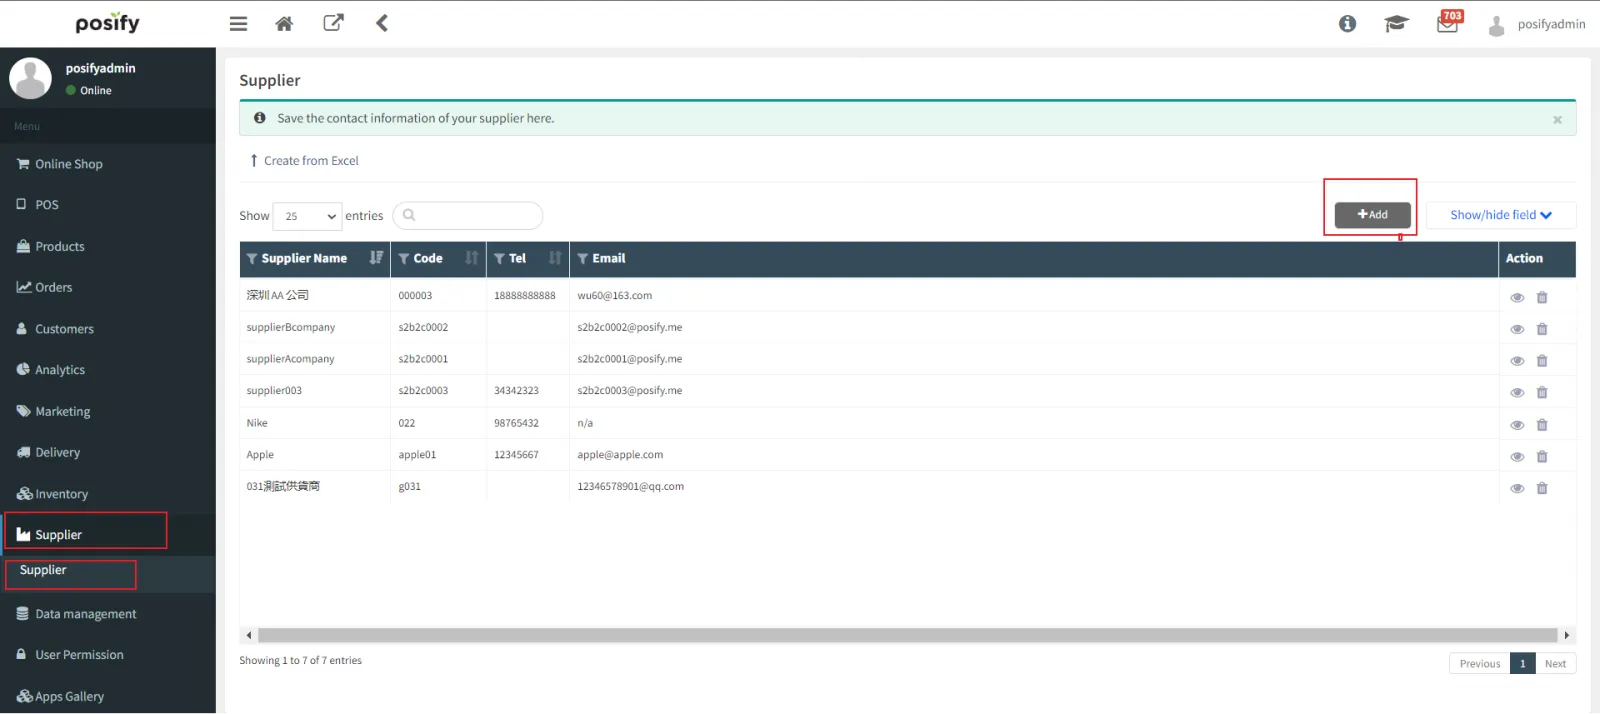
Open CMS click Supplier (Supplier)click Supplier (Supplier)click [Add] at the top right, and add a new supplier (Supplier).
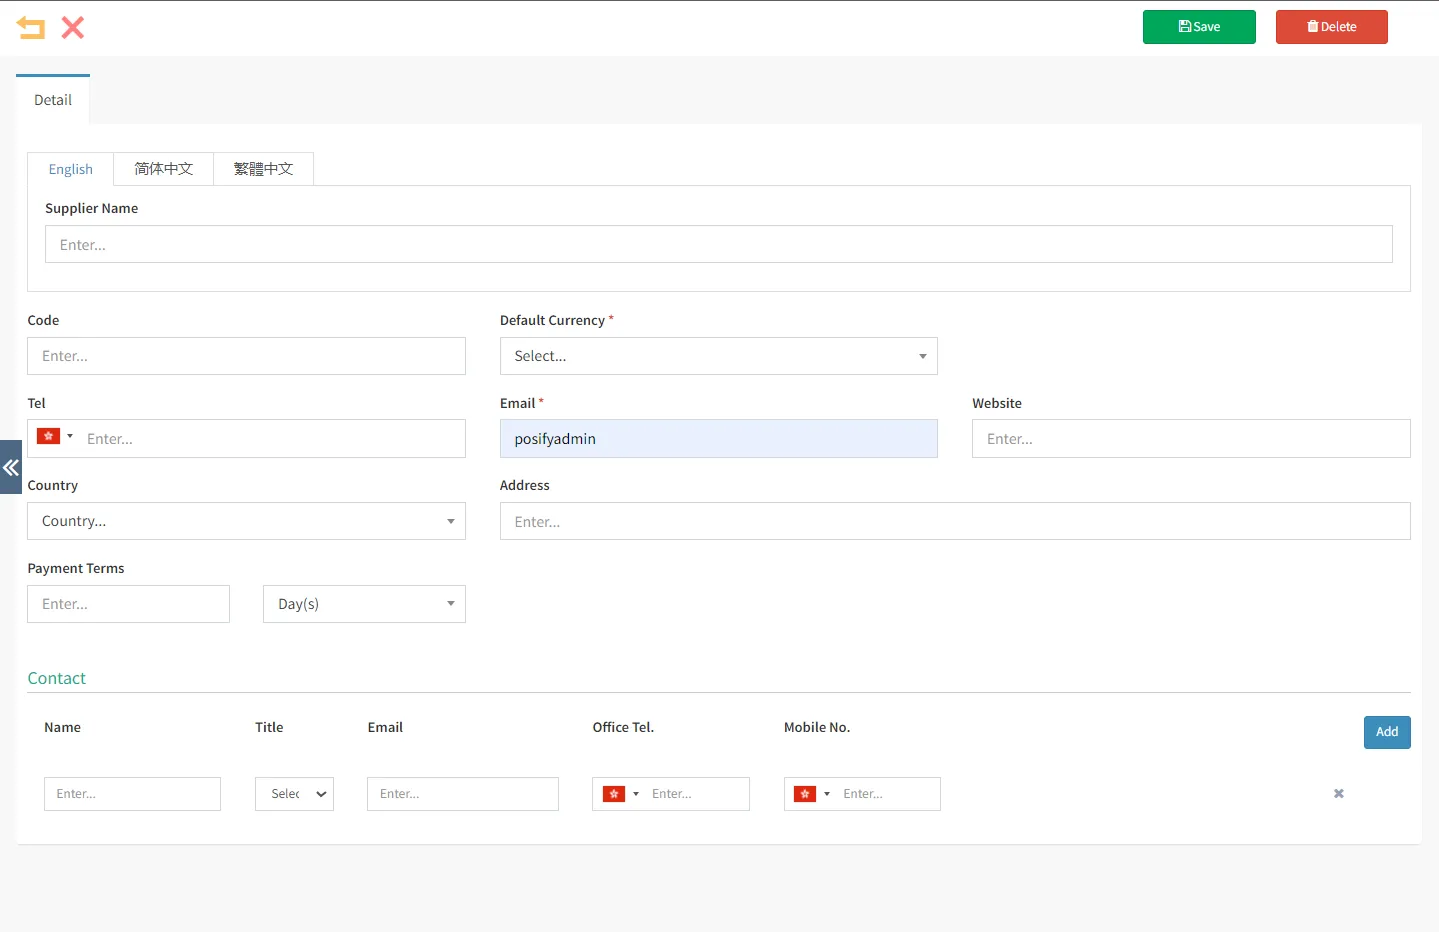
Fill in the required fields such as supplier name, default currency, and email, and other optional fields, and then click [Save] in the upper right corner to create it.
Set up a vendor for the product
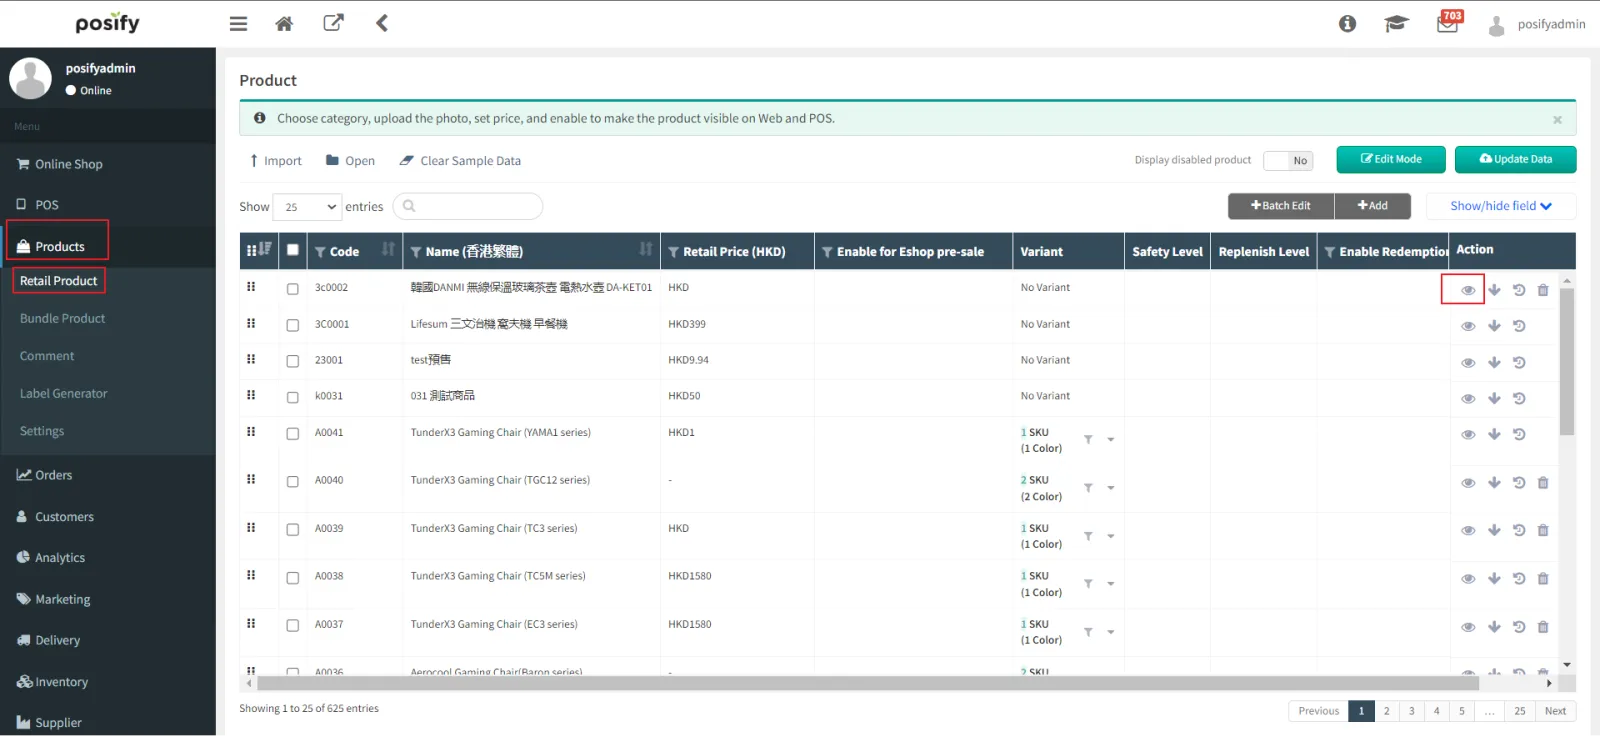
Open the CMSclick Productslick on Retail Productsfind the product you want to set up a supplier and click on the right .
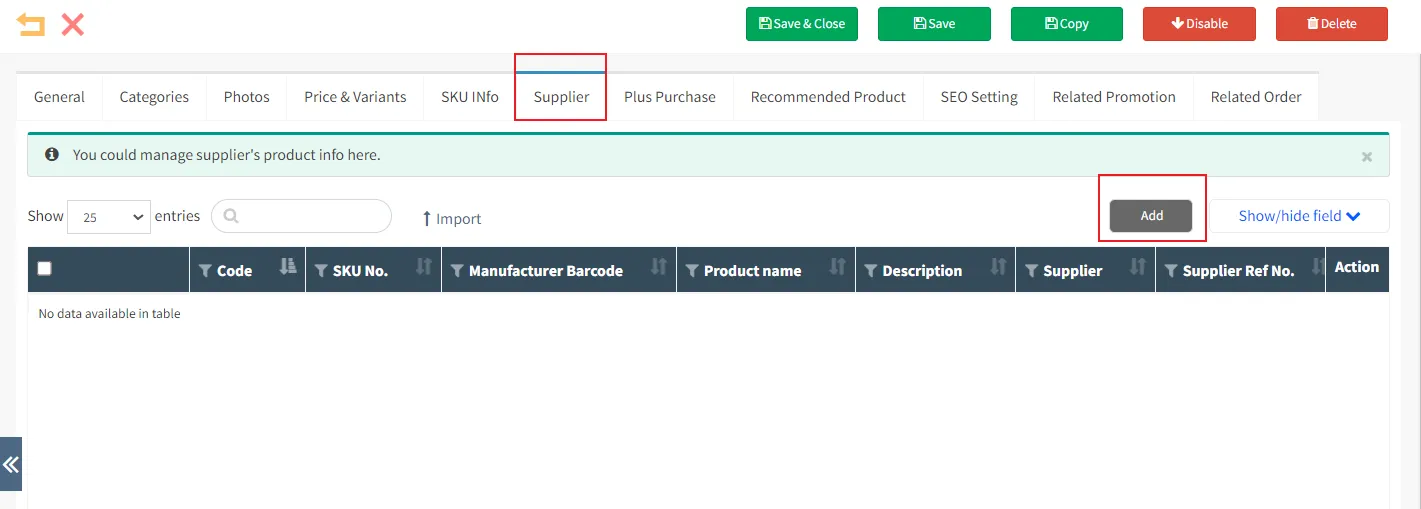
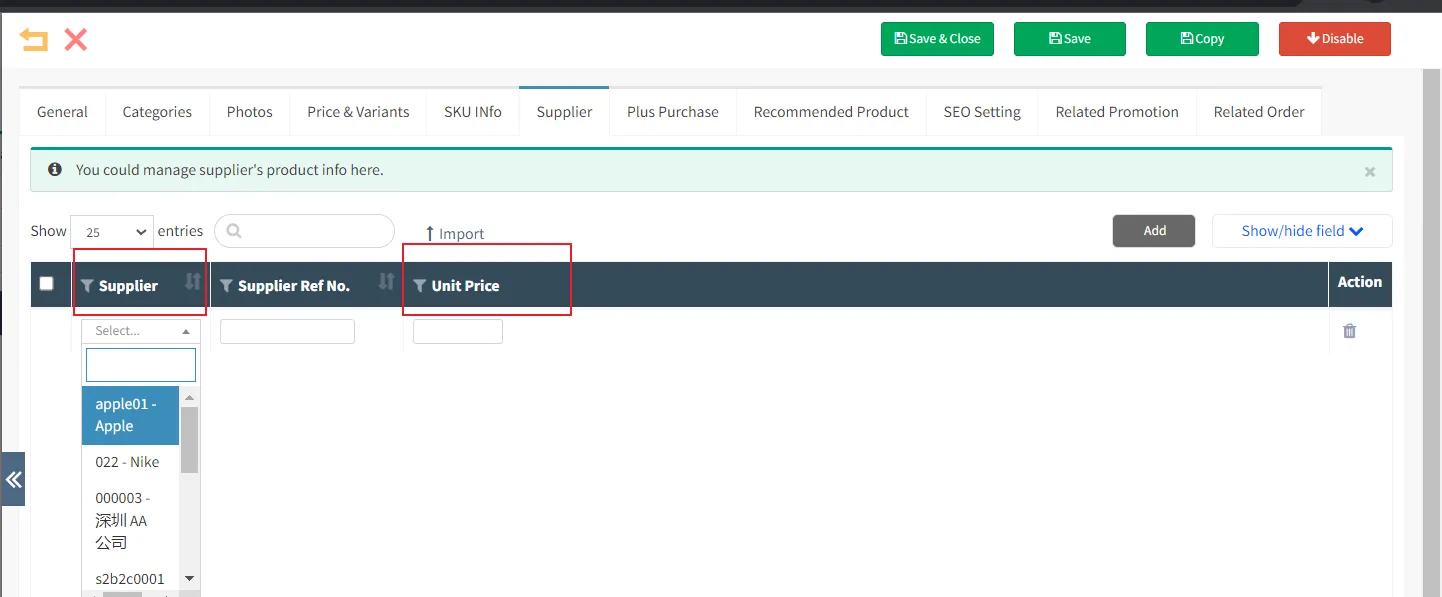
Click the Suppliers taband then click [Add].
In the supplier column, you can optionally fill in the preset supplier (supplier), and the purchase cost is the purchase price of the commodity when purchased from the supplier. If you did not preset suppliers (suppliers) before, please refer to the steps in the previous section [Suppliers] to preset.
Multiple suppliers can be set up for a product, and then click "Save" after setting up.
Commodity Materials
Materials for deposited products
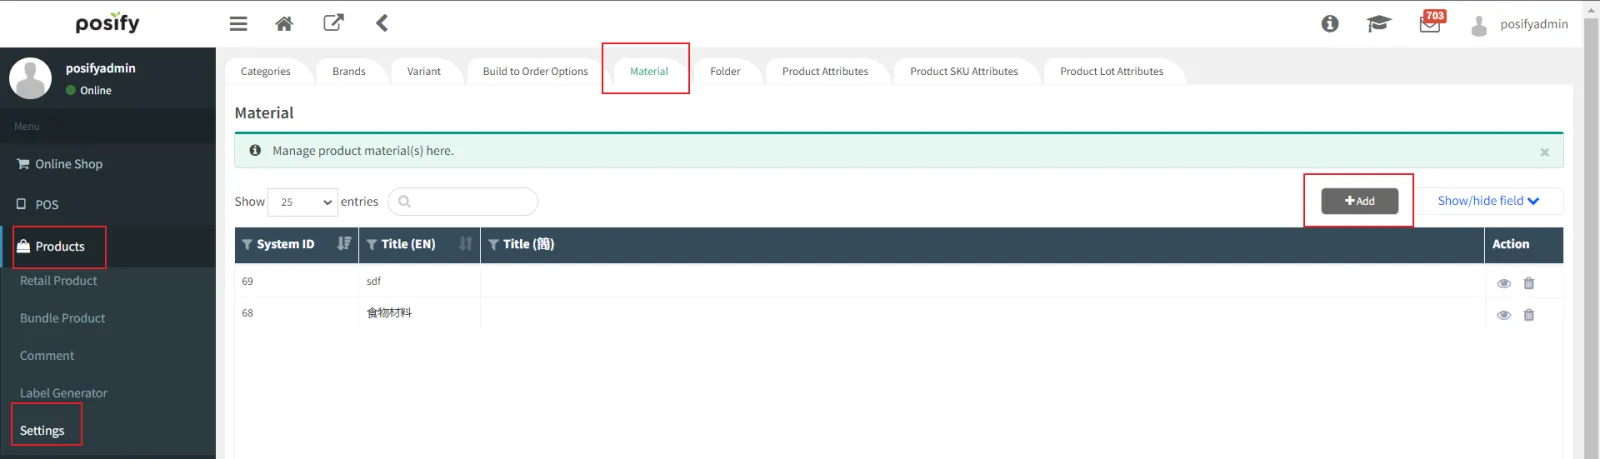
Open the CMSclick the productclick the product-related settingsclick the taband click [Add] in the upper right.
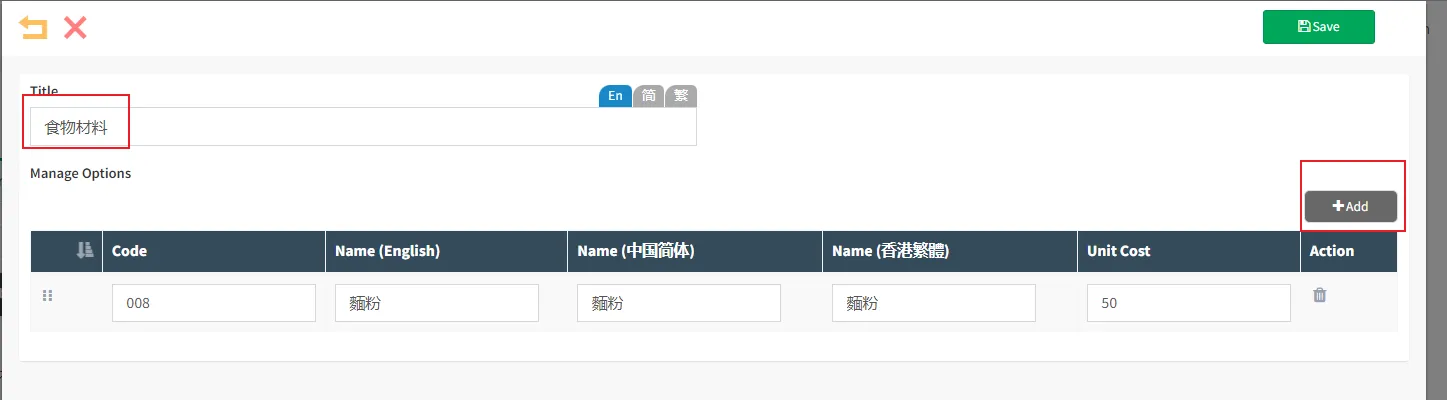
Enter the title, i.e. the type of material, such as food material, furniture material.
Click the Add button to add options for that material type, such as flour, soy, pure milk, etc. Enter the purchase cost for this option, as shown in the following figure.
Click "Save".
Product materials for installation
Open the CMSclick Productsclick Retail Productsfind the product you want to add product materialsand click on the right,to open the product editing page.
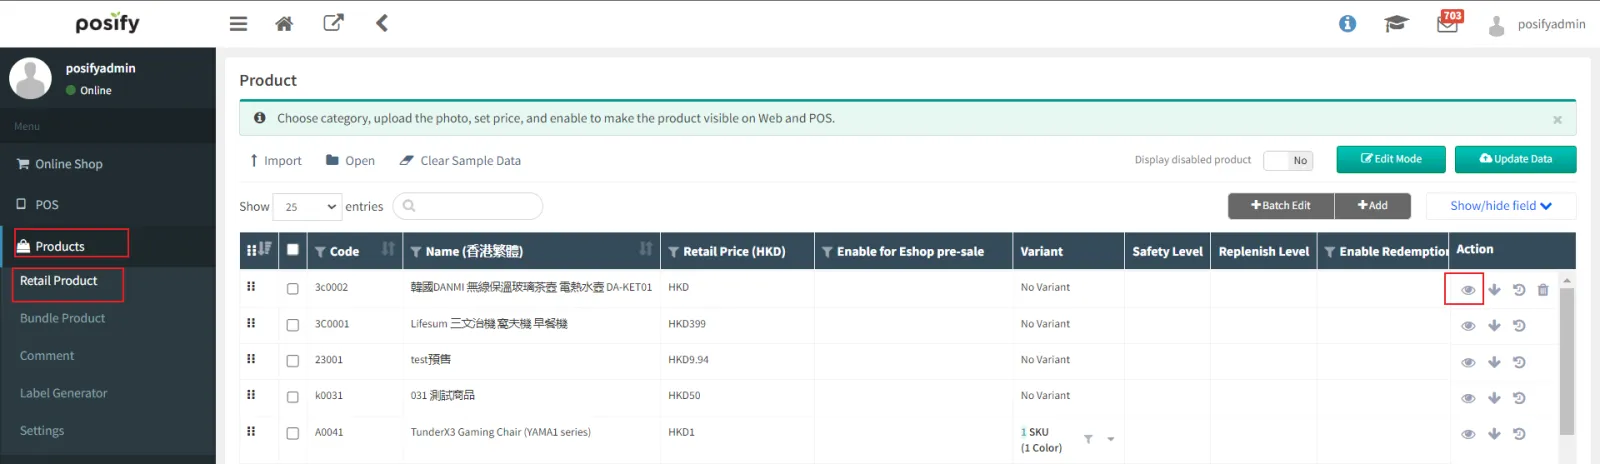
Click the General tab.
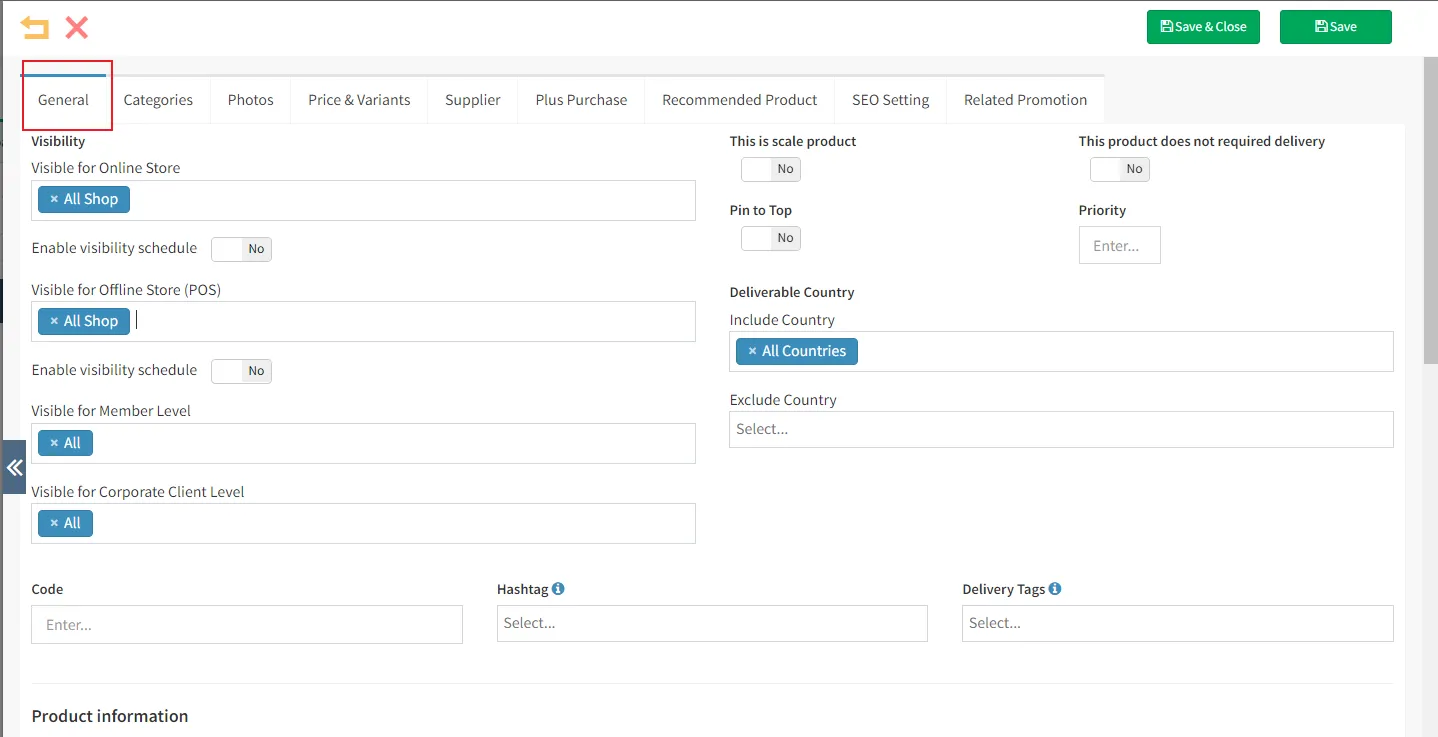
Scroll down to find the product materialselection [Does this product contain materials?] ] is Yesand then click [ Add materials to this product].

Select the option corresponding to the materials used in the product, and after filling in multiple materials for a productclick [Save] in the upper right corner.

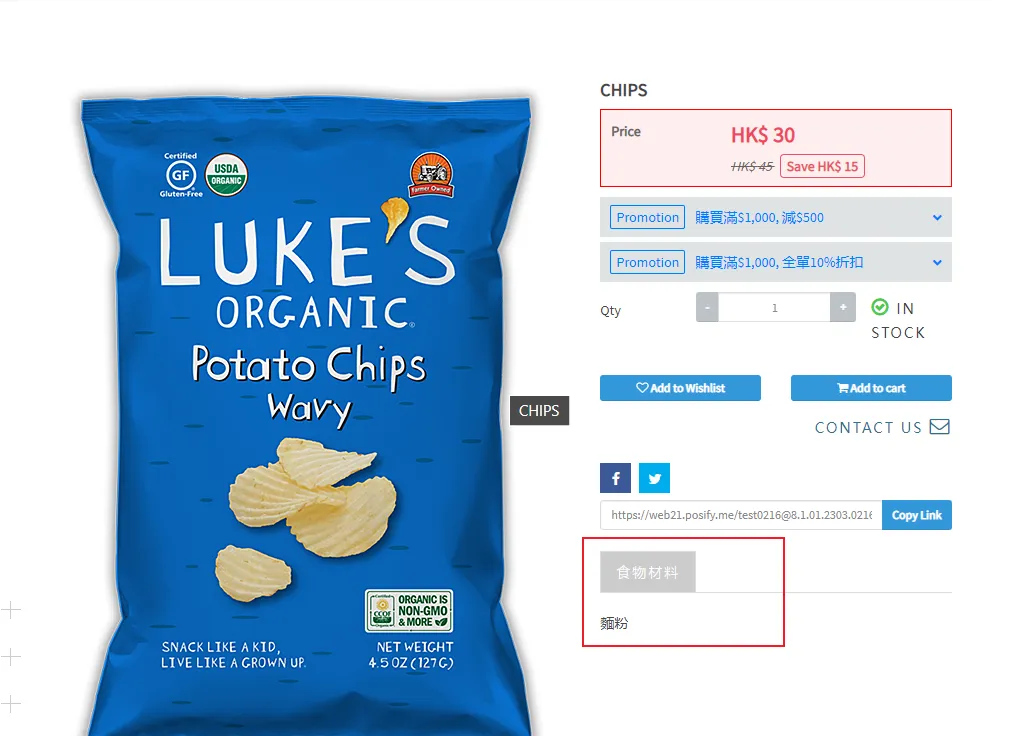
As shown in the image below, we can now see the product materials set up on the product detail page.
Custom products
Custom products are products that contain custom content, such as products that can be customized with stickers, products that can be used specifically to give gifts that can be customized greeting cards, etc.
Set up custom products
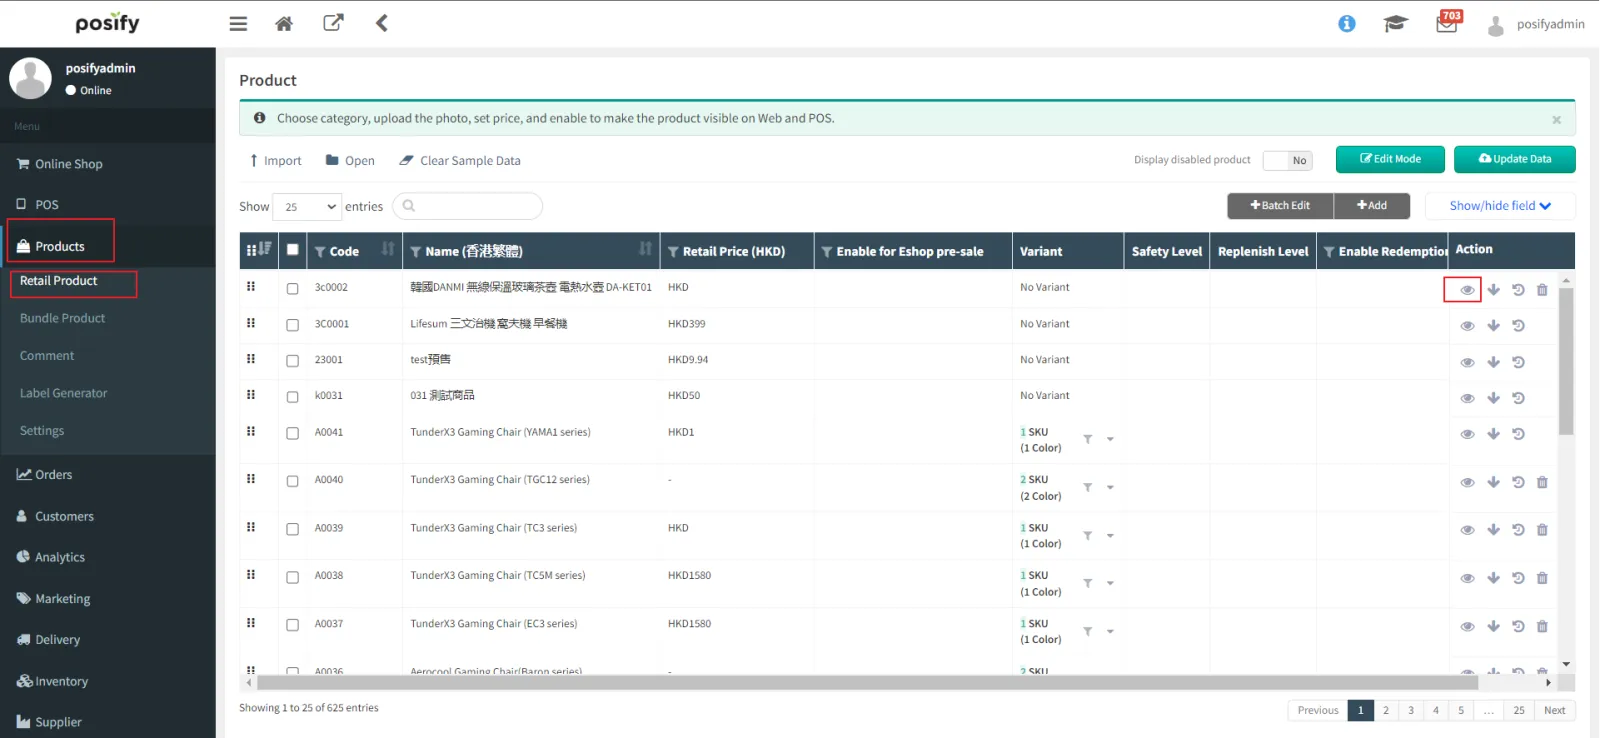
Open the CMSclick Productsclick on Retail Productsfind the products you want to set as custom productsand click on the right。
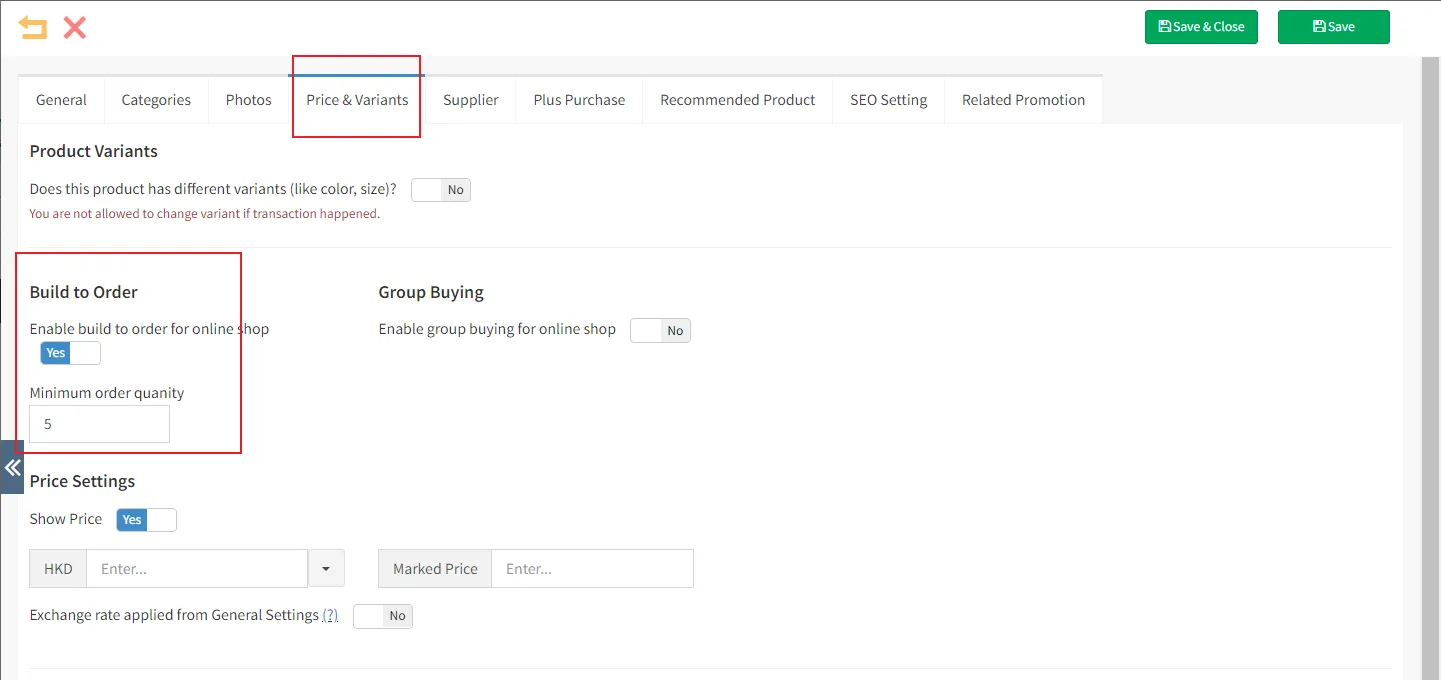
Click the tab, price and attributesselect [Online store open custom product option] under Custom products is yesfill in the minimum order quantityclick [Save] in the upper right corner to set the product as a custom product.
Set custom product options
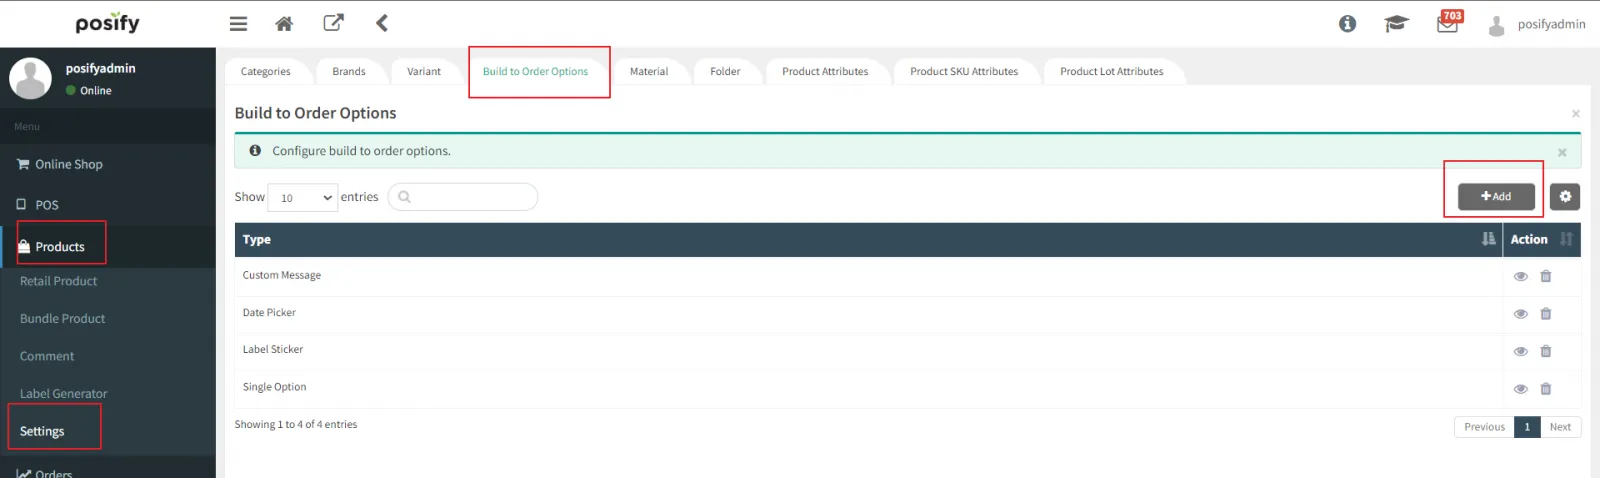
Open the CMSclick the productclick the product-related settingsOpen the CMS click the productclick the product-related settings click the tab, customize the product optionsclick the [Add] button.
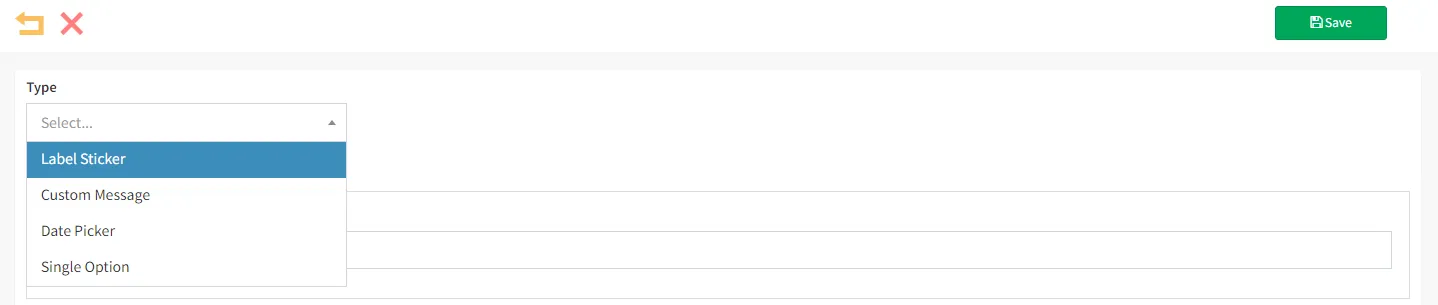
Select the type of option you need, and you can only define one of each category.
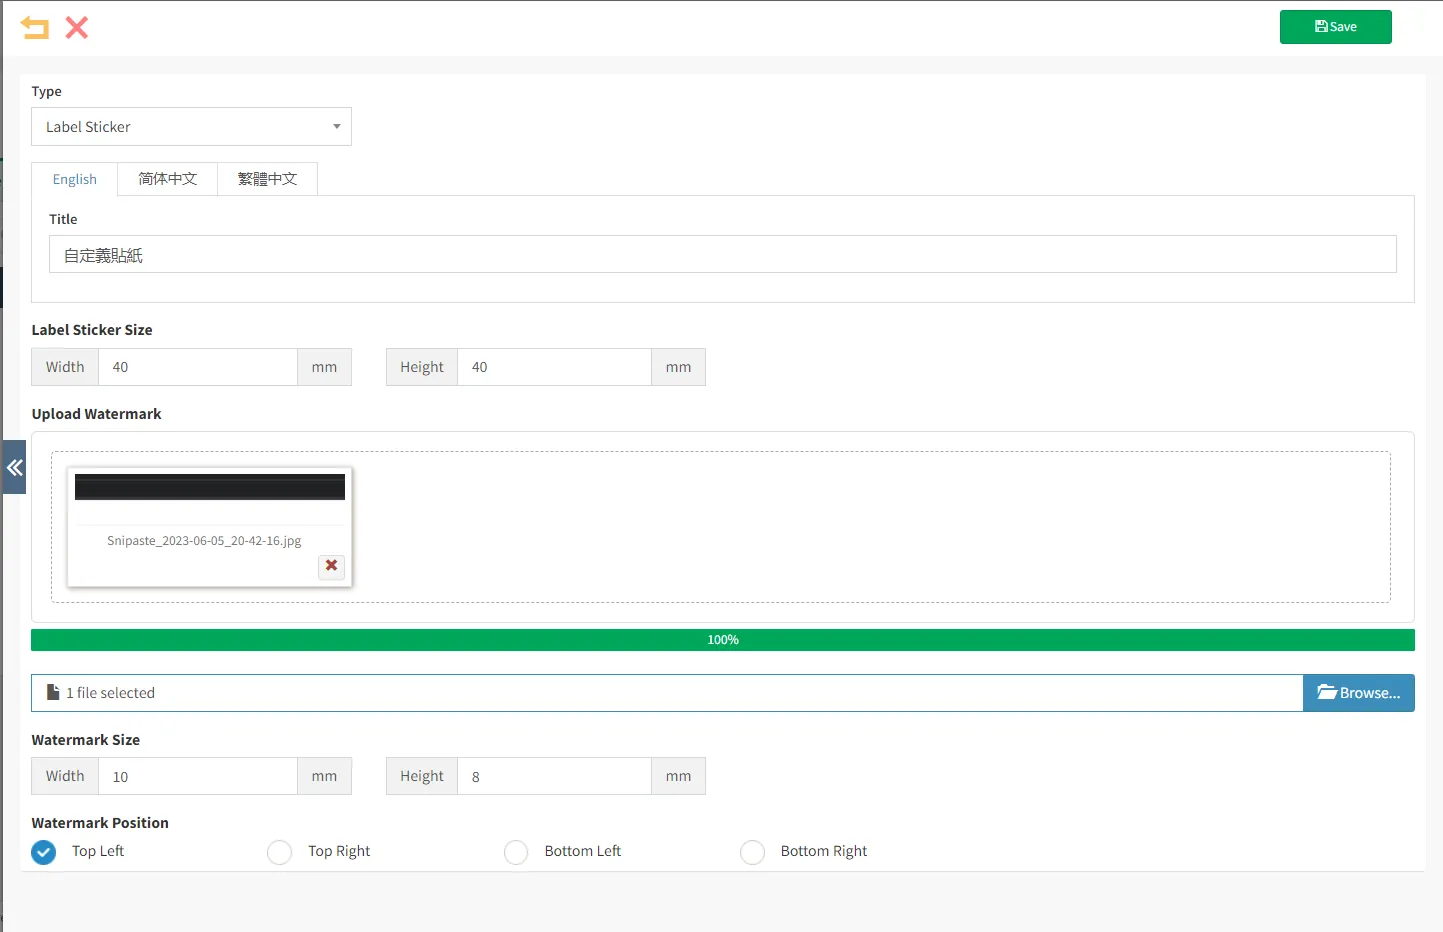
Label stickers are customized by customers and can be affixed to the product.
The watermark is a pattern decided by the merchant and printed on the top of the label sticker, which can be displayed in the upper left, bottom left, upper right or lower right corner of the label sticker. Watermarks may or may not be, if you need a watermark, click [Select File...] under the [Upload watermark] column to upload the watermark pattern.
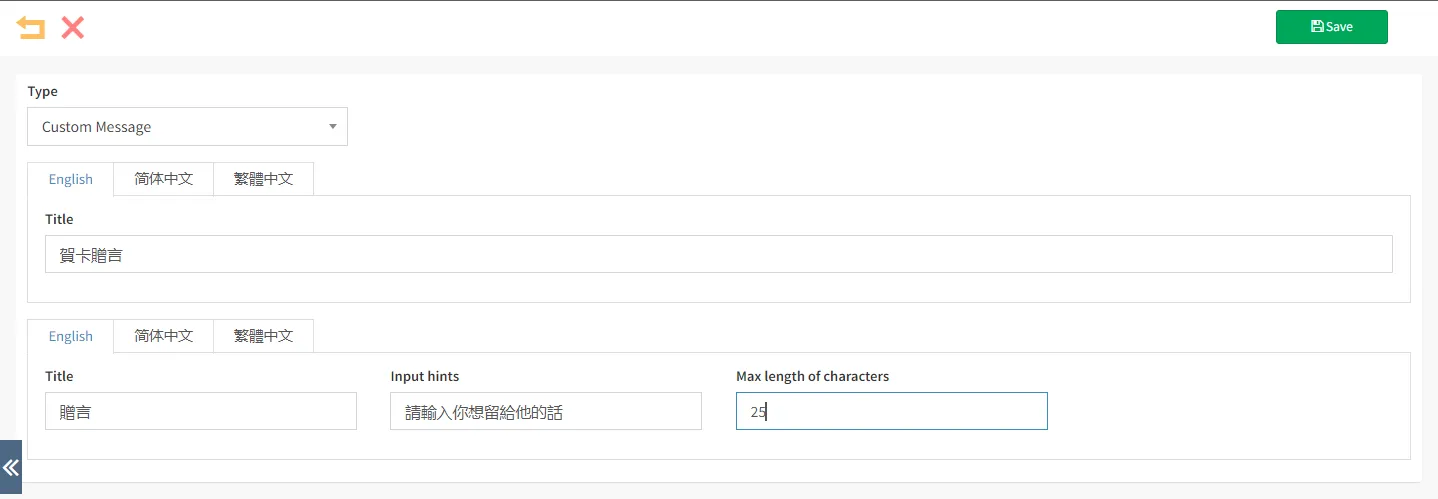
Custom statements are statements that allow customers to customize. For example, if a customer wants to buy a certain product to give to others, and the merchant provides a gift card service, then the words on the gift card can be customized by the customer through a custom statement.
For example, as shown in the figure below, pay attention to the maximum character limit to limit the number of words entered by customers.
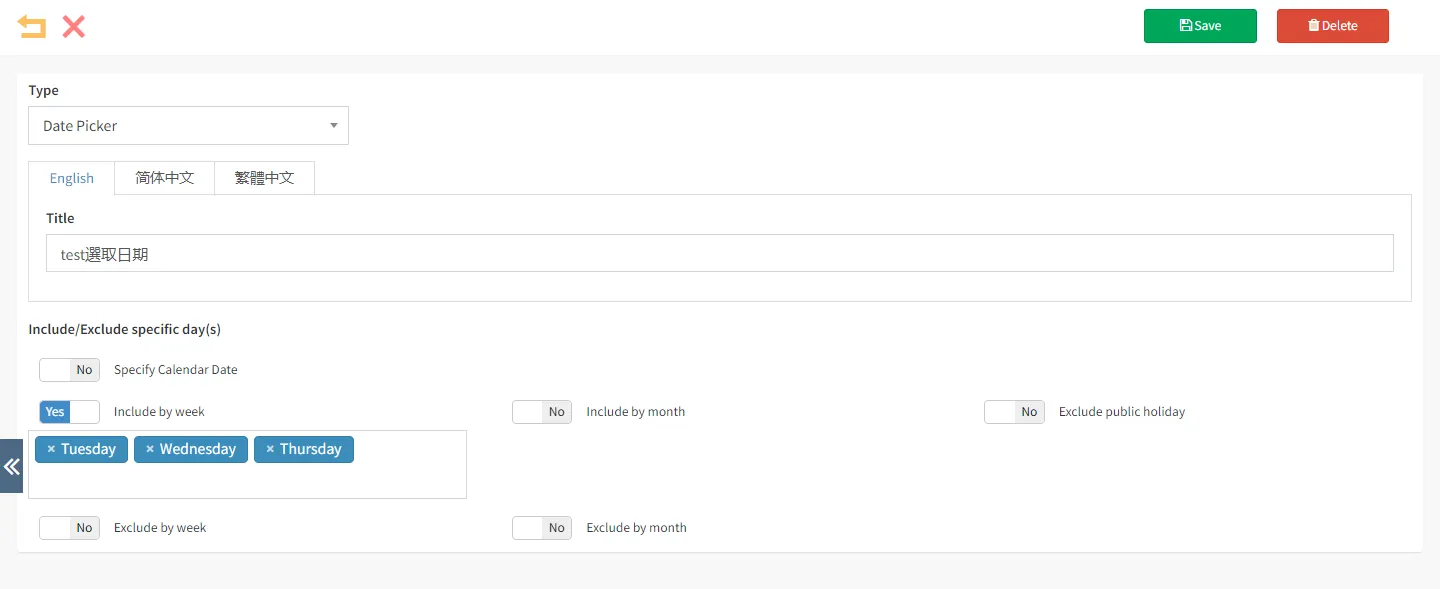
Picking a date allows the customer to customize the date.
For example, if a customer wants to purchase a product to give to others, he can select the date of delivery to the recipient by customizing the selection date of the product.
Merchants can also set which dates are optional or not.
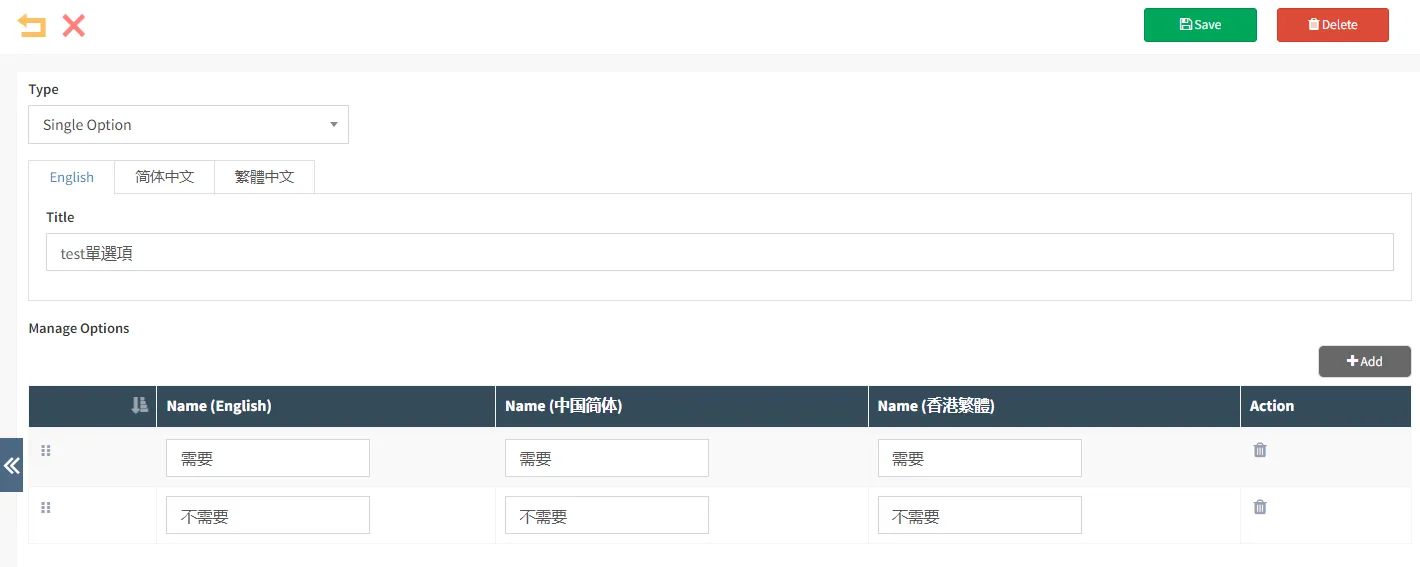
Single selections are options that allow customers to make single selections in a custom product.
For example: As shown in the following figure.
After filling in each information, click [Save] in the upper right corner.
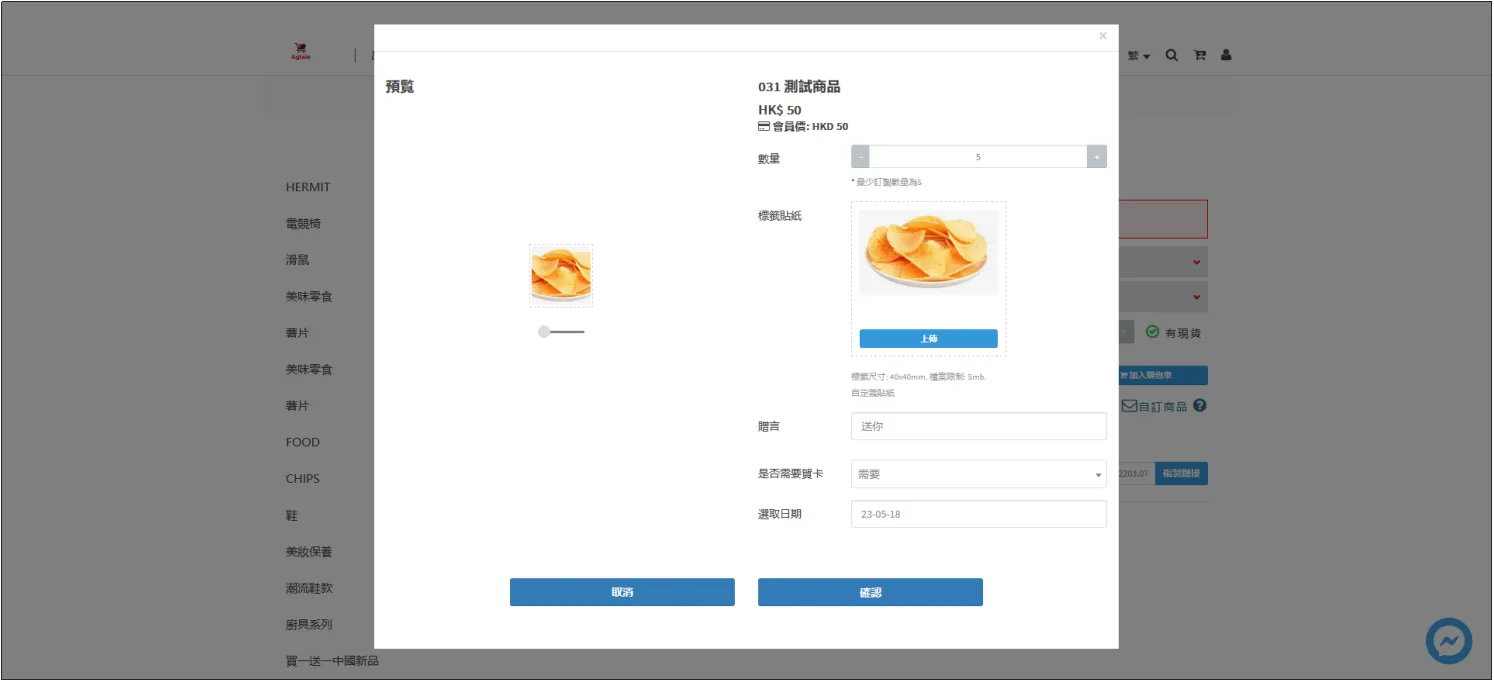
The display of custom products on the product purchase page is shown in the following figure.
remark:
-
Once the options are set, they will be displayed on the product purchase page, and it is not possible to choose which options are displayed and which are not. If you want an option not to appear, you can only delete it.
-
All custom products share a set of options.
Product custom attributes
Open the CMSclick the productclick the product-related settingsclick the tabclick [Add].
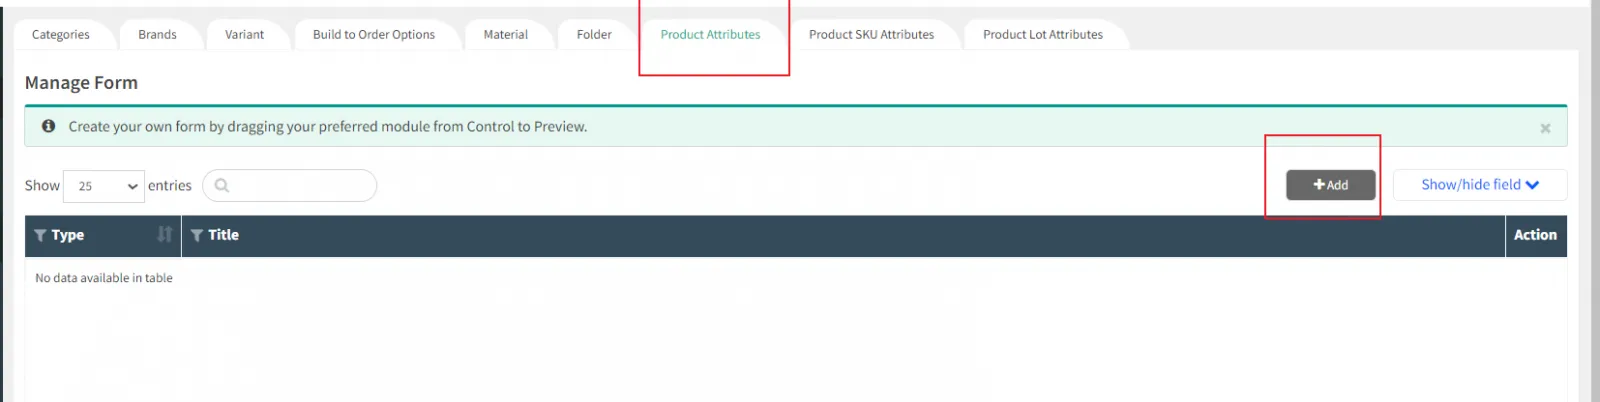
Enter the title and content in the tab.
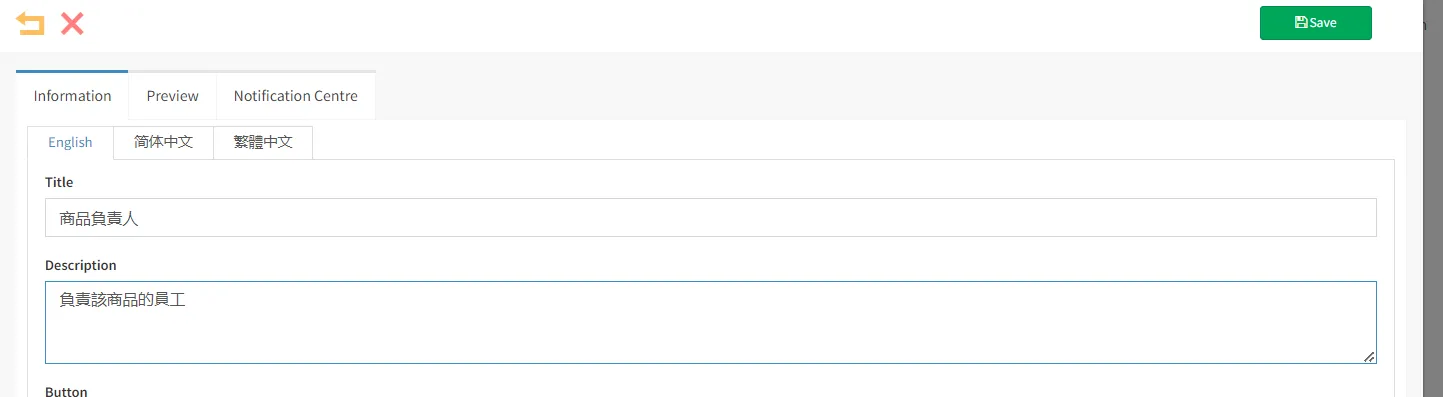
In the tab preview, you can see that there are four icons on the left, which are one grid per line, two cells per line, three cells per line, and four cells per line. Hold down the icon and drag it to the table to add a row to the table.
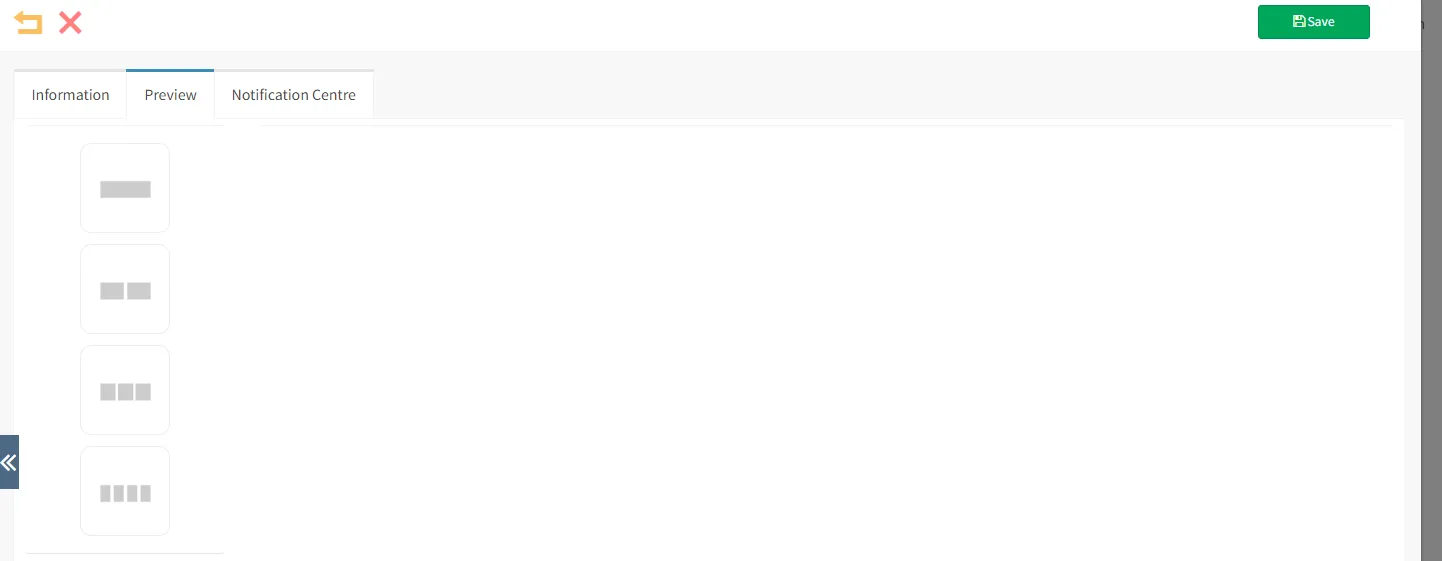
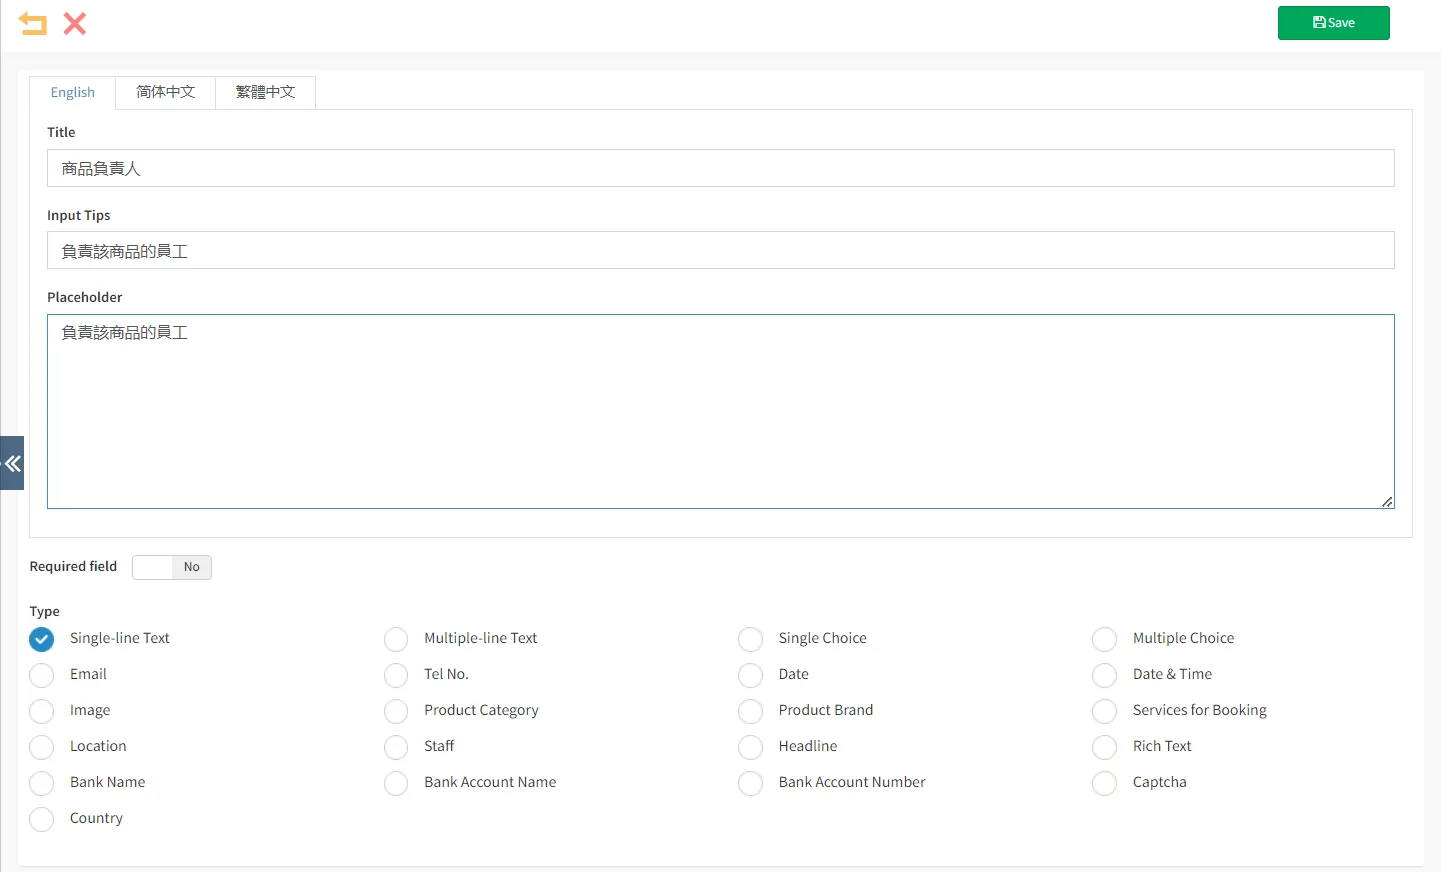
Move the mouse to a row in the table, click the × in the upper right corner of a row to delete the row, and click the small pen in the upper right corner of a cell to edit the content of the box.

Click the small pen, enter the title of the content of the box, enter the prompt, select the type of information in the box, you can choose such as single-line text, multi-line text, phone number, date, etc.
After selecting it, click "Save".
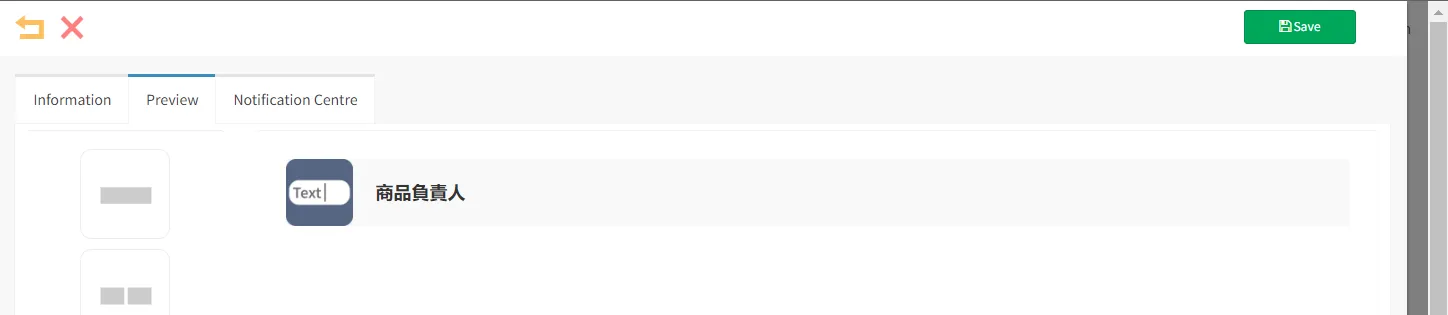
You can see the edited grid in the preview.
Click Notification Management to set message notifications and notification templates.
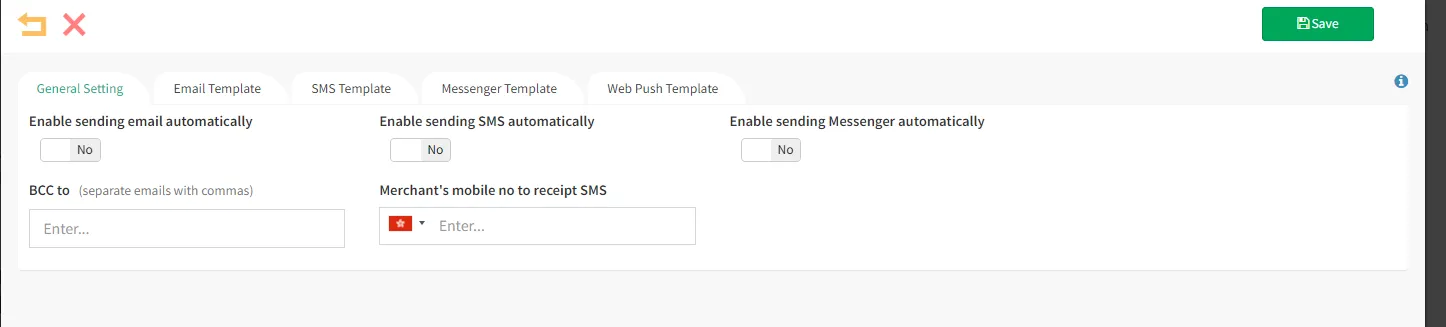
Click [Save] to complete the setting of the product custom attribute table.

Click ProductsClick Retail ProductsClick on the right side of a productto open any product editing page.
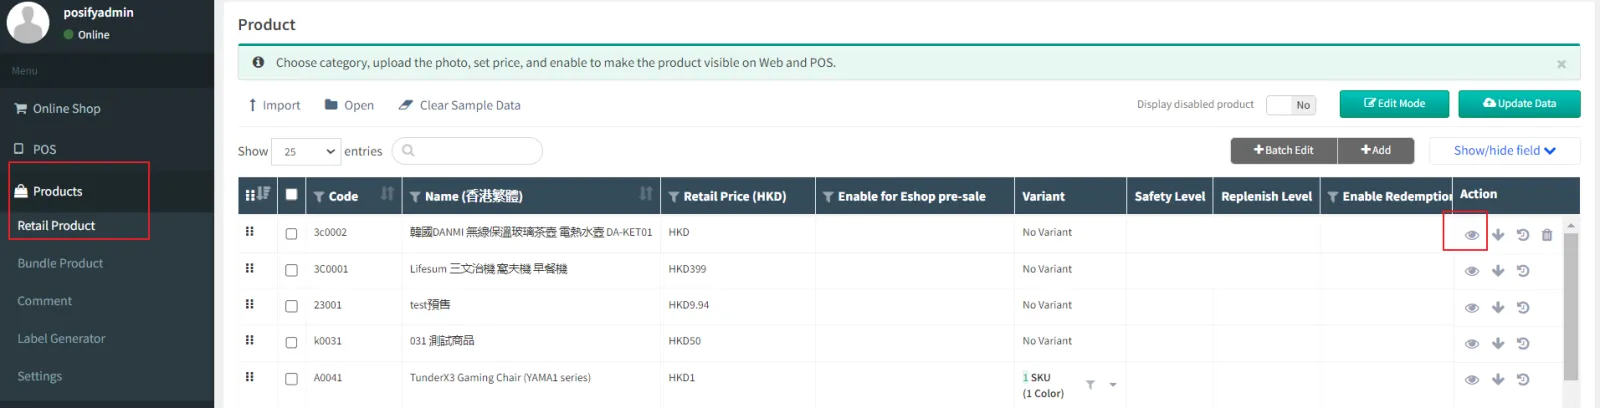
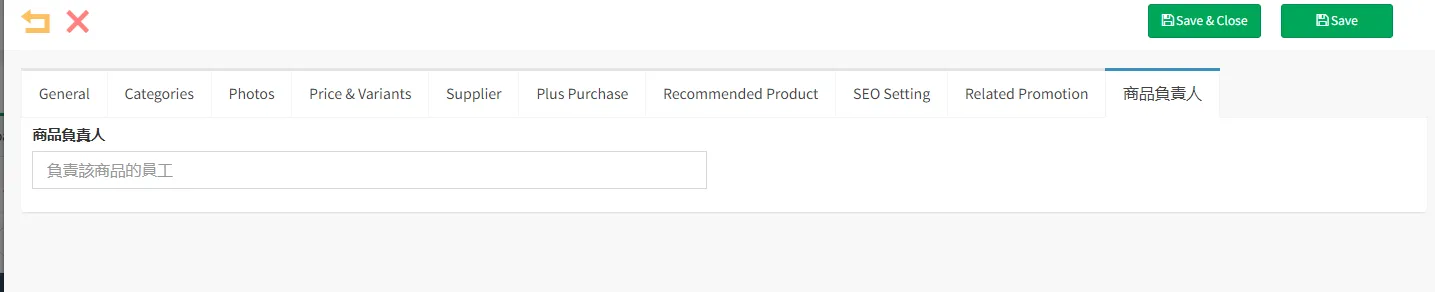
You can see that there is an additional tab of the product owner, click this tab, and the table just set is displayed, where you can record and save the product owner of the product.
SEO settings
SEO:
SEO is written as Search Engine Optimization, Chinese search engine optimization. Simply put, it is to increase exposure by optimizing your website settings so that your online store can get higher rankings in search results for free.
Improve your website's rankings
Website ranking involves many factors, and different search engine websites such as Google and Baidu have their own unique set of ranking rules, but setting the appropriate page title, keywords, description, and custom URL is a common method commonly used to improve website ranking.
Web SEO Setting Demo :
Results rendered by search engines:

As shown in the example shown above, the title, description, and custom URL of the web page will be directly displayed on the search results, while the keywords are the field content for the search engine to review, and will not be displayed on the search results; It is recommended that merchants set up 3-5 groups of keywords related to page content, for example, the content of Posify is related to [O2O], [New Retail] and other words, so first enter [O2O] and [New Retail] in the keywords, and then add relevant words to the title/description/hometown website. Different pages should have different SEO settings and should not be overly repetitive.
In general, if you include keywords that customers are searching for in any of the above settings, your organic ranking will improve in that search result.
Set up SEO on the Posify platform
We can set up SEO for our online store.
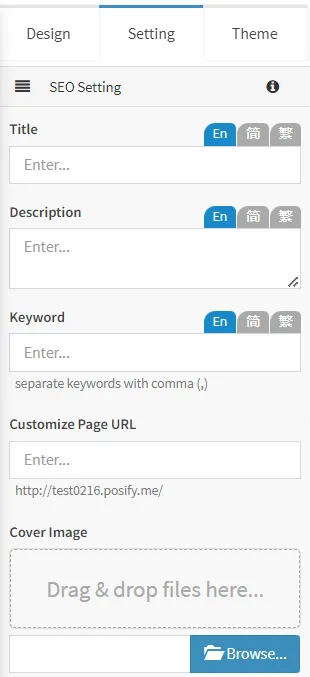
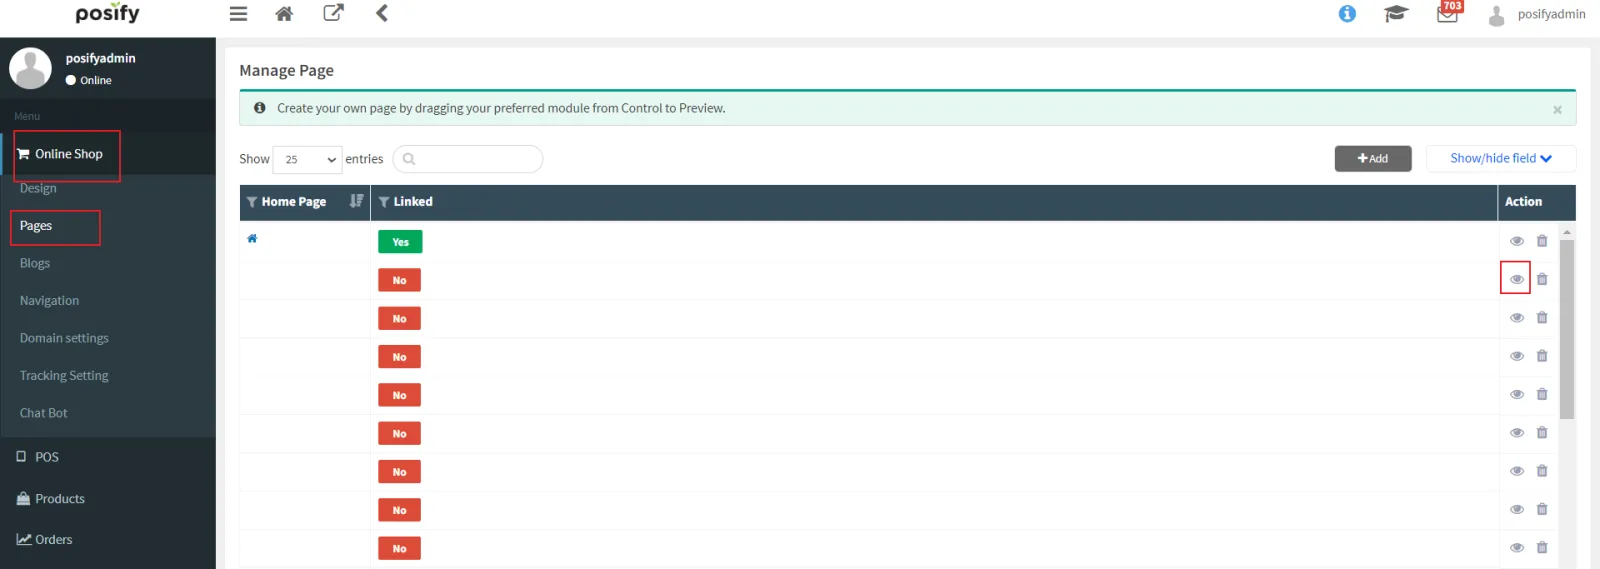
Open CMSclick on Online Storeclick on All Pagesfind the tab you want to set up SEOclick on the right.
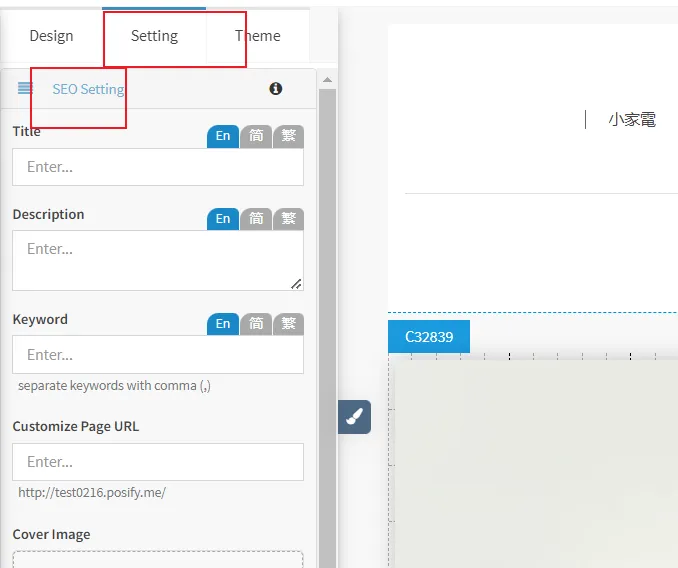
Click the tab Settings to set up SEO.
We can also set up SEO on the product page.
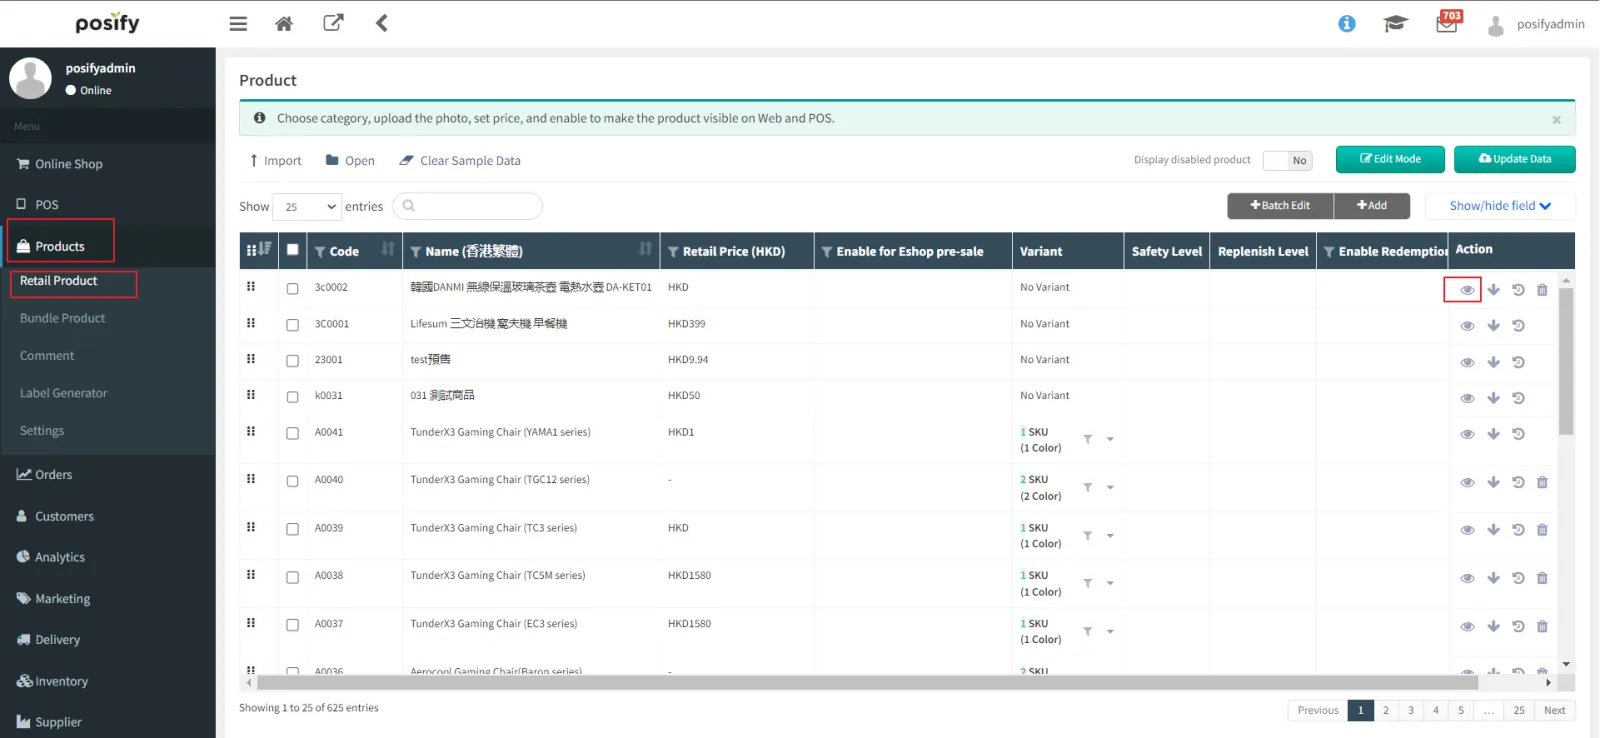
Open the CMSclick Productsclick on Retail Productsfind the product you want to set up SEOclick on the right 。
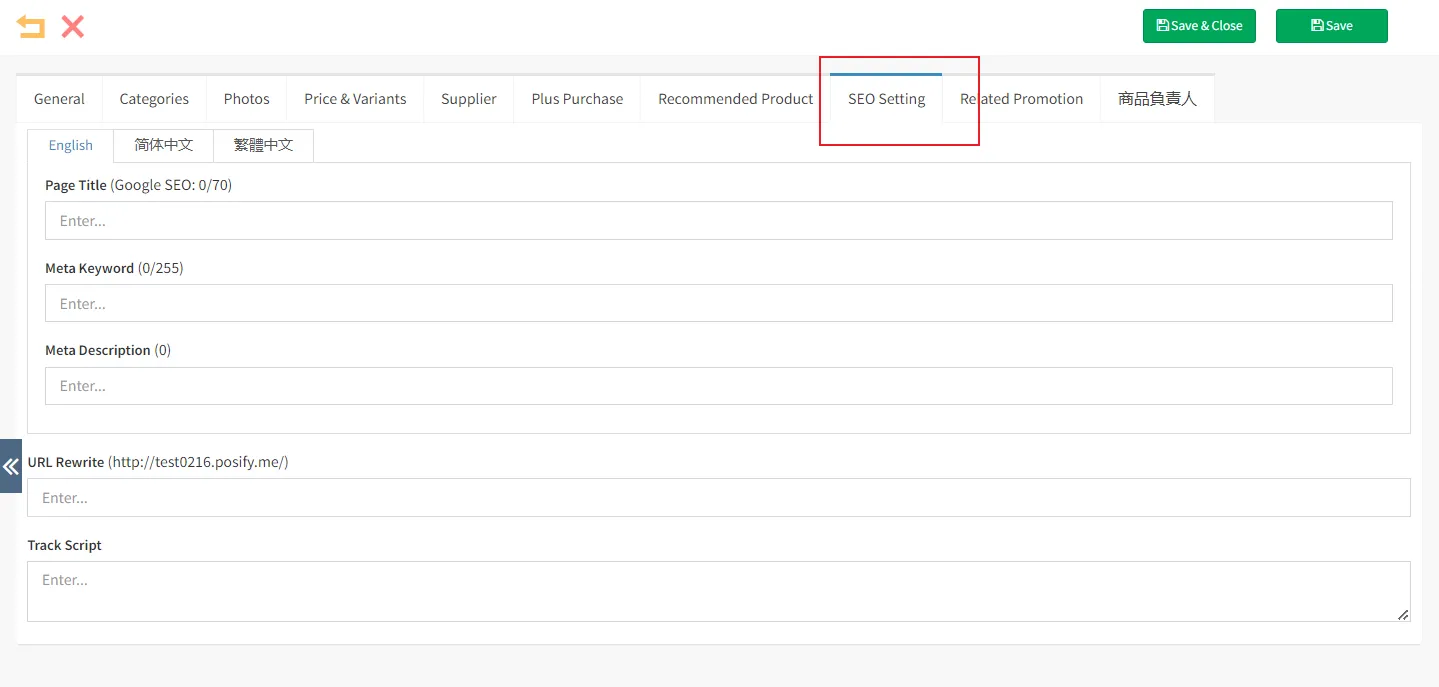
Click on the tab SEO settings to edit. When you are finished editing, click [Save] in the top right.
Posify Tip: Choose useful keywords and write appropriate titles and descriptions
Different search engine sites have tools for users to query the monthly search volume and similar keyword suggestions for target keywords, such as Google's "Keyword Planner". Learn more:
https://support.google.com/google-ads/answer/7337243?hl=zh-HK)
Businesses can enter their target keywords to see monthly search volume, then choose a title, description, custom URL, and more that include the keyword.
In general, keywords that are highly competitive (average monthly search volume > 1000) or keywords with low search volume (average monthly search volume of 0-10) should not be selected.
For some newly established or low-traffic online stores, it is difficult to appear in search results for highly competitive keywords. Even if it succeeds, it will most likely appear on a very late page and no one will see it at all. For keywords with too low search volume, even if they rank high, they don't have much practical effect. Therefore, for most online store merchants, it will be a suitable choice to choose keywords with dozens to hundreds of searches per month.